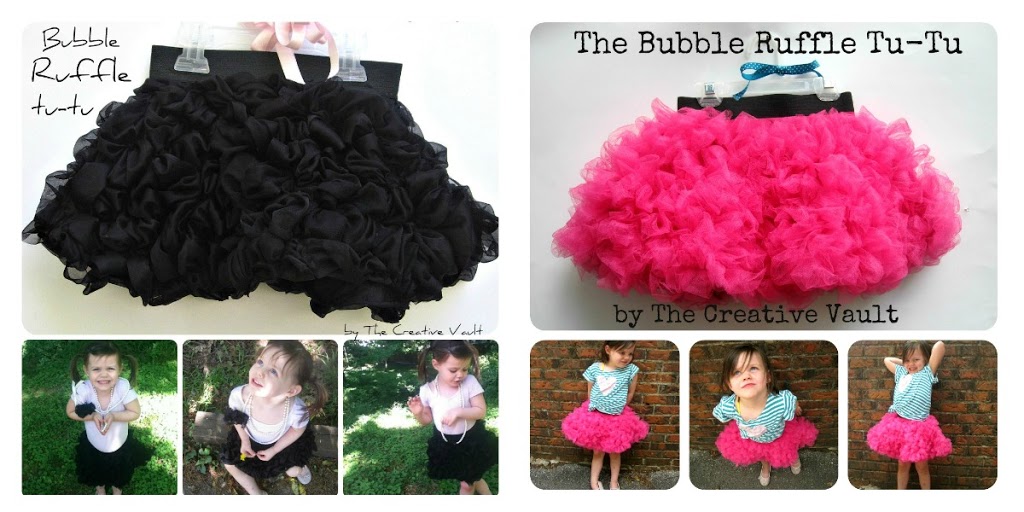
This is a little skirt that you can make to look very sophisticated or super fun. It has everything a girl needs – fluffy, frilly, twirly, sassy, chic, you name it! I can’t help but think of how amazing bubble ruffles in white chiffon would look on the bottom of a wedding dress. There are just so many possibilities. The best part? ANYONE CAN MAKE THIS SKIRT.
This skirt looks like it might be complicated and requires a lot of sewing skill but it doesn’t. Even a beginner can do this. You technically don’t even need to know how to sew a straight line. And because the bubble ruffles are so fluffy it easily will hide any mistakes you might make.
You can complete this skirt in 4 basic steps.
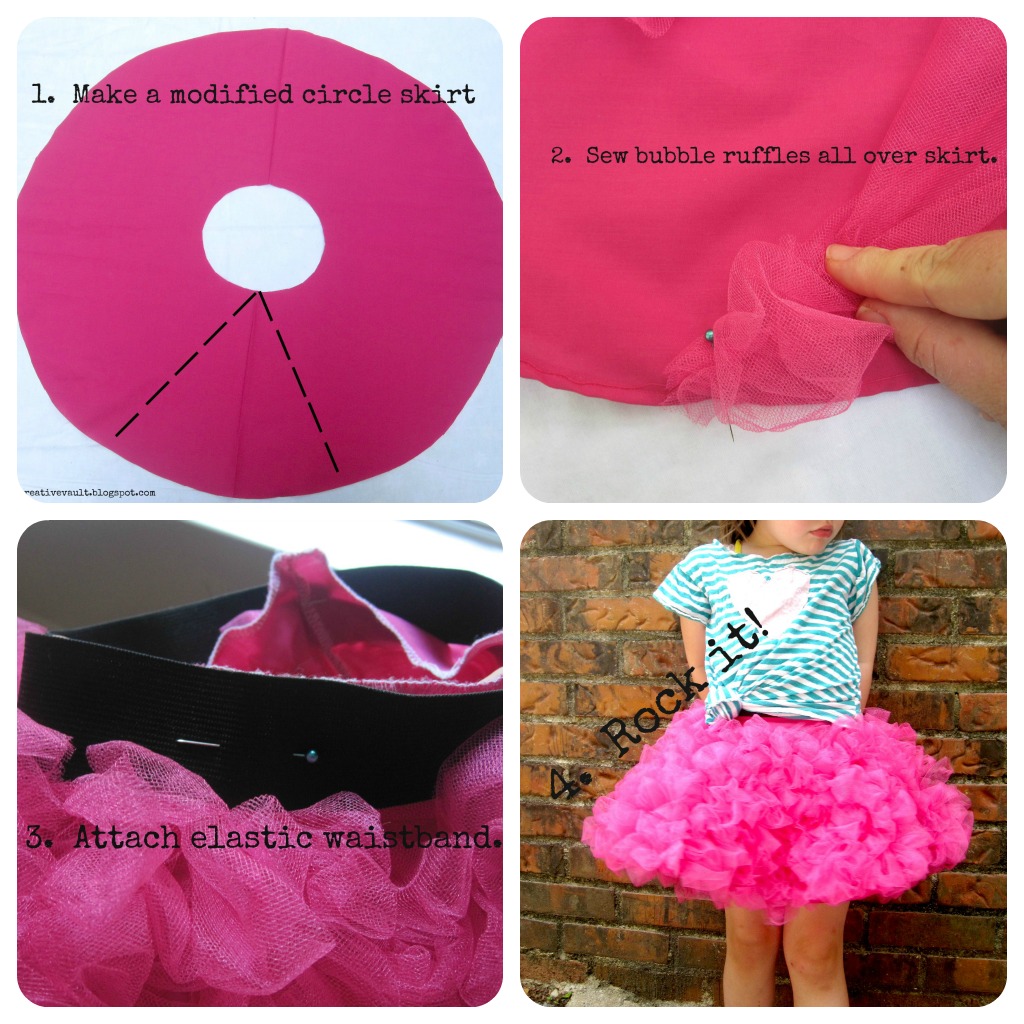
I know, you’re thinking, “That was technically only 3 steps.” But trust me, step #4 is the most important and most fun part.Let’s get started. Here’s what you’ll need.

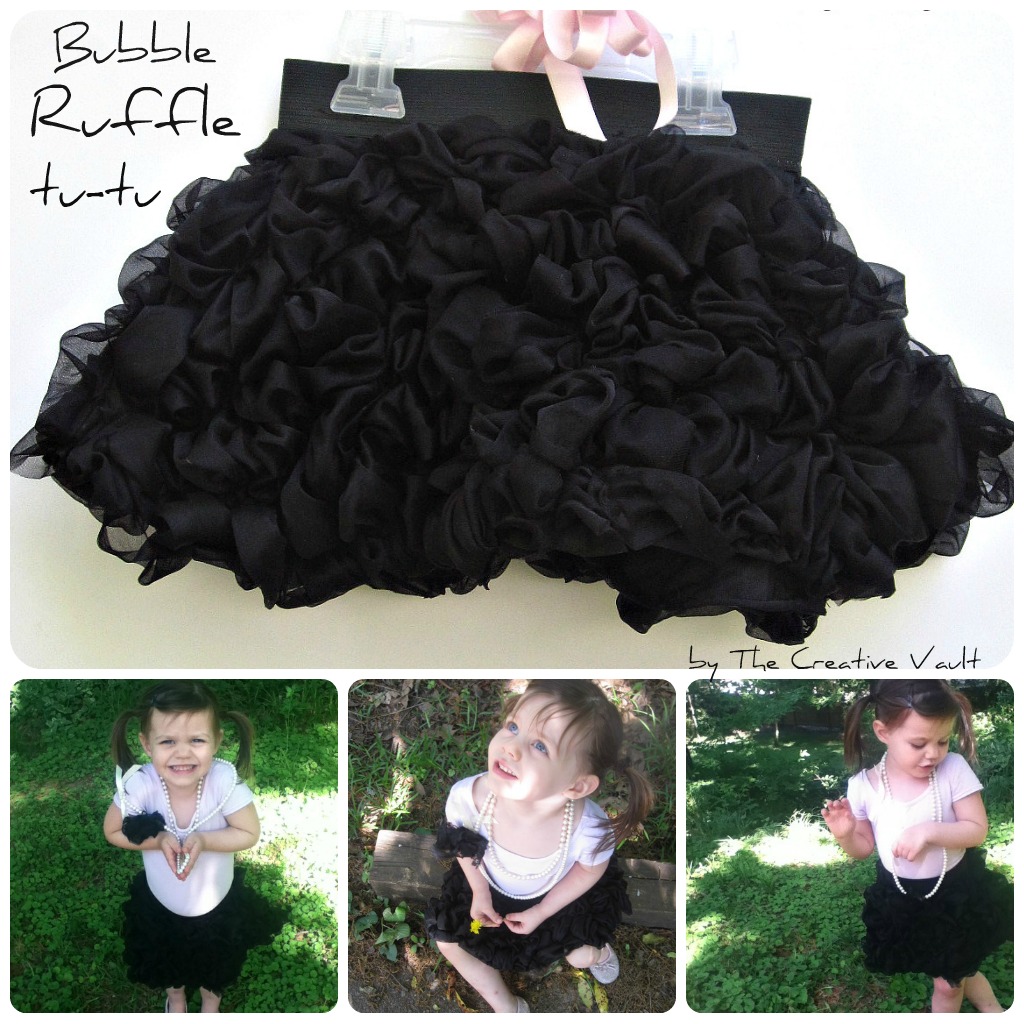
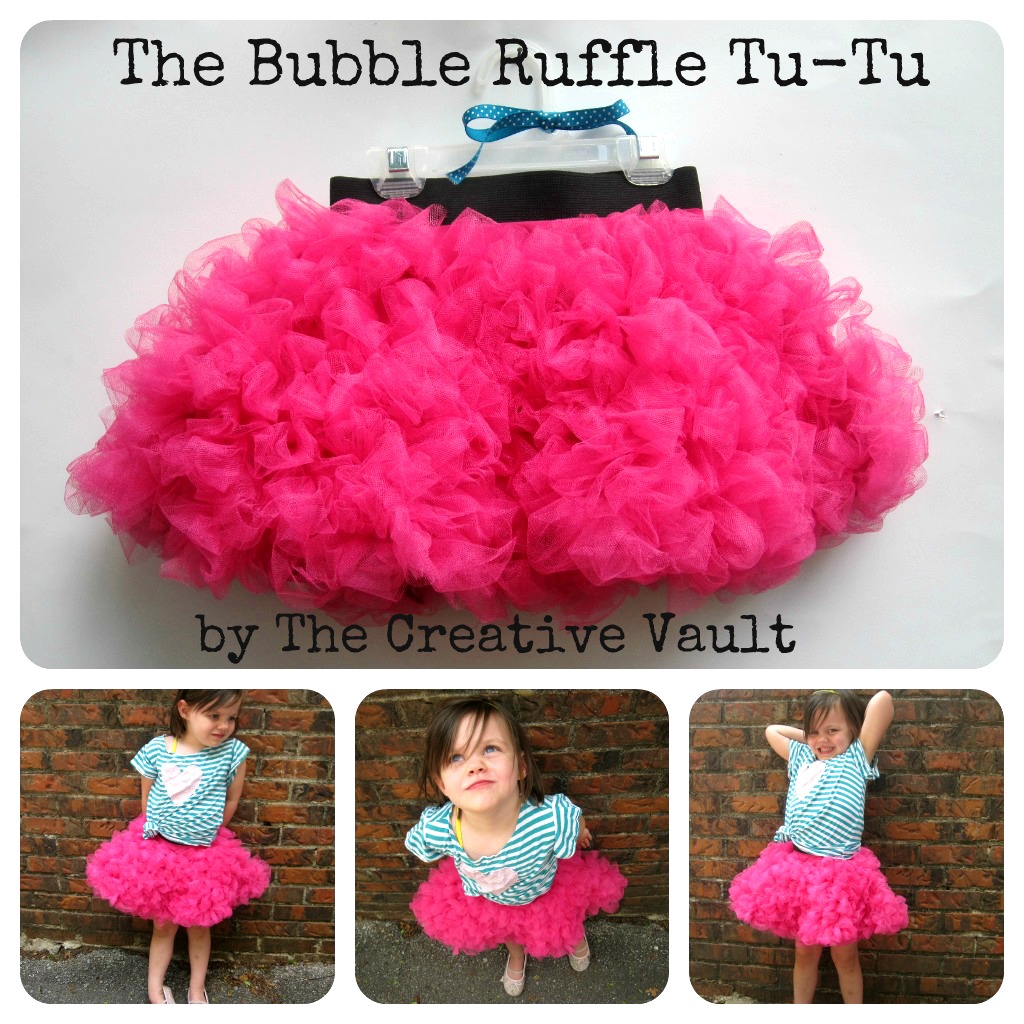
For the black skirt I cut up an older lady style nightgown to make the skirt. The skirt base was made from a slip and the ruffles were made from a nylon chiffon. Neither of which needed to be hemmed. For the pink skirt I used quilters cotton and tulle. If you use cotton like this you will need to hem your skirt to keep it from fraying. Do your best to pick colors that match each other so it will all flow together.
For my 4 year old I used 1 yard of cotton and 4+ yards of tulle. You of course would need to determine the amount you’d need for the size you create but you can use this as a guide.
STEP 1
Make a modified circle skirt.

To create your circle skirt pattern, measure A & B. To create the curve you can tie a string to a pencil and hold it the length that you need. Simply move it up and down on your paper to create the nice curve.
If you look closely at the picture above you can see that the fabric is folded in half on the bottom and then folded over again and there is a fold on the left hand side. When you fold it this way you will cut out one continuous circle.
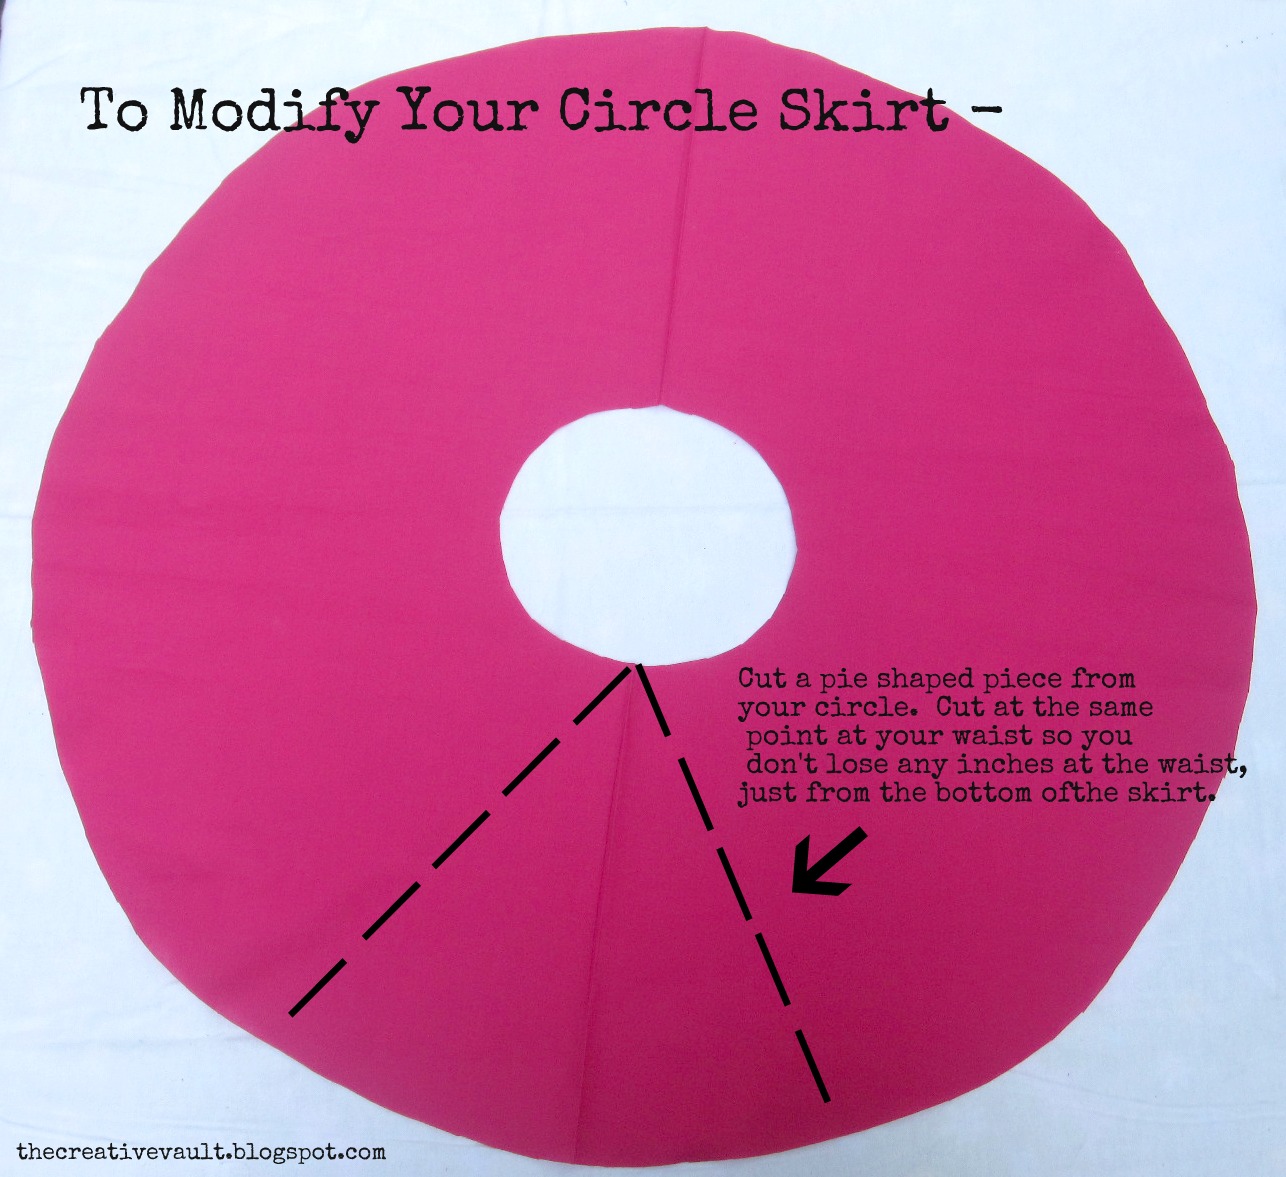
Now that you have your nice circle you need to modify it a bit. As a true circle skirt it is too bulky with the ruffles, but using this modification you cut down on the bulk while still keeping the twirl factor alive.
Cut a pie shape out of the skirt like the picture above shows. You don’t need to get too technical about how much you cut out. Like I said, this is a very forgiving skirt. Sew up that now open seam.
If you are using a material that will fray, now is the time to secure those edges so they look nice and clean. For mine I serged the edges then folded it under and top stitched, but you can use any number of hemming techniques you are familiar with. If you’re using a material that won’t fray you don’t need to hem the skirt.
STEP 2
Sew Bubble Ruffles All Over Skirt
First things first – cut your tulle in 2-3 inch wide strips. It’s ok if its not perfect.
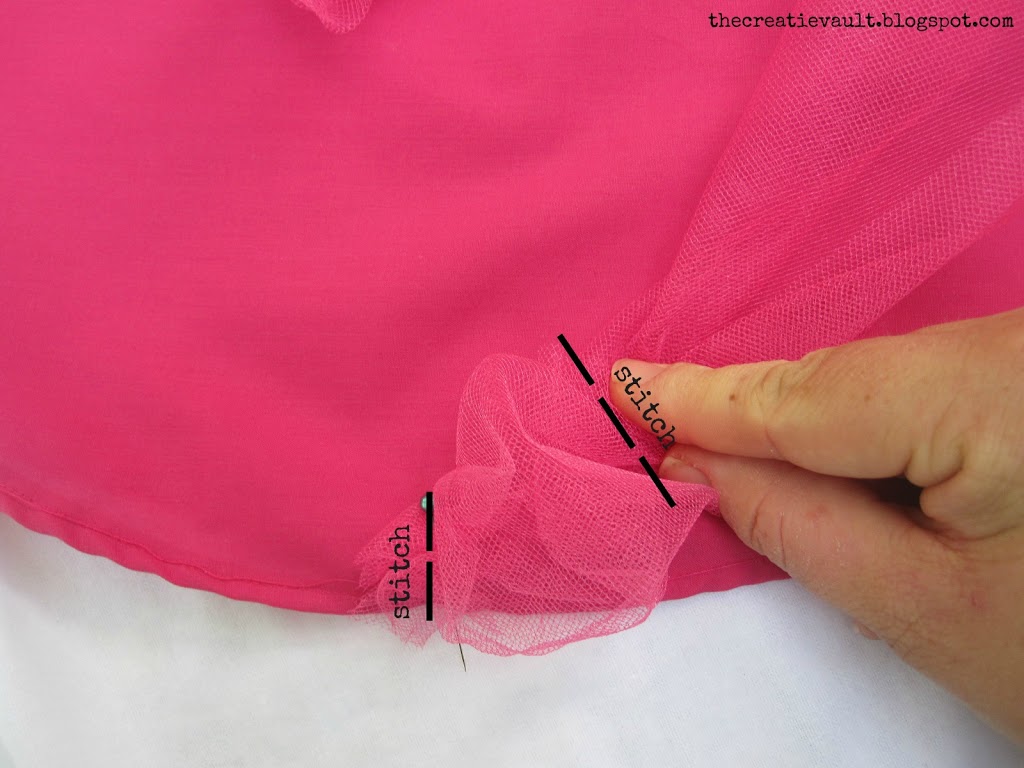
Take a strip of tulle, bunch it up a little and stitch onto your skirt. Then about 2 inches later, bunch up your fabric again and stitch again. Repeat this step in a random pattern until you’ve covered the entire skirt.

This is what it looks like after one strip of tulle has been sewn on. As you can see you’ll need a lot of tulle.

Although you’ll be sewing in a random pattern there is no need to sew and stop, sew and stop. If you look at the back of my skirt you can see that I just made one continuous line.
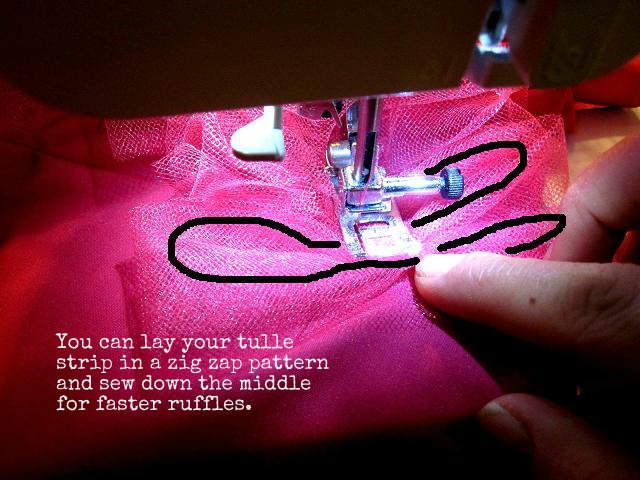
A faster way to make the ruffles is to lay your tulle strip in a zig zag pattern and sew down the middle. It works faster but you really have to make sure you fill in all the spaces next to it to get that full bubble look.
After you make a few bubble ruffles you’ll get in the swing of things and the work will go much faster.
Leave about an inch or two at the waist free of ruffles so you can attach your elastic.
STEP 3
Attach Elastic
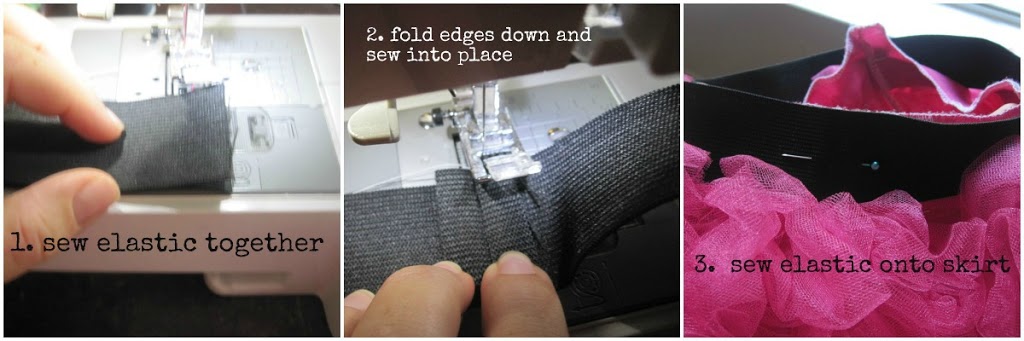
When you sew the elastic together and then stitch down the edges it creates a nice flat round of elastic and a finished look. When you attach they elastic you’ll need to make sure you stretch out the elastic to line up smoothly with the waistband as you sew to ensure it has the give it needs to fit over your little girls tum.
Step 4
Rock it!
The best part about creating is creating smiles!
I hope you create a bubble ruffle tu-tu for the girls in your life. If you do be sure to stop by The Creative Vault and show me. I’d love to see it!
Thank you Kari for noticing my little tu-tu and inviting me here today. It is such an honor and a ton of fun!
Thank you! Thank you! Thank you!


So darling!! My little girl would love this!!!
Thank you! I know she’ll love it! 🙂
Love Love this idea. My girls would love this tutu. Thanks Alicia, for this idea.
li
Thanks Britta!
Totally gorgeous!!! Too bad I can’t sew 😉
It can be your first project! 🙂
This is So cute! I almost scrolled past it because I thought it was another skirt made from that pre-ruffled fabric, which I can’t get locally at all yet, but No! I CAN make this! Thank you so so much <3
Thanks! I can’t ever find that fabric either! I’m glad you didn’t scroll past! 🙂
Alicia is the best; so creative and talented and really knows how to get more for your buck! Follow her blog, you won’t be disappointed!
Wow. You flatter me too much! 🙂 Thanks!
Oh. My. Heck! I love this. Thank you for the tutorial!
Thank you!
This skirt is so awesome! Everything you make is awesome. Love it!
Thanks! 🙂
I WAS LOOKING FOR A DRESS MY DAUGHTER CAN USE FOR A WEDDING, i THINK THIS WILL WORK !
If you do I would love to see it. I bet it will be gorgeous. 🙂
Love it, thank you!!
Thanks!
Seriously SO CUTE! Love all of Alicia’s tutes!
Thank you Hannah!
This an EXCELLENT tutorial. very clearly explained for my novice skills 🙂
I will definitely be making this for my nieces. Also for myself, there will 80s parties to attend!
Oh thank you! I’m glad you found it easy to understand. An PLEASE make sure you send me pictures of this 80’s fabulousness when it’s done! 🙂
If any body could would you please take a look at my blog, craftatier.blogspot.com
there are only two posts but it would mean the world to me!
Welcome to the blog world! 🙂
Hey this is brilliant! I can only imagine a little girl’s pleasure in wearing one! Thanks for sharing!
I know my daughter loves it! Thank you for the nice compliments! 🙂
You made working with tulle look so ease. I have a big problem working with tulle. Wonderful work 🙂
I do too! The little strips of tulle make it So much easier! 🙂
These are so fabulous!! Think I could get away with wearing one in my size?! 😉
Ummm… yeah! Of course! Wouldn’t this make for a fun little cocktail dress? Grown up girls need frills too! 🙂
It’s so cute!!! 🙂
I am a professional dress maker and designer. Never ever use different colour thread than the fabric.
Good advice! Though sadly, I don’t always have the matching thread but for this project matching thread is super important.
Love it! Just wondering if you used a different type of tulle for the black one? It just looks a little different.
I did! The black one is a repurposed older lady style nightgown. The base of the skirt is the same material they make slips out of and the bubble ruffles are made with a nylon chiffon from the nightgown. This one is much smoother and the bubbles are more distinguished because of the different fabric but the technique to sew it is the same.
This is too cute! Thank you for the detailed tutorial!
Thank you so much! 🙂
I have a question, how big of a section do I cut from the circle skirt to modify it and do I sew up the seem before or after I bubble ruffle? Sorry not very experienced at this but love the tutorial.
I wish I had a better answer for you but I would just cut out enough of a chunk to make the skirt full but not too full. It’s not an exact science you just don’t want too much fabric or else the skirt start to fold. As for sewing up the seam you would just sew like you would any seam. I would sew it together BEFORE your do the ruffles. Good luck I hope this helps!
I LOVE this.My lil one would love this I bet.I will definitely be making it in the very near future and will send in a pic thanks for sharing this adorable skirt with everyone.
Thank you! I’m glad you enjoyed it. I would LOVE to see a picture when you’re done. Good luck!
what do you think about this as an floor-length bubble ruffle skirt? my wedding dress is short and i was looking to make something fun for a detachable skirt – and this might just fit the bill!
I am in LOVE with this skirt!!! And I can’t wait to give it a try, though I’m still a bit intimidated by it since I’m a MEGA BEGINNER at sewing, if you happen to make a video tutorial of the tulle part please let me know since I would love to make a little dress for my daughter to wear at my sister’s wedding, she will be the flower girl <3
Lovely tutorial, thanks! I just wish I was more knowledgeable at sewing.
This is a LOVELY project I’d LOVE to make, specially for my daughter who is going to be the flower girl at my sister’s wedding… the only problem is me being a BEGINNER :/
If there is any chance you can do a video on the tulle part please, please, please let me know.
Thanks again!
This is absolutely AMAZING!
I LOVE THIS!! now hope I can get the tulle to cooperate…I have a ton of tulle I bought super cheap fropm a retired crafter…and its just sitting around!
Do you think other kinds of strips of fabric would work instead of tulle? My brain is wanting to try this!
Hello from Verra and my daughter Payton from SC. I am trying this for the first time, I am making a longer skirt for a princess costume…I pray it turns out right…its my first time sewing again since highschool over 10yrs ago. Thank you for sharing this amazing tutorial. Its so appreciated.
ADORABLE!! What little girl wouldn’t love this?!
Thank you for sharing..I have two grand-daughters, who will love these…
Super cute!!! I have all boys, so I am excited about the idea of finally getting a girl this time around. Do you think this style would work for a newborn photo shoot or would a normal tulle skirt work better?
Absolutely! I’ve seen these in newborn photo shoots and they are darling!
This is adorable…It was nice to run across something other than the typical cute tutus. You did a great job making them as well as sharing your instructions. I’m going to be giving this a go this week & hope it turns out as lovely as yours. Thank You again.