
Happy Thursday everyone! My name is Wendy and I cannot tell you how excited I am to be here today. {I get to officially check this off of my blogging-life bucket list- get something posted on U-Create. What a great feeling!} I’m here by way of my own little crafting blog Craft Goodies. It’s a newbie in the world of blogs, only been around just over a month, but what a month it has been. I am amazed and thrilled that others out there are interested in what I’m doing. More so that they like it! This all started when my hubby told me we were moving to Texas and my very busy life took a HUGE detour. I found myself in a new state, in a new home with nothing to do and no one to talk to. {Okay, it really wasn’t that bad-just felt like it at the time!} So now, I have found something to do and people to talk with and I love it.
2×4 Turkey Tutorial
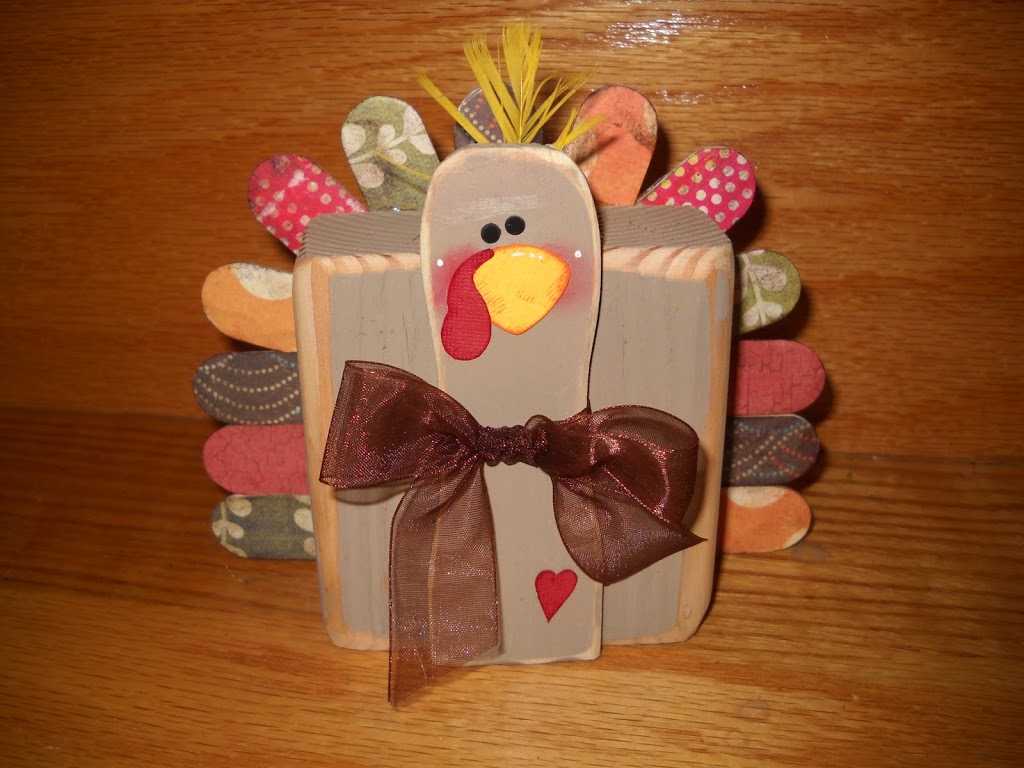
I am thrilled to share this tutorial with you and hope that you enjoy the end results. Come on over and see me sometime, the door is always open and I can always use another friend! To make your 2×4 turkey here’s what you’ll need:
2×4 block cut to 3.5 “x3.5”
7 Jumbo craft sticks
5 gal paint stick
{I bought mine at Wal-mart for $.28, if you happen to be painting ask for a spare!}
Multi-colored papers for feathers (or paints)
and a scrap piece of both yellow and red cardstock
and the usual project stash of:
Sandpaper
Paint and brushes
Hot Glue Gun
Modge Podge
and Embellishments {feather and ribbon}
Finish the Base Pieces:

Cut the handle end of the paint stick so that it now measures 4.5″ long. Paint the block and head piece light brown.
**You don’t have to paint the backs as the block will be covered with the sticks and the head piece will be glued onto the block**
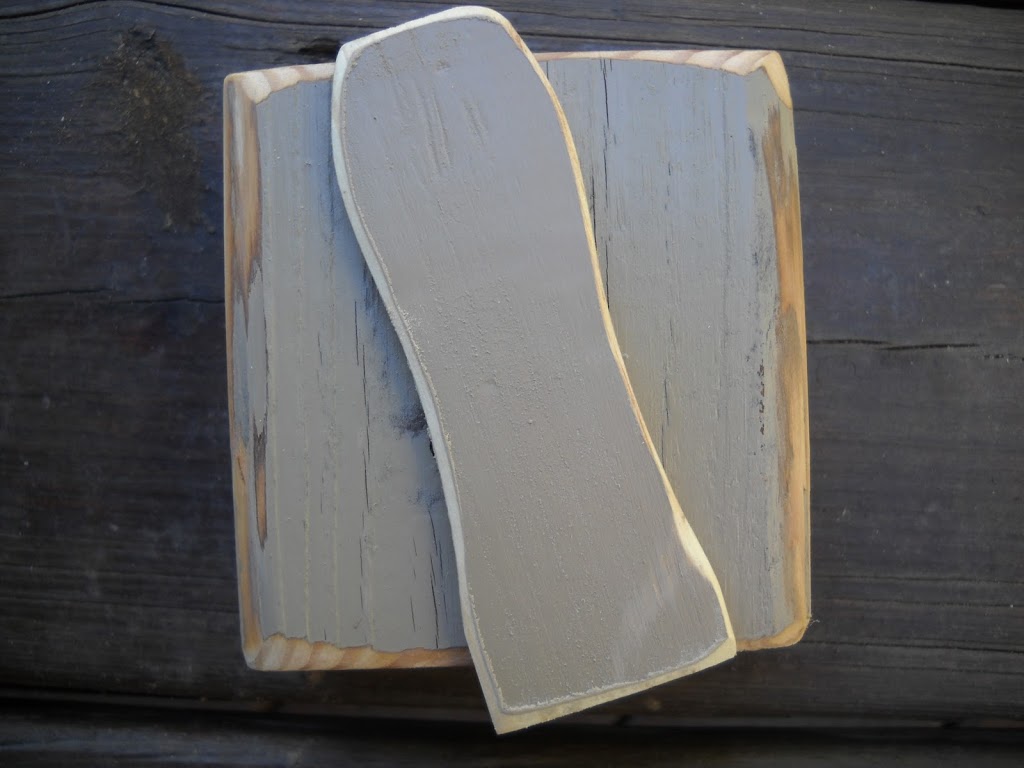
Once they are dry sand down all the edges. A power sander works great here! If not, use some old fashioned elbow grease and work until the edges are smooth.
Finish the head piece:
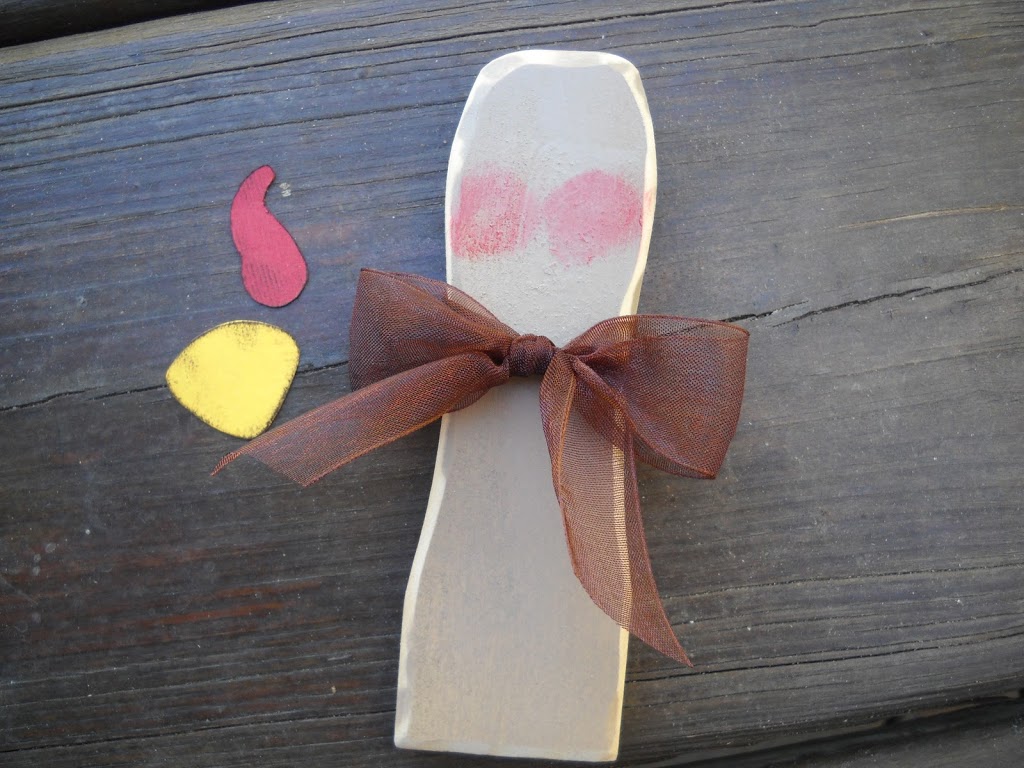
Start by tying a ribbon around the neck of your turkey.
Then blush his cheeks. I used a Q-Tip and red ink, paint would also work.
Dip one end of the q-tip into the ink and then rub it on in small circles. Turn the q-tip over to the clean end and go over the circles again to lighten and blend in the ink a bit.
Using your scrap pieces of yellow and red cardstock, cut out a beak, waddle, and small heart. Ink the edges of these with brown ink.
Lay the pieces onto the head and play with the placement until you like it, using the Modge Podge glue them into place.
Snip off the tip of a yellow craft feather. Ruffle it a bit and then hot glue it into place on the back of the head.
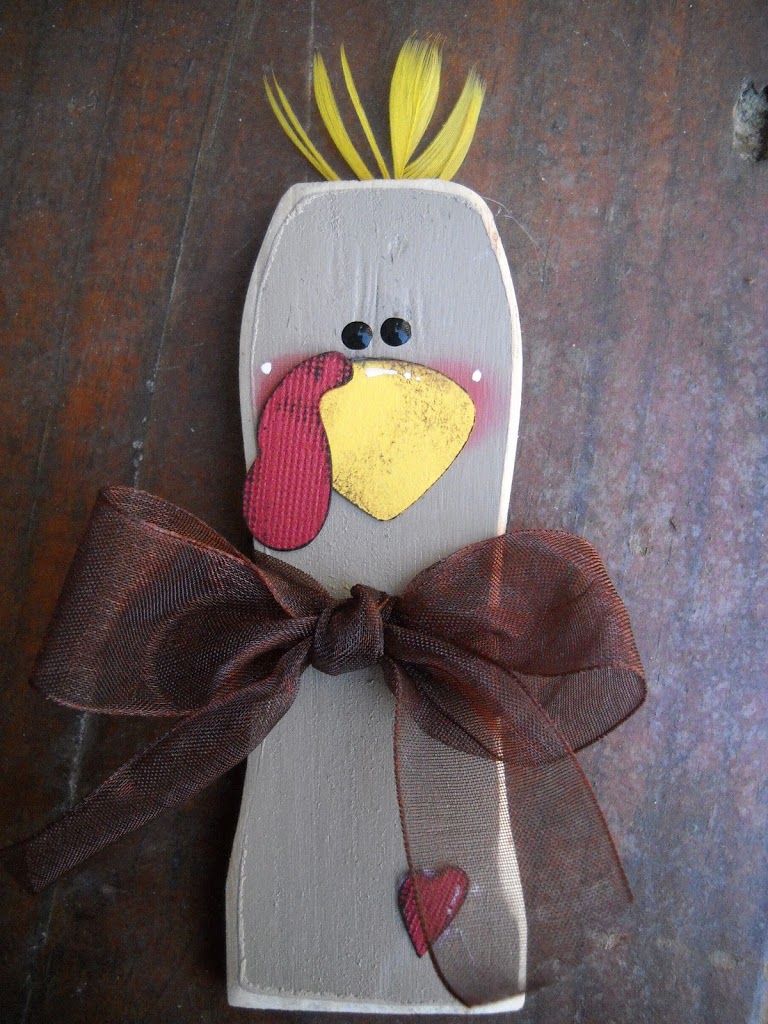
Dot the eyes with black paint.
Add a highlight across the beak and dot the cheeks with white paint.
{I use a small detail brush to add the white and then flip it over and use the end of the handle to dot the eyes}
Set the head aside to completely dry.
Finish the Feathers:
Start by cutting all of your 7 craft sticks in half with a pair of scissors. You will only use 13 pieces-but hang on to the extra just in case!
Whether using paper or paint, determine your pattern order.
Paint or paper cover the sticks.
To paper cover, place the stick onto the backside of the paper and trace around it with a pencil. Cut out the shape staying as close to the line as possible. Add a layer of Modge Podge to the stick and adhere the paper to it being sure the stick is covered and there are no bubbles. Add another layer of Modge Podge on top.
 |
| When I made the first one I left the 3 bottom sticks whole. I’ve made a bunch now and promise, it’s a whole lot easier if you cut all of the sticks in half… |
Once the feathers are dry, swipe them across a brown ink pad to define the edges.
Lay the sticks back out on the table in the order you want them on your turkey. You’re going to glue them in a back and forth pattern {one from the right, one from the left…}-this will help you to not mess it up!
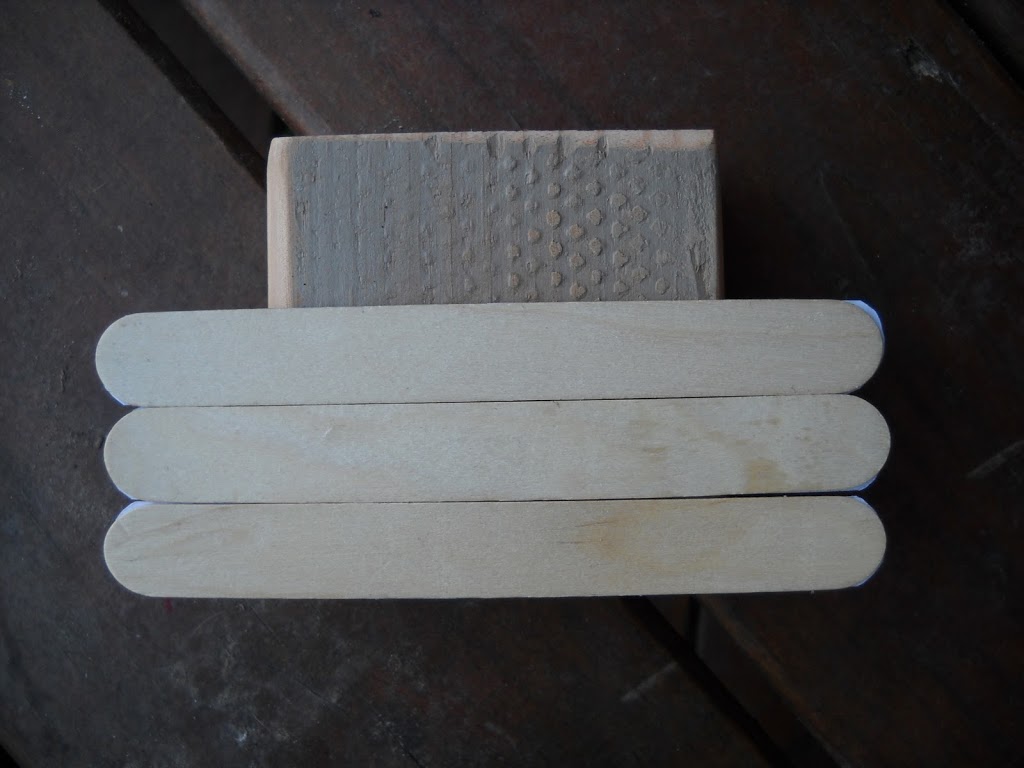
Glue the bottom 3 sets straight across the back of the block.
{**Papered side of the stick to the un-painted side of the block**}
Pay attention to your pattern layout so that
you grab the correct one.
Then glue on the very center feather-it’s the one pointing straight up!

Start building your arch on the 4th set of feathers. Glue down the feather on the right, and then the feather on the left that sits in the same spot. This will help keep your spacing and make sure you glue them at the same angle. Keep working back and forth one level at a time and keep your scissors close by to trim the sticks as needed to make them fit.
Cut a scrap piece of light brown paper to a 3 1/4 ” square.
Glue onto back of block to cover the sticks up.
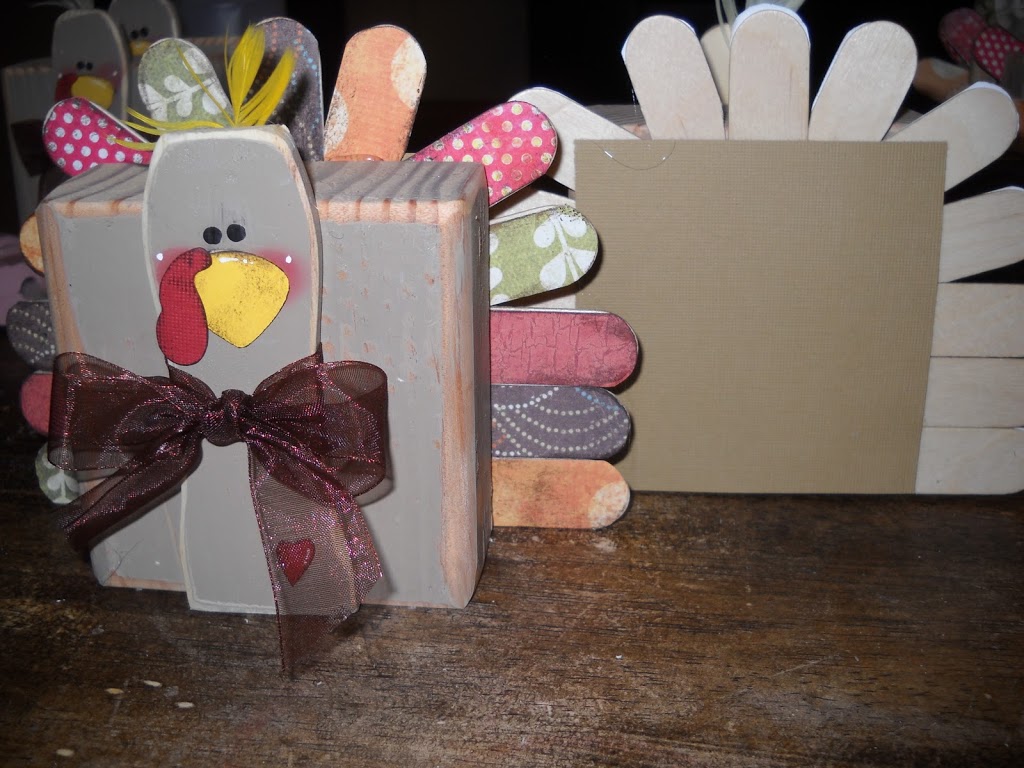
Add some hot glue to the back side of your head piece and center it on the front of the block.
Your little gobbler is now complete! I hope you had fun with this and you enjoy your turkey. If you have any questions or need help jump on over to Craft Goodies and leave me a comment.
Happy Crafting!


This is sooooo pickin cute!!! Im going to have to make it!!! Thanks for sharing!!! 🙂
Pretty cute!!!! thanks!!
This is soo cute. When I first looked at it I had no idea the head/neck was from a paint stick. If I have time I’m totally making one.I might even try to make a smaller one using popsicle sticks.
Very cute indeed!
This is SOOOOOO cute. I have the 2×4 wooden pumpkins that I did last year and this little guy would go so well with them. Thanks for sharing!
So cute! You should post to my 2×4 Link Party at http://craftersanonymousclub.blogspot.com/2010/11/2×4-tuesday-link-party.html
Terrific tutorial, Wendy!
Welcome to ‘crafty’ blogging.
I love him! Or her. . .
OMG!What a cute little turkey!That’s going to be a fun project for my kids!
So stinkin’ cute!!!
This is really darling! I am thinking they would be fun for the kid’s table at Thanksgiving dinner. thanks for sharing!
So cute! Sharing on my facebook page, Pirates-n-Princesses. 🙂
Heather
I love how she did the tail- that’s so cute! Thanks so much, I’ll be linking.
love this! it is featured on my blog today smallfineprint.blogspot.com
I had to make this, you can see it here.
http://dizzylizzyscreations.blogspot.com/2010/11/gobble-gobble.html
That is the cutest Turkey ever. I am a turkey farmer wife, so I am gonna make one of these for year round! Love It! Buy “Norbest” Turkey! 😉
That is too cute!
Love, love, love, love, love! Thanks for sharing!
I love that this has pieces that anyone can find!
Made this yesterday– thanks for the idea and tutorial!
Am finishing these up today. Can’t wait to get them finished and take with us to Grandma’s house!
This is super cute! Thanks for sharing this tutorial. I think I’m going to have to make a few of these! 😉
Love this,just made 6 I used the colored ones and painted the sticks with white dots and lines turned out so cute thanks,can’t wait to put them on the table for thanksgiving.