
I’m Sierra from Blue Robin Cottage! I really discovered my love for creating things at a very early age. I think I might have been the only 2nd grader with a vintage inspired valentine’s box complete with pearls, lace, glitter and elegant paper dollies. I started sewing about a year and a half ago and it was love at first sight! When I’m not crafting (which isn’t very often) I enjoy the metropolitan atmosphere in DC with my two sweeties, antiquing or decorating my home. 🙂 At the Blue Robin Cottage, I love to share all the fun craft and home decor projects I’ve been working on. Stop on by and see what I’m up to! 🙂
Now onto the tutorial! I am so in love with everything ruffly these days! I decided I needed a tote bag to put all of my things in and of course it HAD to be ruffled! 🙂 This tote is a lot easier than you think so let’s get started!
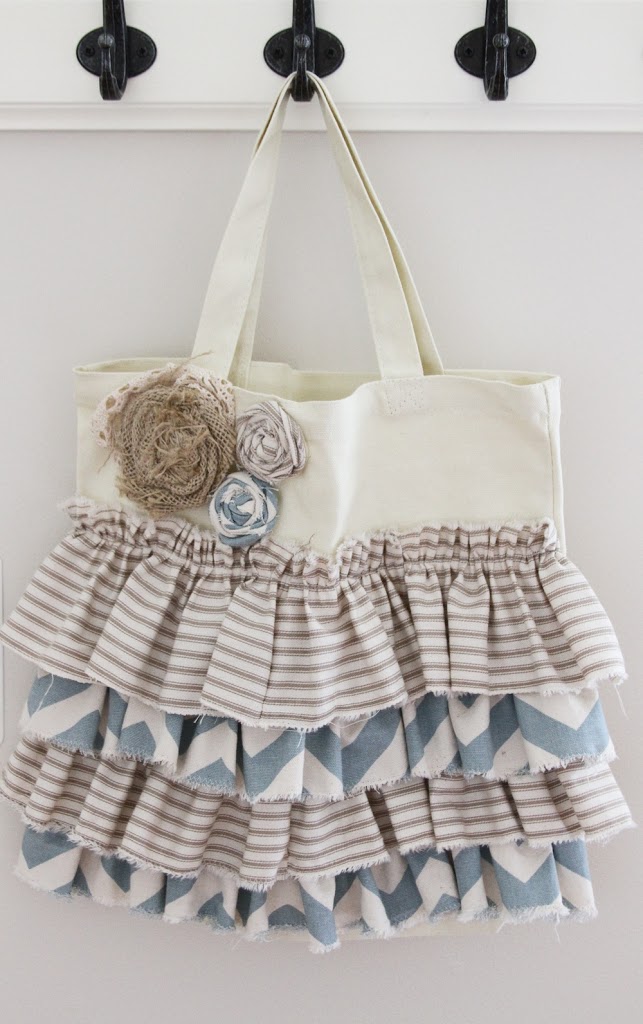
Here’s what you’ll need for this project:
*1 Canvas tote bag: I found these at Walmart in a package of 3. I think they ran around $6.

*4, 4inch strips of fabric: I used a medium weight home decorator fabric- it just seems to hold up better but you can certainly use a regular cotton fabric
* Any embellishments you wish to add
*Jean sewing machine needle
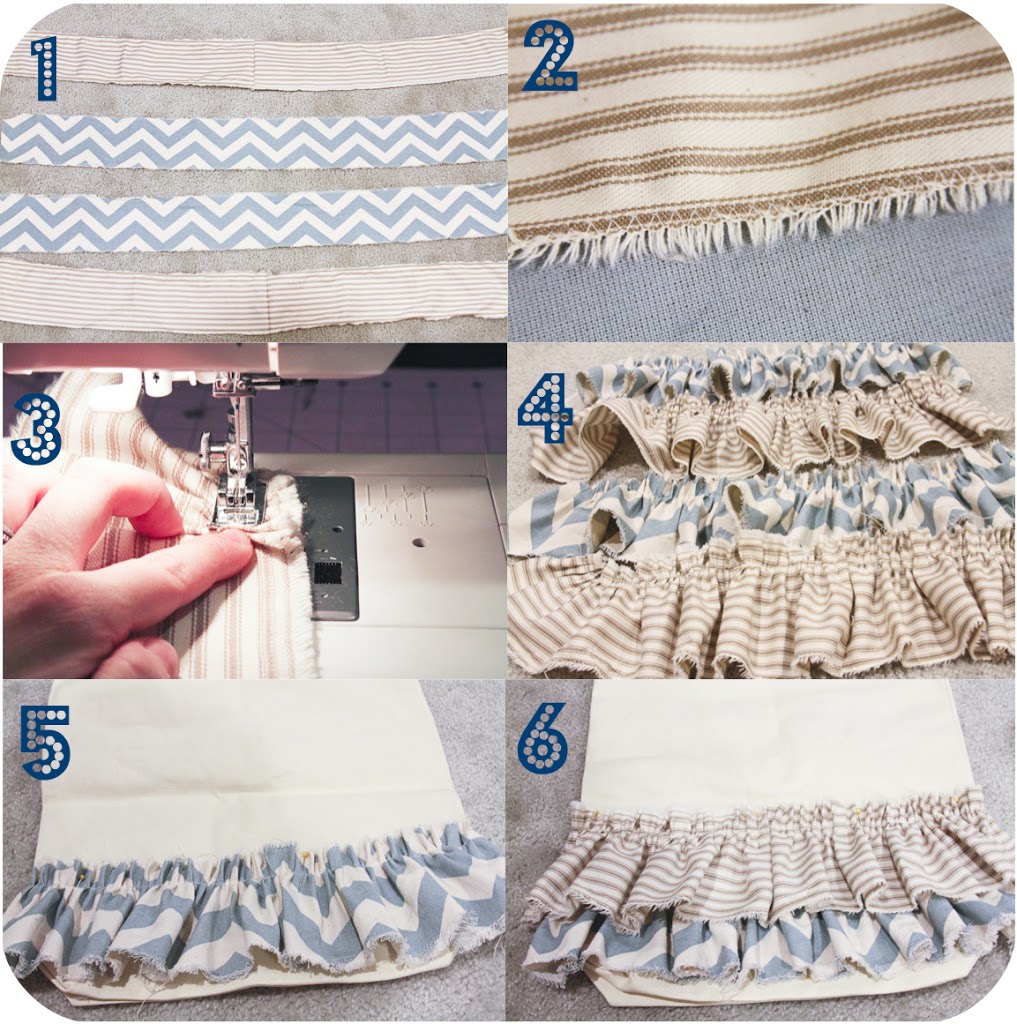
Step 1: Cut your fabric into 4, 4 inch strips- depending on how ruffly you want your ruffles you can cut your strips double or triple the width of your tote for the length.
Step 2: Sew a zig zag stitch on both sides of the strips- this prevents the fabric from fraying, you could also use fray check if you wanted to.
Step 3: Its ruffle time! The easiest way I have found to do ruffles is to push the top part of your fabric strip through your presser foot on your sewing machine faster than it can sew so it creates nice gathers. Just keep pushing and sewing until you get to the end. So simple!
Step 4: Lay out your ruffles to decide where you want to place them on your tote.
Step 5: Pin your ruffles one strip at a time onto your canvas tote, starting at the bottom.
Step 6: Sew the ruffles onto your tote- This is where your jean needle will come in handy because canvas fabric is so thick. The first 2 ruffles are a little difficult to sew onto your tote but if you take off your extra compartment on your sewing machine arm, you can easily slid your tote over the base of your sewing machine.
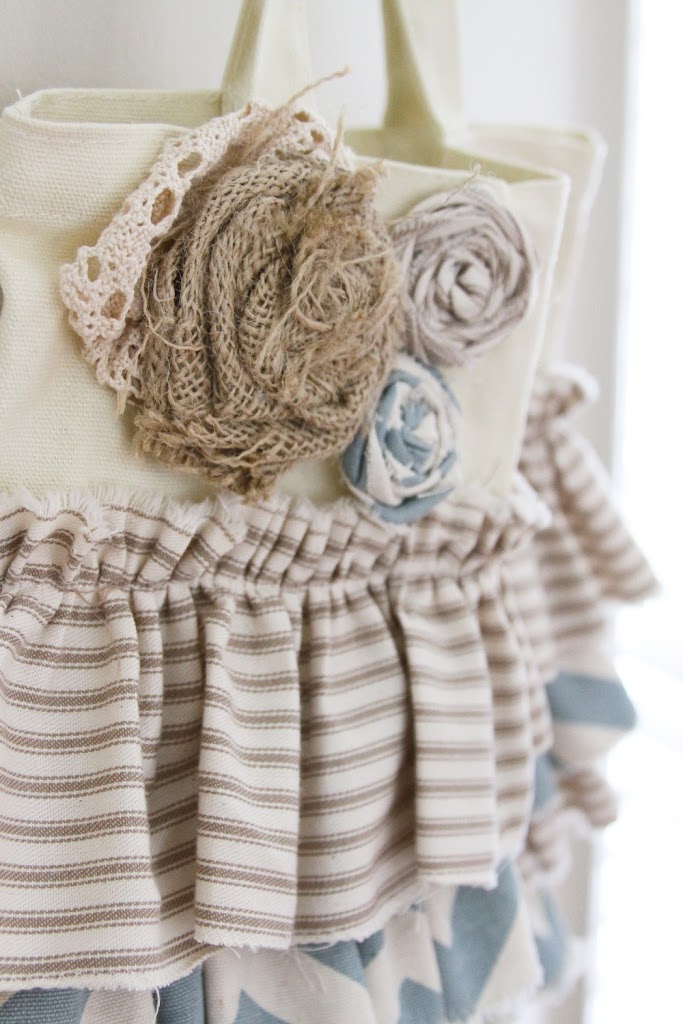
If you want to add any embellishments, you can sew those right onto the top of your tote! The possibilities are endless! I added a burlap rosette and some fabric rosettes to match:

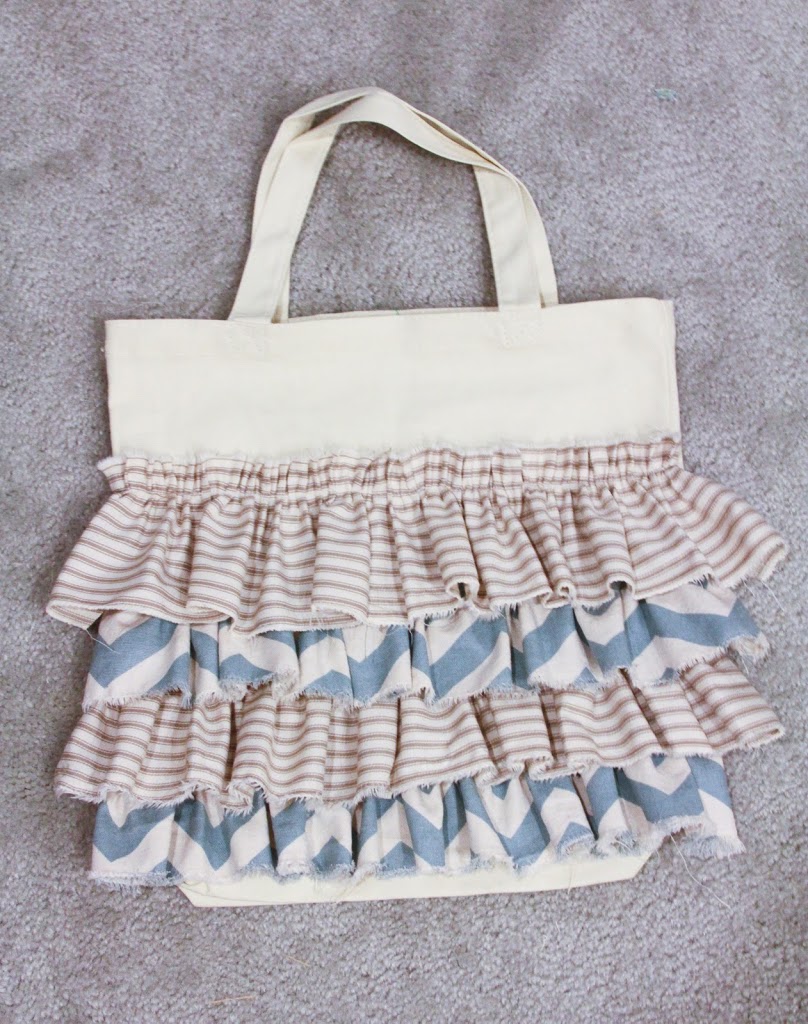
And there you have it… a simple, adorable ruffle tote! These would make such cute gifts, they are so easy to make and lets not forget to mention cost efficient! 😉
Thank you so much for having me today! 🙂 I hope to see you soon at the Blue Robin Cottage!


That is one really cute tote! I love ruffles too!
lovely tote!!!
wonderful fabrics, simple tutorial!
thanks for sharing Sierra!
So cute tote! Thanks for the idea and the tutorial!
http://www.vallys-creations.gr
Super cute! I’ve got a ton of canvas bags that could you some ruffles like this! Thanks for sharing!
Oh my goodness, I adore this tote! I’m slightly obsessed with totes and this one will be mine one day (when I figure out how to use my sewing machine). Love it!
Love the ruffles and I like your choice of fabrics. Thanks.
So cute!! 🙂
Incredible bag and great tutorial!
Thank you!
Love this…I saw many other tutorials but yours is by far the best and answers many questions! I will try this one and post and link to your tutorial very soon
I’ve always wondered how to transform those plain canvas bags into something extraordinary. Now I know–great job.
Please visit me when you get a moment to see my transformations.
http://altered-artworks.blogspot.com
omg i love it the fabric is beautiful. such a cute tote xxx
super-cute bag and great photos. This bag would be an especially sweet gift for a young girl.
so lovely so easy .. so perfect gift for my best friend ^.^
thank you
Aldina
this bag is absolutly adorable. i was wondering if the rosettes were homemade or storebought. if you made them i would love to see a tutorial on that as well and if not i was wondering if you know a good place to buy them. thanks so much for sharing!
Great and inexpensive gift idea.Thanks!
absolutely adorable!! i love this idea…thanks!
If you want another way to make ruffles lay a piece of dental floss on the fabric-fixing one end with a pin, zig zag over it, then pull the end of the floss. Floss is so strong that it never breaks like thread does!
I love, love, love this purse. I would love it if you would make it for me! I wish I knew how to sew. You are gifted!
Love it. Must give it a try one day. Thanks for the wonderful inspiration!
I love your idea, I have a ugly advertisement bag that was given to me that I can take the ruffles and cover the add. I think I have some clothes that no longer fit that I can make the ruffles out of thatwill look cute on it. I can’t wait to get started, thanks again for the idea!
i like it very very much!! Thank for your tutorial
xoxo
great tote so cute for the granddaughters
Thank you! I cannot wait to make this. It’s beautiful. And now it’s pinned. 🙂
Thank you so much for your idea – I began making 3 of them for teacher gifts for Christmas but loved them so much I ended up making 12 of them! I bought some of the fabric at Hobby Lobby but then found some vintage looking floral sheets at Goodwill for $1 and used that for ruffles – turned out super cute and ended up costing only around $5 per bag.
I had never made ruffles or fabric rosettes so thank you for the tutorial and great pics!
Thanks again!
I have made all the components for the bag, ruffles and flowers- but I’m intimidated by having to switch out my needle for a denim one and then to have to switch back to the regular for other projects (can you tell I’m very inexperienced with my sewing machine? So my question is this- can I just hot glue gun my ruffles and flowers to the bag instead of sewing them onto the bag?
Hi Lynn,
I actually used a regular sewing needle and didn’t switch to a denim one. It worked great, however please don’t blame me if your needle breaks!!! LOL
Thanks for your response! I went ahead and used my regular needle and it worked out great. Here’s my bag if you want to see:
http://i.imgur.com/Hl3VwTc.jpg
Your bag turned out super cute! I love your choice of fabrics and the rosettes are lovely.
Awesome job! Fun colors…thanks for sharing!
Love this bag! Did you sew the ruffles all the way around or just on the front? Thanks for the inspiration!
Same question as Lynne….How long would I need to make the strips to go all the way around the bag? And are those strips 4″ in Width?
Lynne and Angie,
Sierra sewed the ruffles along the front side only. You could easily double the fabric strips and go around the whole tote easily!
I’m not sure how long the strips were.
For any questions about sewing the tote contact Sierra at the blue ribbon cottage as this is her guest tutorial!
So glad so many of you like this as much as I do!! Sierra has major talent!
Your bag is lovely. The shabby ruffles are so cute!
Do you sew ruffles only on one side or both sides?
I made one for my daughter and only did ruffles on the front, but you could absolutely do it on both sides. More work, but twice as cute!
This is a simple and beautiful tote! It is so fun to make! One comment I have. While making mine, I used four times the circumference of my bag (I made a 16″ bag so the total circumference was 32″, so I made the length of my ruffles was 128″.). I also couldn’t get the hang of pushing material through my machine to form consistent ruffles, so I made them the old fashioned way by basting two stitch lines on the top and pulling the threads to gather the material. This was such a success and made awesome gifts that I have made several! Thanks for sharing your idea!