Hi everyone! I’m Autumn from itsalwaysautumn.com, where I blog about crafting, sewing, cooking, photography, scrapbooking, and more.
Today I’m sharing a tutorial for this quick and easy stuffed animal sleeping bag:

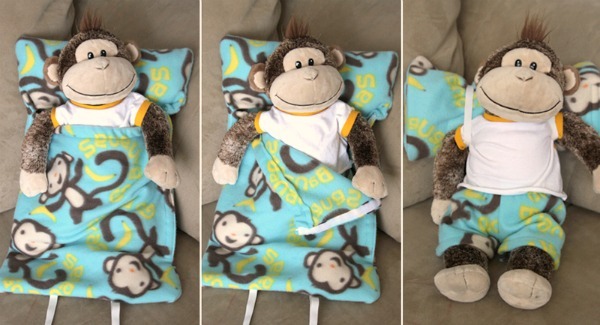
My son has a monkey named Jim from Build-a-Bear Workshop, and he wants Jim to have every single accessory that store carries. Since that’s obviously out of the question, I decided to make Jim a sleeping bag complete with a built in pillow that he can snuggle into at night.
The sleeping bag rolls up into elastic loops that fit on his shoulders during the day. (While I was at it I made Jim a new pair of PJs to match the sleeping bag – that tutorial and a free downloadable pattern is up on itsalwaysautumn.com today!)
The sleeping bag is very easy–all you have to do is sew a few straight lines. Plus it’s pretty inexpensive to make since it only takes 1/2 yard of fleece. If you buy fleece on sale and have some polyfil on hand, you can expect to spend about $5 on each sleeping bag (gift idea anyone?). It’s the right size for all the standard size/shape Build a Bear animals (on any other 18 inch stuffed animal).
Gather your supplies:
1/2 yard of fleece (Joann’s has fleece half off just about every other week)
12 inches of sew on velcro
1 yard of 1/2 inch elastic
a few handfuls of polyfil (or any stuffing-type material)
sewing machine and thread (just about any color will work as the thread doesn’t show much on fleece)

Lay out your fleece on a flat surface. It will be 18 inches wide and around 60 inches long. Cut three inches off of the width, leaving you with a 15 inch wide and 60 inch long piece.

Set aside the 3 inch strip (you won’t be using it). Cut the remaining fabric into four pieces as shown here:

Set aside piece D (you won’t be using it).
Grab piece A and sew a 1/2 inch hem along one of the 15 inch sides (if your fleece has a right and wrong side be sure the hem is folded onto the wrong side of the fabric). With fleece I don’t worry too much about pinning or pressing beforehand. For a 1/2 hem I simply fold the edge under my presser foot as I sew, using the presser foot as a guide, like this:

Set piece A aside for now.
Take piece B and hem one of the 15 inch sides as well, this time turning it up a full inch instead of just 1/2 an inch. This hem will act as a casing for your elastic. Cut a 13 inch length of elastic and use a safety pin to help thread it through the hem/casing, like so:

When the elastic is all the way through the casing, sew a vertical line through the elastic and casing at each end to secure the elastic, like this:

Adding elastic here will make sure the top edge of the sleeping bag stays nice and snug across your stuffed animal’s chest.
Now you want to lay out your three pieces together. Put piece C down first, right side up. Place piece A and B right sides down on top of piece C, as shown here:

Pin around all the edges. Now cut your remaining elastic into two pieces. Fold each piece in half and slide them in between piece B and piece C on the bottom edge, each one about 3 inches right or left of the center.

Sew along the dotted lines as shown, using a half inch seam allowance, backstitching at the beginning and end of the seam.

Now, turn the sleeping bag right side out. Open up the right hand side, where you didn’t sew. On the bottom, fold up the edge 1/2 inch and pin one half of your sew-on velcro on top of it as shown below. Attach the velcro by sewing around all four edges, very close to the edge. Repeat with the other half of the velcro on the top edge of the open side.

Your sleeping bag should now look like this:

All that’s left is to sew along the bottom of the pillow (sewing through piece A and piece C right along the hemline of piece A), leaving about 4 inches open. Stuff the pillow with polyfil or some other stuffing material, then sew the opening closed.
Here’s Jim, all tucked into his brand new sleeping bag:

The side velcro makes it easy for little ones to open and close the sleeping bag:

And when Jim’s not sleeping in it, we just roll it up, secure with the elastic loops, and slide the loops over his arms.
It’s that simple! Remember, if you’re interesting in a free pattern download and tutorial for the jammies, click on over to itsalwaysautumn.com! Thanks!


Super cool!! I need to make one for my little guy 🙂
Cute idea. Love the fabric too!
Sooooo cute!!!
this is adorable and just in the nick of time! I need to make my son one asap for his birthday!
Such a great idea! I have a feeling once I start this for one of my daughter’s dolls I will be making one for the rest of them! 🙂
Just adorable!
Uau!!!! Beautiful!!! Congratulations!!!!
Oh how cute!!! Love this!
Thanks for the tutorial – I found it via pinterest. We are off camping this weekend, so the teddies will need some warmth too!
Thank you for sharing this! Your directions were great, and now my boy is very happy!
I love this! I made one for a webkinz panda so she can go camping anytime and anywhere! Thanks for the instructions and Happy Sewing!
So cute and so easy! The instructions are easy to follow. I used leftover flannel, and zippers instead of Velcro to make a couple of these for my grandchildren and they turned out great. Thanks for the idea.