U Create

It's a good day to create!

  • pinterest
  • facebook
  • instagram
  • twitter
  • rss
  • crafts
    • crochet/knit
    • jewelry
    • kids crafts
    • paper crafts
    • sewing
      • bags
      • boys-clothing
      • girls-clothing
      • women-clothing
      • pillows
      • quilts
  • home decor
    • bathroom
    • build it
    • frames
    • kids
    • kitchen
    • office
  • recipes
    • desserts
    • dinner
    • snacks
    • soups
  • parties
    • baby shower
    • birthday
    • games
    • gift wrapping
    • party decor
    • party favors
  • printables
  • holidays
    • Christmas
    • Easter
    • Father’s Day
    • Halloween
    • July 4th
    • Mother’s Day
    • New Years
    • St. Patrick’s Day
    • Thanksgiving
    • Valentine’s Day
  • gifts
    • baby
    • electronics
    • graduation
    • teacher gifts
  • About
  • Be My Guest
  • Advertise
  • Contact
  • pinterest
  • facebook
  • instagram
  • twitter
  • rss

13 Sep

DIY Embroidery Hoop Thread Rack

Embroidery Hoop Thread Rack Tutorial

Embroidery Hoop Thread Rack Tutorial

Supplies

Embroidery hoops (one for each thread rack)

1/8″ dowels

Wood glue

Blade

Instructions

embroidery hoop thread rack 1

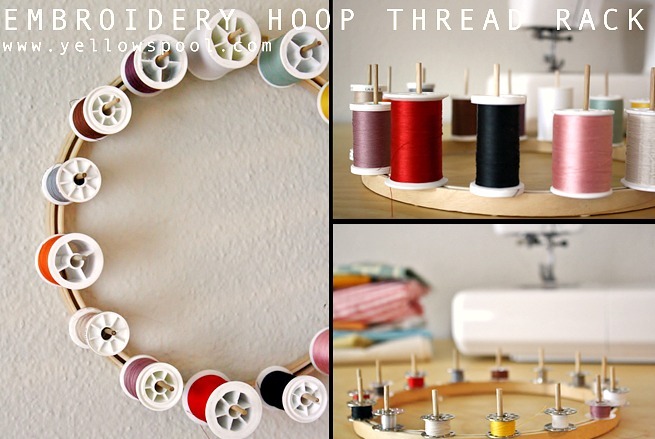
1- Start by cutting the dowels down. For my spools, I cut 3 1/4″ pieces. For my bobbins, I cut 1 1/2″ pieces. To start, just make an indentation with the blade all the way around the dowel, then snap.

thread holder 2

2- Loosen the fastener at the top of the hoop as much as possible without screwing it all the way out. This should leave you with enough space for the dowels. For spacing purposes, place dowels on the top, bottom, and sides- think 12 o’clock, 3 o’clock, 6 o’clock, and 9 o’clock.

embroidery hoop 3

3- The spaces in between the dowels are going to be tighter, so you’ll want to put your next dowel in right next to one of the dowels you already had in place, and then slide it over. Spread dowels around the hoop fairly evenly, then you can space them perfectly even.

embroidery hoop 4

4- Once the hoop is set up how you’d like it, set it upside down on some newspaper and place a small amount of wood glue at each joint. Start with a small amount of glue, and if you decide you need more later, you can go back and re-glue it. Let dry.

You may also like these

Sewing Sheets for Kids – PART TWO!One Hour Bindless Baby Blanket Tutorial1-Hour Bindless Baby Quilt10 Comfortable Mask TutorialsSewing Sheets for KidsMessenger Bag TutorialMessenger Bag Tutorial
Previous Post: Kid Friendly Food Ideas
Next Post: DIY Daily Chore Board

Comments

  1. Dear Emmeline says

    September 14, 2012 at 1:55 AM

    very cute idea!

    reply to this comment >
    • Pat says

      August 28, 2019 at 11:11 AM

      Best idea ever. If you get gradating sizes, you can hang them inside of each other! THANKS

      reply to this comment >
  2. w says

    September 13, 2012 at 11:16 PM

    what a great idea! oh my goodness!

    reply to this comment >
  3. zeynep says

    September 14, 2012 at 6:31 AM

    very cute..

    reply to this comment >
  4. DazedandCreative says

    September 14, 2012 at 1:17 PM

    Awesome idea!

    reply to this comment >
  5. betty loechel says

    September 14, 2012 at 10:07 PM

    Perfect! I am going to pint my hoop and use some twigs that I recently painted and wondered what I could do with them…now I have an idea. Great job, thank you for sharing 🙂

    reply to this comment >
  6. Mel M. M. McCarthy says

    September 15, 2012 at 1:01 AM

    Too brilliant. Love how easy it is!

    reply to this comment >
  7. Aukse says

    September 16, 2012 at 12:32 PM

    Such a wonderful idea! 🙂

    reply to this comment >
  8. Christina at I Gotta Create! says

    September 17, 2012 at 2:25 AM

    Fantastic idea!
    <3 Christina

    reply to this comment >
  9. Katrine says

    September 18, 2012 at 5:03 PM

    Good idea! I was just thinking I needed to nail some holes in boards for my thread, but I’m intrigued! Great idea!

    reply to this comment >
  10. WinnibriggsHouse says

    September 24, 2012 at 7:09 AM

    What a top idea! Have some unloved embroidery hoops, will def be giving that a go.

    reply to this comment >
  11. La Pecora Nera says

    January 11, 2013 at 9:59 AM

    Great idea! Thank you to share:-)
    Emanuela

    reply to this comment >
  12. Betty says

    December 31, 2014 at 11:58 AM

    I would cut the dowel 4 inches long to accommodate both the spool of thread and matching threaded bobbin; keeping them together.

    reply to this comment >
    • Karen says

      August 28, 2018 at 11:08 PM

      I totally agree! I’m also going to do smaller hoops inside a large one so I can maximize my storage amount. I’m excited to do it. Thanks for sharing!

      reply to this comment >

Trackbacks

  1. Storage that looks cool | sewscrapmuse says:
    April 26, 2015 at 8:07 PM

    […] The Web link is: https://www.u-createcrafts.com/sewing-notions-wall-by-yellow-spool/ […]

    Reply

Leave a Comment Cancel reply

Your email address will not be published. Required fields are marked *

Recipe Rating


Popular Posts

New Year's Eve Minute to Win It games by U Create

New Year’s Eve Minute To Win It Games

Free Printable "Color Your Own" Christmas Banner

Merry Christmas Coloring Banner

Free Pattern: Fall Turkey by U Create

Fall Turkey Printable

Free Printable Pumpkin Games

Halloween Printable: Bugs and Kisses

Halloween Minute To Win It Games

  • pinterest
  • facebook
  • instagram
  • twitter
  • rss
 
Privacy Policy
Back to Top

Copyright © 2023 U-Create • All Rights Reserved • Site Design by Emily White Designs