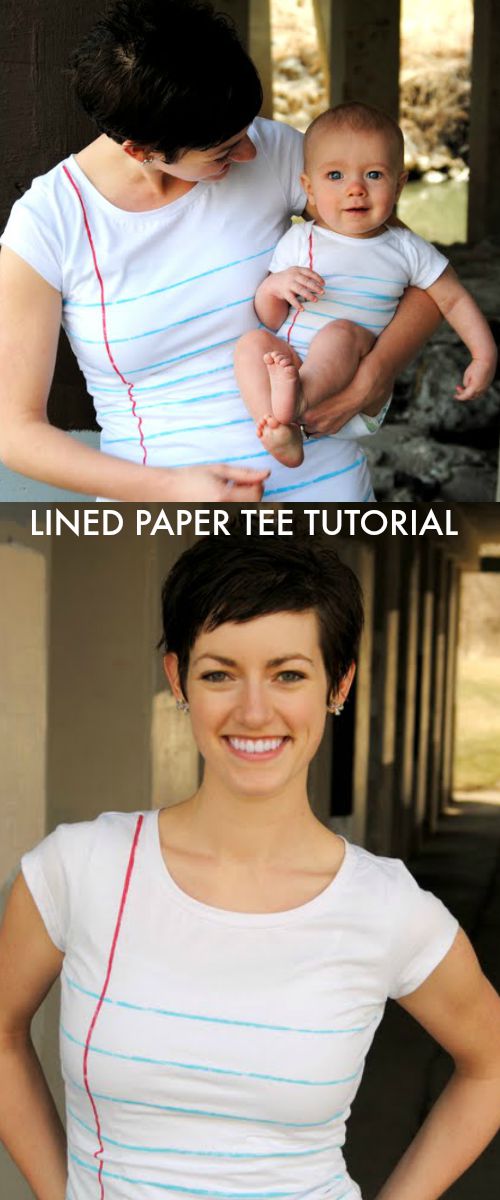
I’m pretty dang excited to be guest posting on U Create, of all places, with an easy and fun project for you. Just in time for heading back to school, I came up with this cute top:
My name is Rachel, and I blog over Maybe Matilda. I’m from small-town New York, currently living in Utah with my soon-to-be-chiropractor husband and our soon-to-be-one-year-old son. When I’m not sweeping up Cheerios, I love sewing and crocheting for my etsy shop, and sharing what I make on my blog.
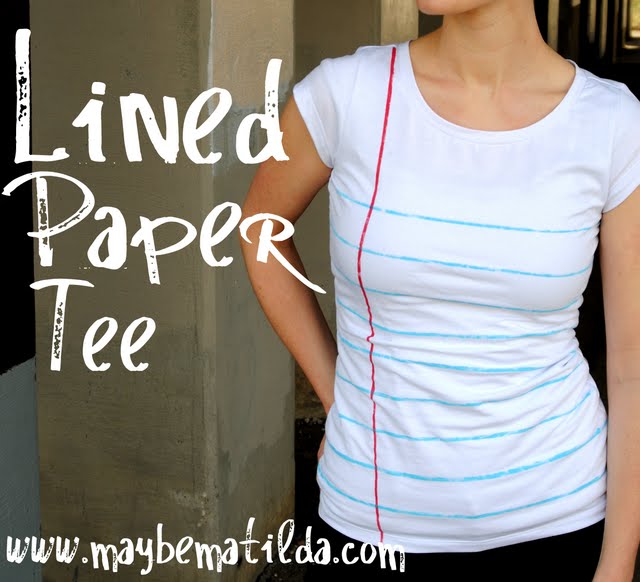
I think this lined paper tee is such a fun way to bring out the inner student, and possibly even encourage a little bookishness in a little one (maybe that’s a stretch, but a girl can hope, right?).

It’s really simple to put together, and you can easily make it in any size. And how cute would it be if you embroidered or stamped your child’s name or a favorite quote onto the lines?
Here’s what you’ll need to make this tee:

a white tank, tee, or onesie
masking tape
foam brush
blue and red acrylic paint
fabric painting medium (available at craft stores–you’ll find it with the paint supplies)
To start, place some cardboard between the front and back of the top so your paint doesn’t bleed through to the back of your shirt, then place your tape in straight horizontal lines across your shirt to mark the areas where you’ll paint your blue lines. I put my first strip of tape right beneath the sleeves. I spaced the tape strips about 1/4″ apart from each other, but only painted in every other open space (on an adult size tee) to create a little more distance between the lines. For my little guy’s onesie, I painted in the spaces between each tape strip.

Mix your blue paint and fabric painting medium according to the directions on the medium (usually a 2 to 1 mixture of paint to medium), and lightly sponge it between your tape strips. A little goes a long way, so try not to get too heavy-handed with your brush. (And personally, I really like the look of a lightly painted, sort of splotchy paint line!)

(You can see here that I only painted in every other open space for the adult tee. For a baby/toddler top, you can paint in each open space.)
Give it some time to dry, then carefully remove the tape. Place two long strips of tape vertically down the left side of the shirt where you’ll paint your red line. Again, place the strips about 1/4″ apart, and make sure they’re running straight down the tee so you don’t end up with a wavy line.

Mix your red paint with the fabric painting medium according to the directions on the package, and sponge it on as you did for the blue lines. Let it dry for a while and carefully remove the tape.

If you’re making a baby onesie, don’t forget to lift up the shoulder flap to tape and paint underneath it!
Make sure you read the directions on your fabric painting medium to find out how to finish your shirt–you’ll probably need to let it air dry for 24-48 hours, then iron it to set the paint. You can just turn the shirts inside out and toss them in the washing machine, and the paint holds up just fine.

Have fun sporting your lined paper tee, and I hope you’ll swing by and visit me at Maybe Matilda!

OMGOSH that is soooo adorable! I just adore it! Great tutorial. Thanks for sharing! I hope I can make my daughter one of these in time for school! 🙂
OK, did you just make another amazing top? I think you did…
Awesome job, Rachel!!!! You are outstanding!
Thanks again for having me, Kari!
REALLY cute!!!! perfect for back to School 🙂
So clever!!!!!
THAT is adorable! Would be cute on a yellow t-shirt too!
This is awesome! Go cousin Rachel!
First of all, I love Rachel! And second of all I LOVE this shirt (and onesie!). Rachel has mad skills, so I am not surprised she came up with this!
Super cute. I hope you and your baby wear them together 🙂
So creative! love it! iv just started blogging and really enjoy the awesome ideas!
Very Cute!!
Love, love, love it! What a clever idea.
This is adorable! I’m a teacher, and I want to do this on a white button-down!
This is such a clever idea. I will use this for my kids as it’s summer hols now!
buy to let mortgages
My girls & I are going to have a blast doing this! 🙂
THAT IS ADORABLE! LOVE THIS AND MUST TRY! Thank you so much for posting this awesome project.
That is awesome!
adorable! i’m going to have share!
This is an awesome idea and I think I could even do it. Thanks for sharing!
I made this, and it turned out great. Thanks for the clear instructions.
http://colleenish.blogspot.com/2011/11/project-notebook-paper-t-shirt.html
I made this for a last minute shower gift, so didn’t have time for paint to dry. I used tulip fabric markers and I traced the lines from a composition notebook (didn’t have the patience to tape). It worked out great! I wrote baby’s name on top line and am giving a fabric marker to mom so she can write the birthdate on the “paper”
I instantly thought of using the sharpie/rubbing alcohol bursts as the holes in the paper at the side. I would just put a single dot of marker and bleed it out with the rubbing alcohol. Hmmm, gonna try this one.
I’m a 15 y.o homeschooler. My BFF and I can’t wait to make these for the 1st day of CO-OP. This is a wonderful idea! What a fun way to start off a new school year. And what a beautiful baby you have 🙂
Gr8 job, Rachel, That looks too cute.
My daughter and I made one for her back to school outfit this year. It turned out super cute. Thanks for the tips.
http://voneinspired.com/2012/09/back-to-school-outfit/
Cute, cute, cute! It would be even cuter if you had the hand for it and could write little words or phrases in the lines! 🙂
Just pinned for my “gifts for teachers” board
My daughter is getting her teaching degree, and I just finished one of these adorble Tshirts for her. It turned out sooooo cute!! Thanks for the great idea 🙂
OH YEAH! Post it to our facebook page at U Create. I would love to see it!
Great! Thanks for sharing!