I’m so happy to have Melissa from Happy Quilting here and I’m crazy about the quilt she is sharing today!
Oh, and today is her birthday!
Happy Birthday Melissa!!!
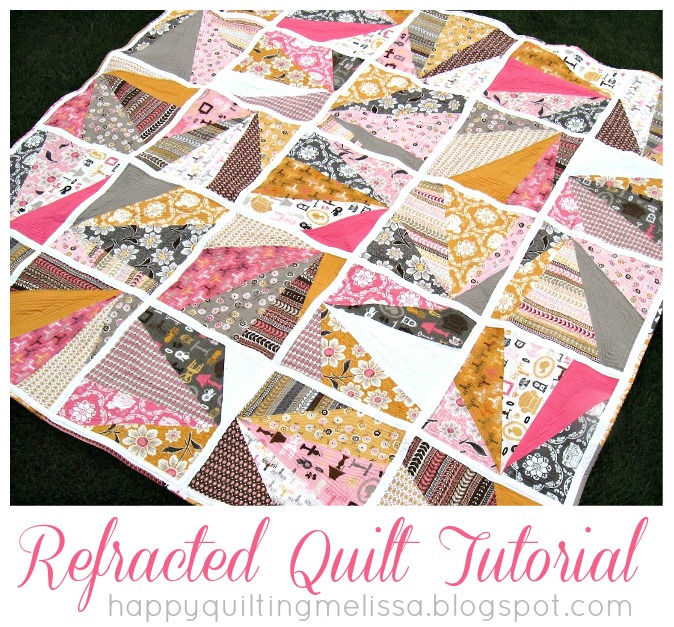
Hello Ucreate readers!! My name is Melissa Corry from Happy Quilting. A little about me, well, I am a wife, mother of 5, homemaker, and most often very happy with wearing all the hats that these entails 🙂 Oh and one other thing . . . I love all things Quilting!! And I can’t begin to explain how excited to share my newest quilt tutorial with you all. I named it Refracted because it reminds me of the way light comes out of a prism 🙂 It is super modern, super chic, and super easy!!!! So let’s get to it!!!
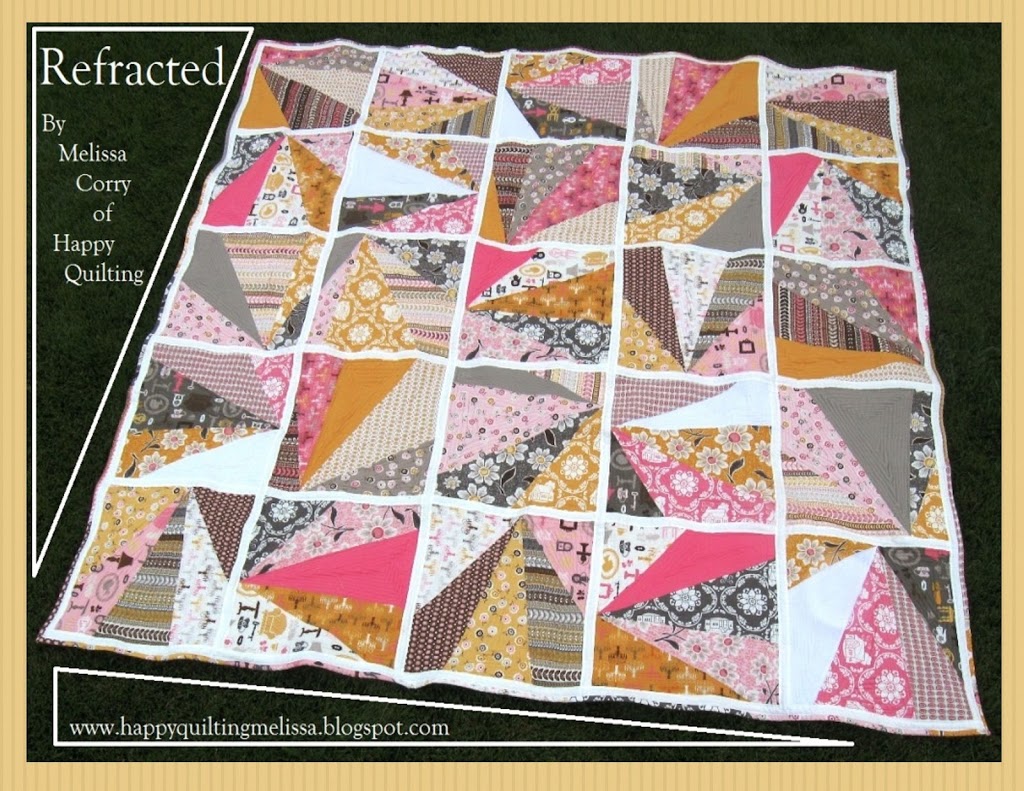
To make an 85″ x 85″ Refracted Quilt you will need :
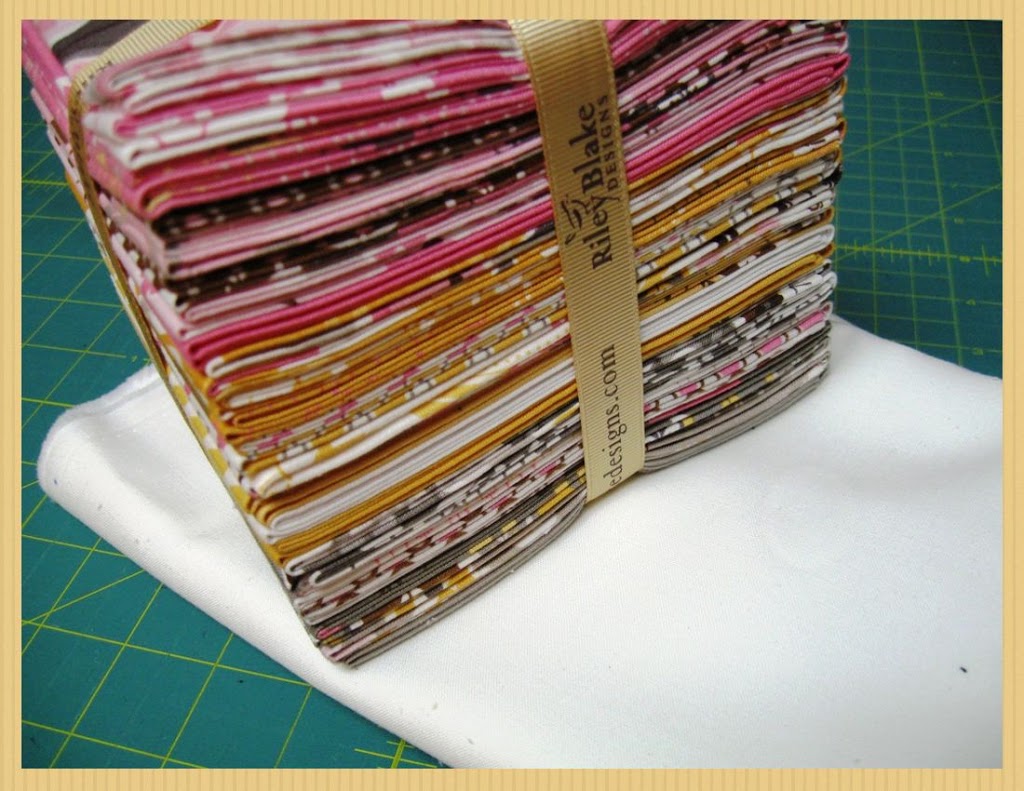
25 Fat Quarters – I used Lori’ Holts Daisy Cottage line for Riley Blake
1 1/8 Yard of a solid fabric for sashing – I used Moda Bella Solid White
STEP 1- CUTTING THE BLOCKS
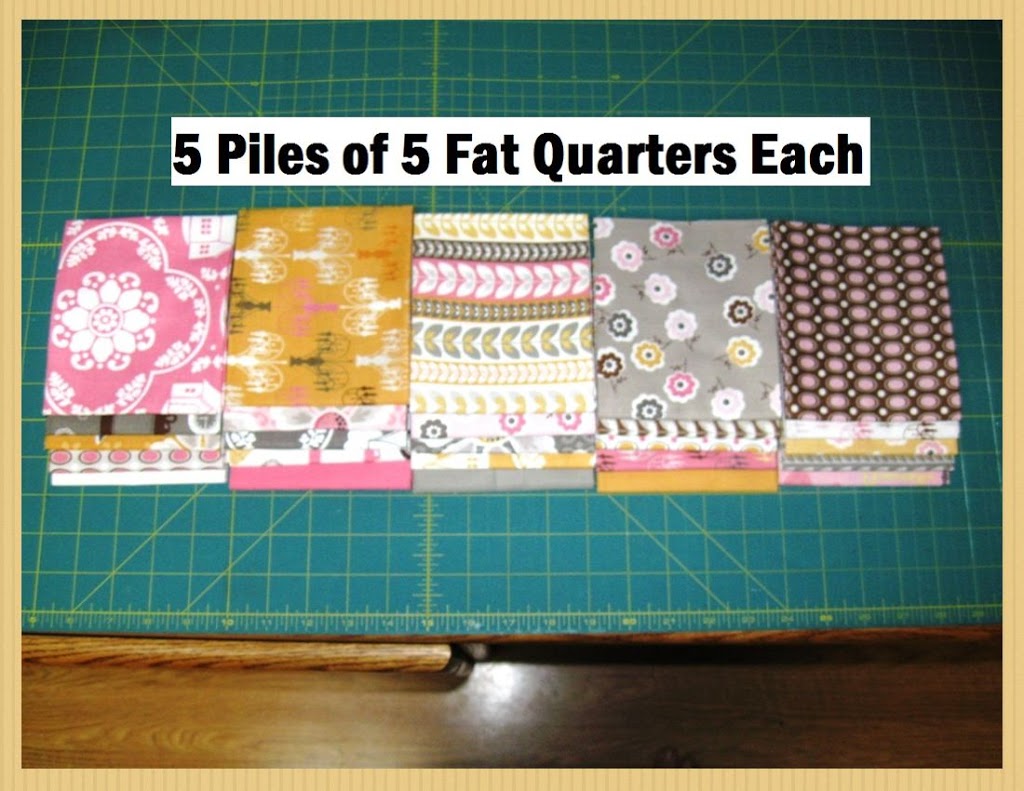
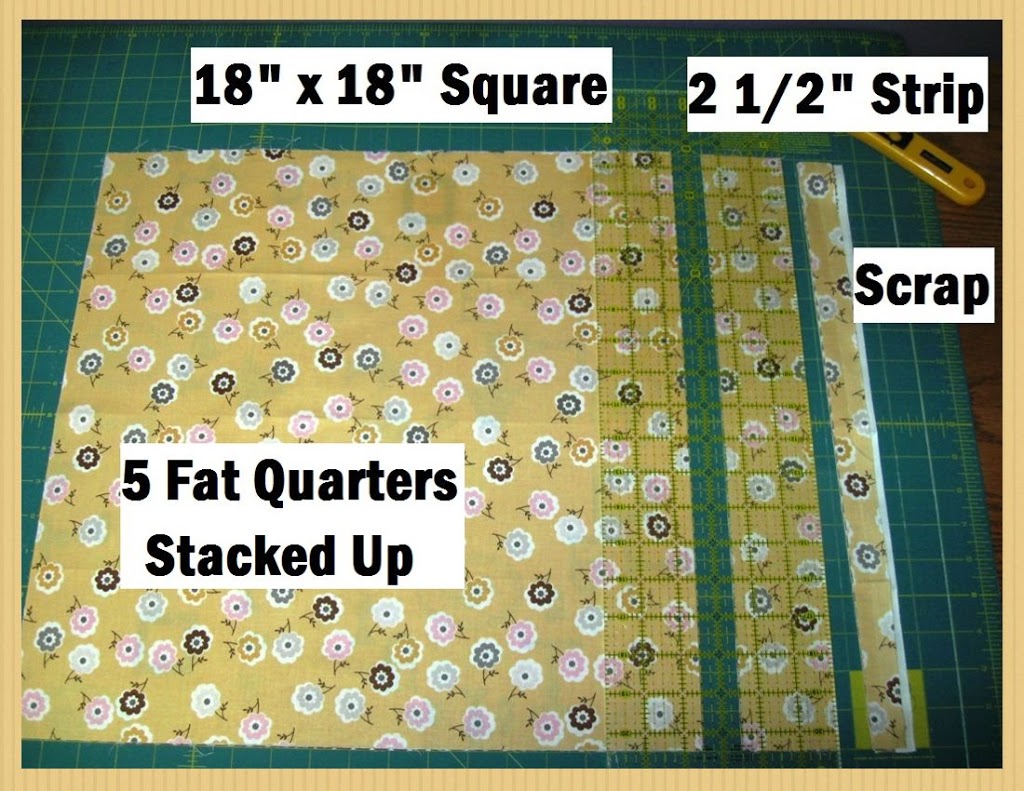
Start by separating the 25 fat quarters into 5 piles of 5 fat quarters each. Be sure to get a good color and print mix in each pile.
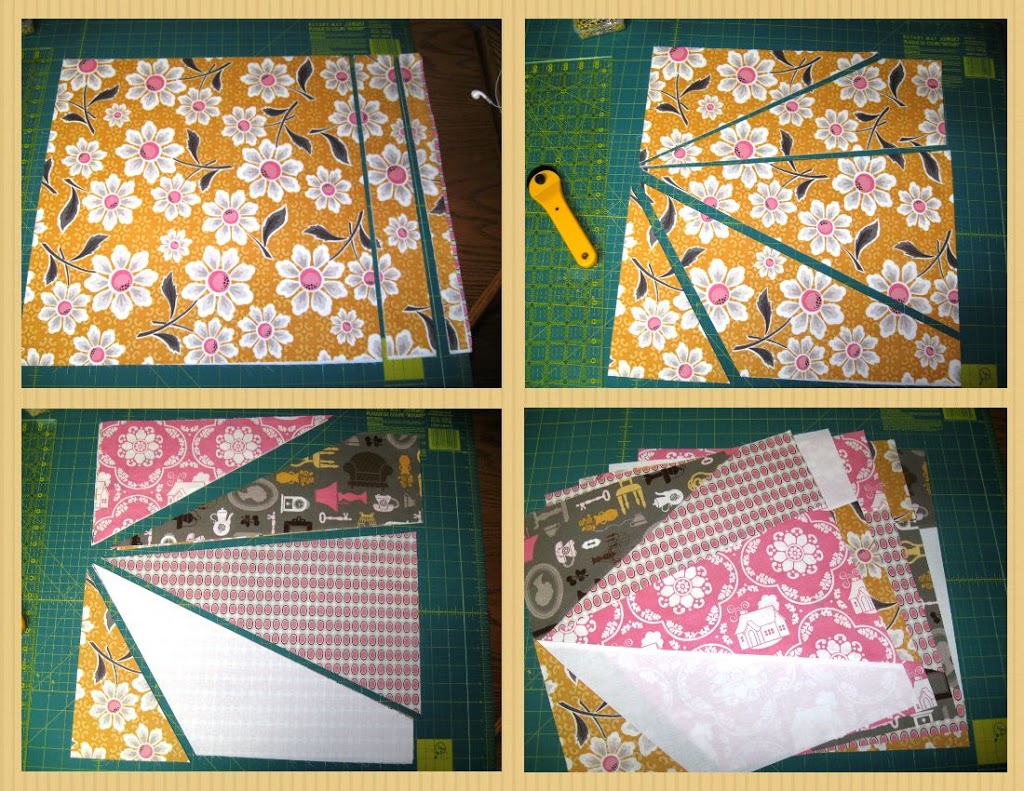
Now, lay the first set of (5) fat quarters on your cutting mat stacked up and aligned as best as possible. Cutting all 5 pieces at once is necessary so be sure to put a good sharp blade in your rotary cutter. Cut your fat quarters as shown resulting in an 18″ square and a 2 1/2″ x 18″ strip. Set the 2 1/2″ strips aside. (They will be used for binding.)
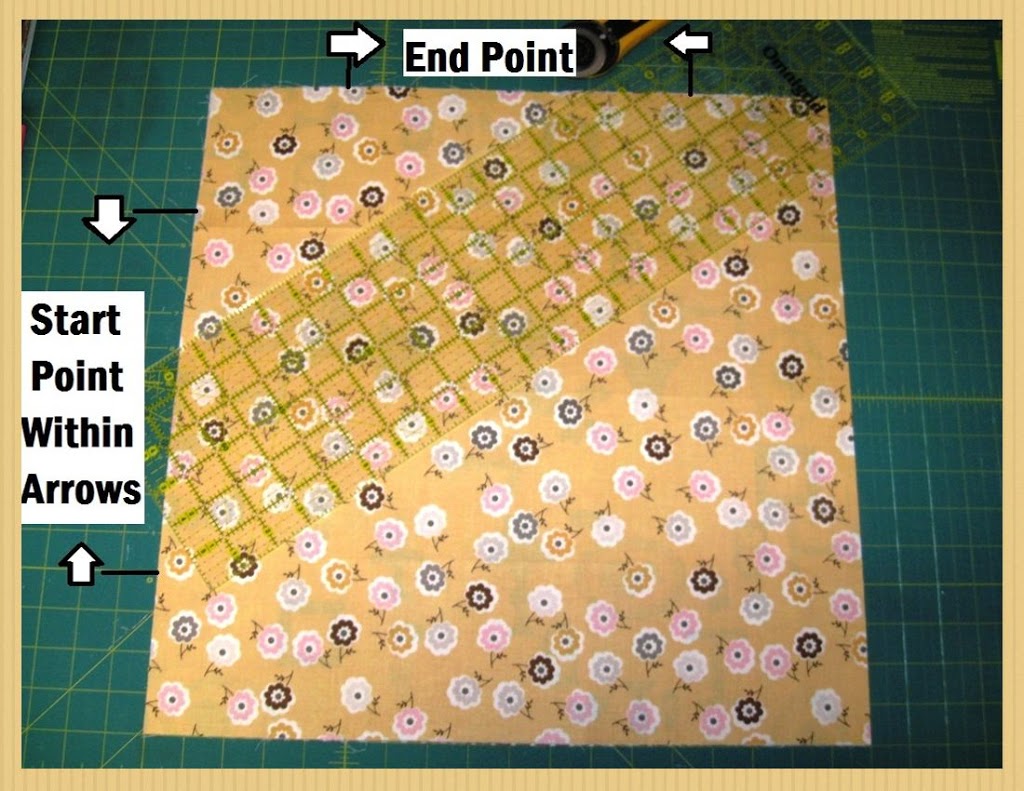
Now, you are ready to cut your angles. Make sure to keep all (5) 18″ squares stacked up. First you need a start point. Pick a point along the left hand side of your square that is at least 4″ in from either end and place your ruler along it. And now you need an end point. Keeping your ruler along your start point, place the other end of the ruler a a point along the top of your square that is at least 4″ in from either side. Now simply cut along the edge of the ruler. And your first pieces are cut.
Now, to create your second pieces, place the edge of the ruler at the same start point. Now for the end point, align your ruler along a point on the right hand side of your square that is at least 3″ down from the top and 9″ up from the bottom. Cut along the edge of the ruler to create your second pieces.
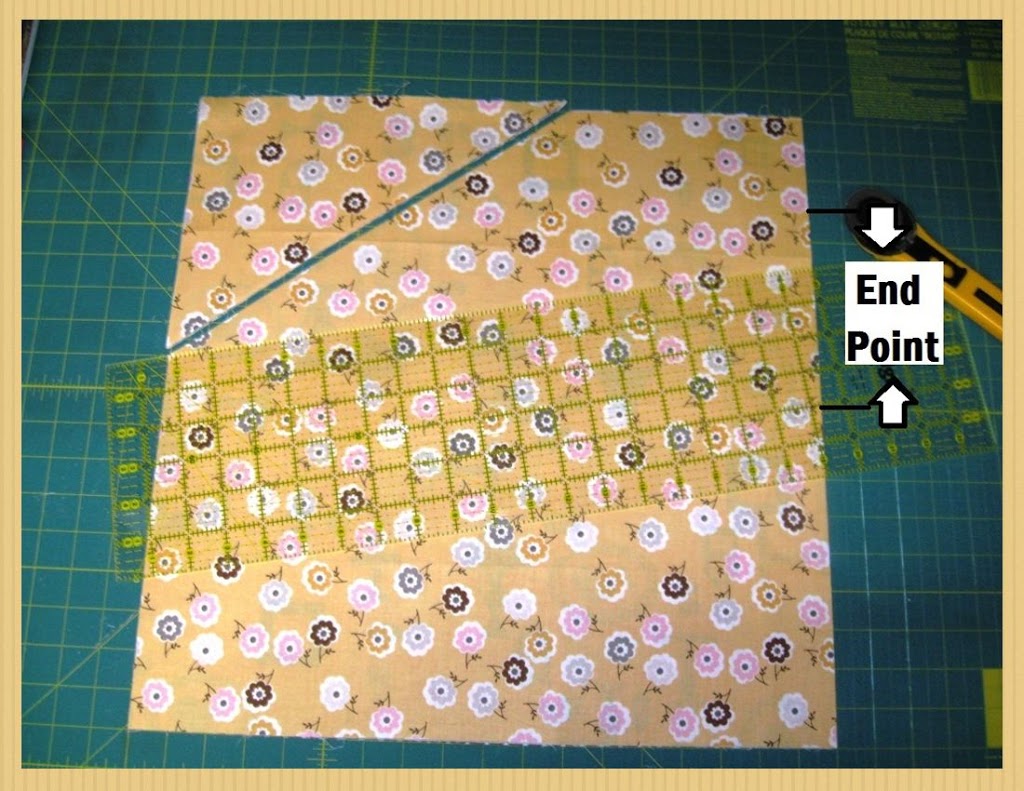
To create your third pieces place the edge of the ruler at the start point again and then pick an end point along the right hand side of the block that is at least 9″ down from the top and 3″ up from the bottom. Cut along the edge of your ruler to create your third pieces.

Your final cut creates the fourth and fifth pieces. Align the edge of the ruler at the start point one last time and then pick an end point along the bottom of the block that is at least 4″ in from either side. Cut along the edge of the ruler to create your fourth and fifth pieces.

STEP 2 – SEWING THE BLOCKS
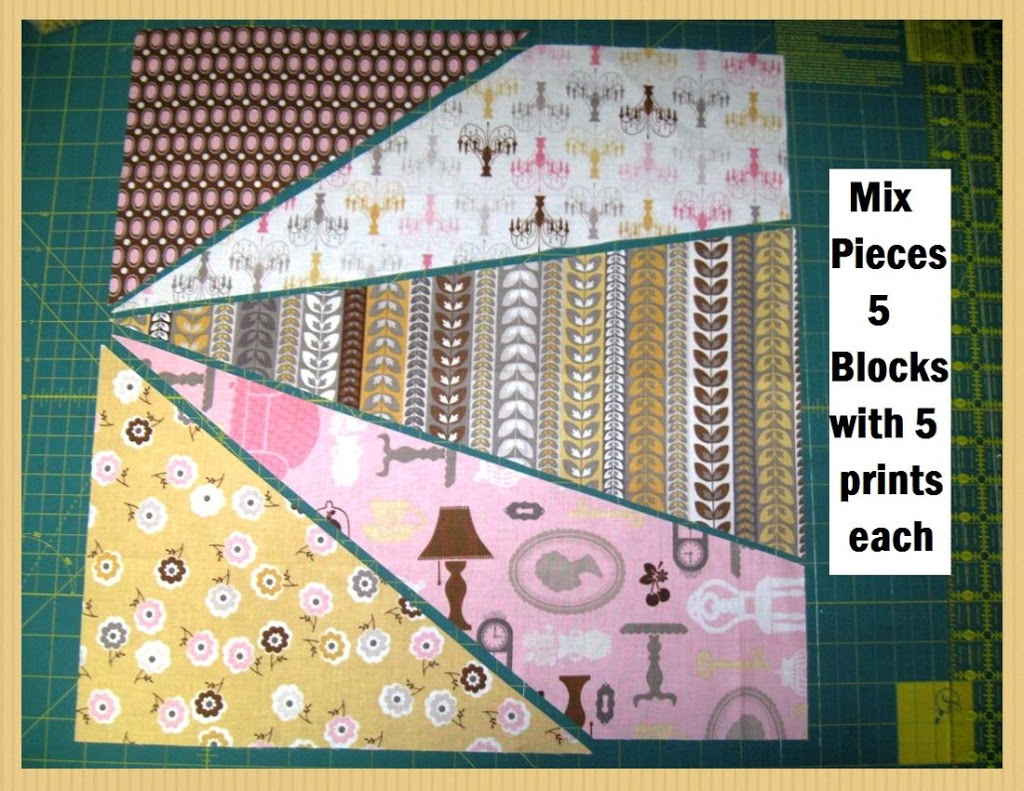
Now that the pieces are all cut you need to mix them up. Create 5 sets of pieces that each have 5 different prints in them. (This is a little like making a puzzle 🙂 Once they are all mixed up you are ready to sew. You can choose to chain stitch your 5 blocks assembly line style or piece each block one at a time. Whatever suits you best 🙂
Lay the first piece onto the second piece with right sides together. Your edges should overlap 1/4″. Pin along the raw edge. Sew a 1/4″ seam along the pinned edge. Remember, you are sewing on a bias so be careful not to pull or stretch the fabric. Press your seam up. And if your edges don’t line up perfectly, don’t worry, we will be trimming 🙂
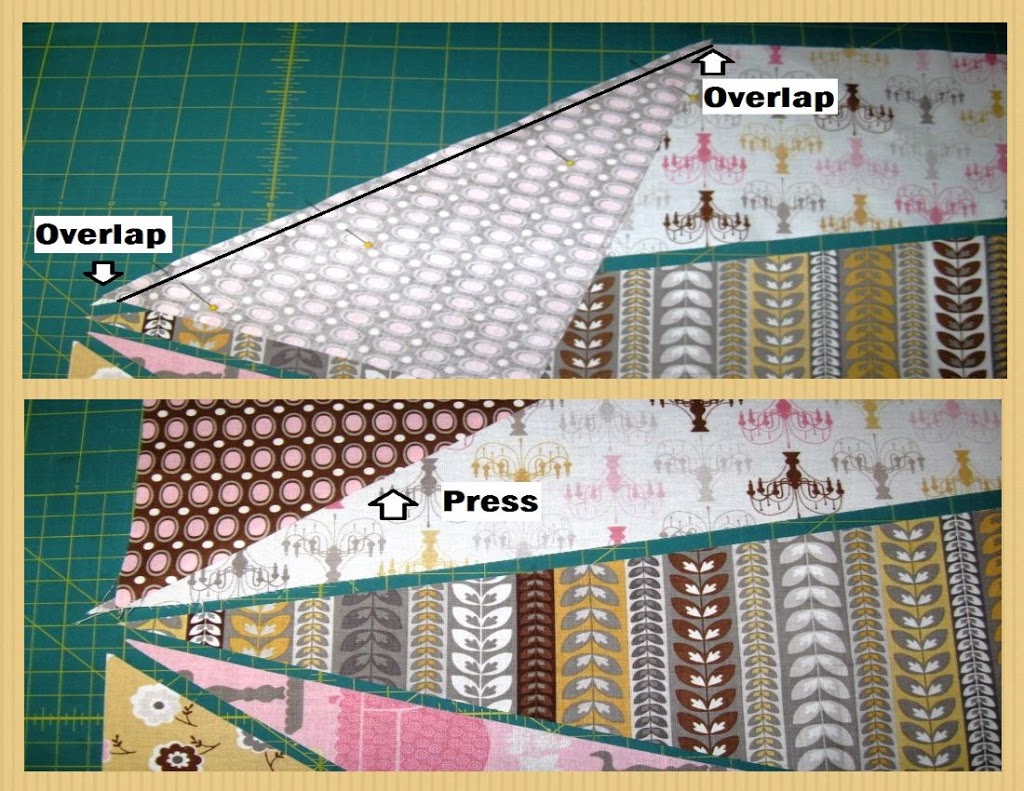
Now lay your third piece onto your sewn pieces with right sides together. Once again, overlap your edges 1/4″. The tails at the start point will line up. Pin and then sew a 1/4″ seam along the edge. Once again Press your seam up. You will notice that the points are not perfect at this stage. Don’t worry, that is the way it is supposed to be.
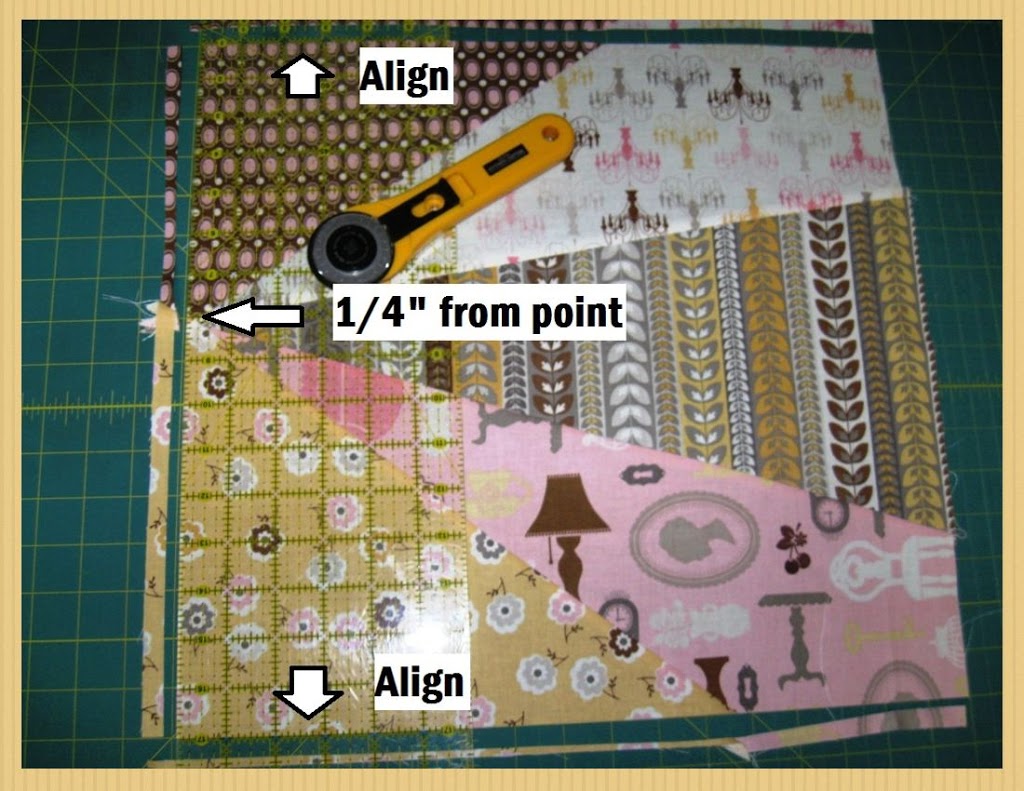
Now, lay your fourth piece onto the sewn pieces with right sides together. This time the bottom fabric will be overlapping on the right hand side and once again, the tails will all line up at the point. Pin and sew a 1/4″ seam along the edge. This time press your seam down. Note that now the white and grey angled come together perfect 🙂

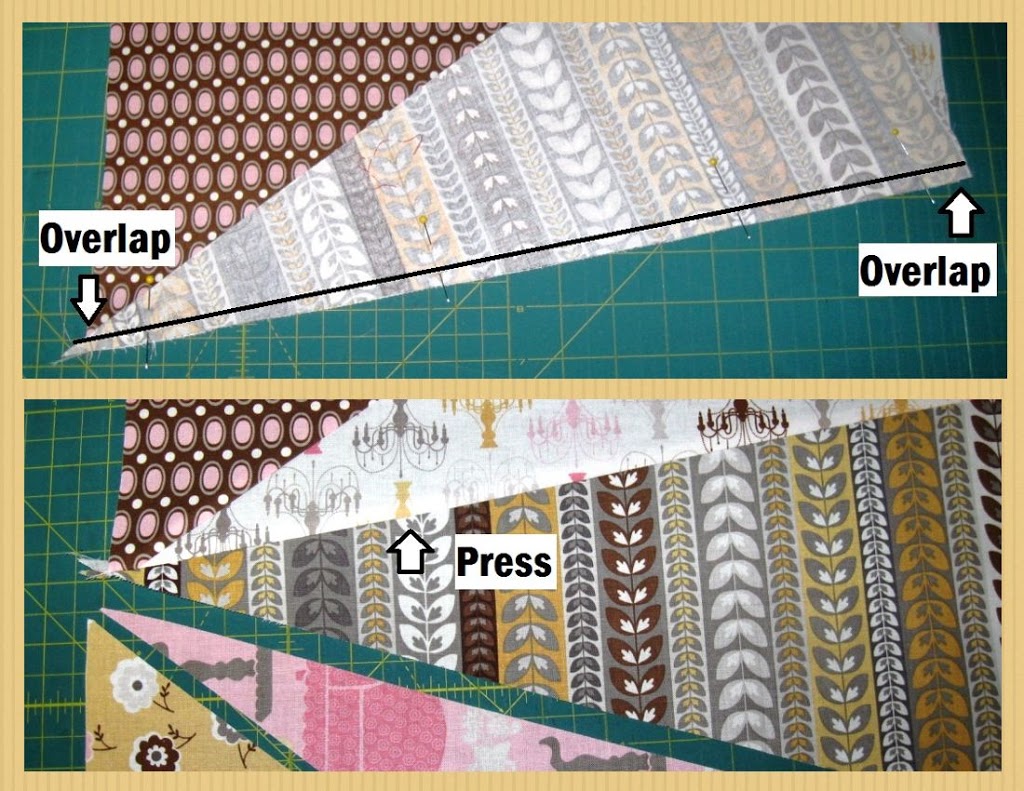
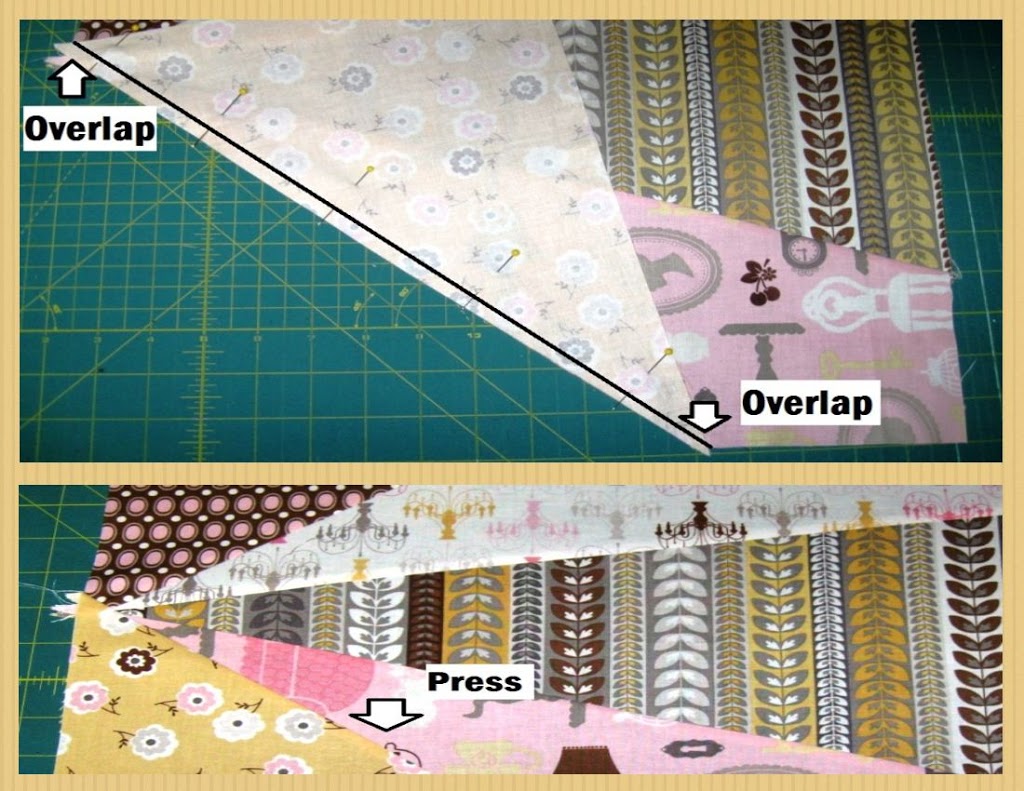
And now, to the last piece. Place the fifth piece onto the sewn pieces with right sides together. This time, the overlap tails will not line up at the point. Pin and sew a 1/4″ seam along the edge and then once again press down. Notice how now the white, grey, and pink points all come together, and then we will trim the block to make them all perfect 🙂
STEP 3 – TRIMMING THE BLOCKS
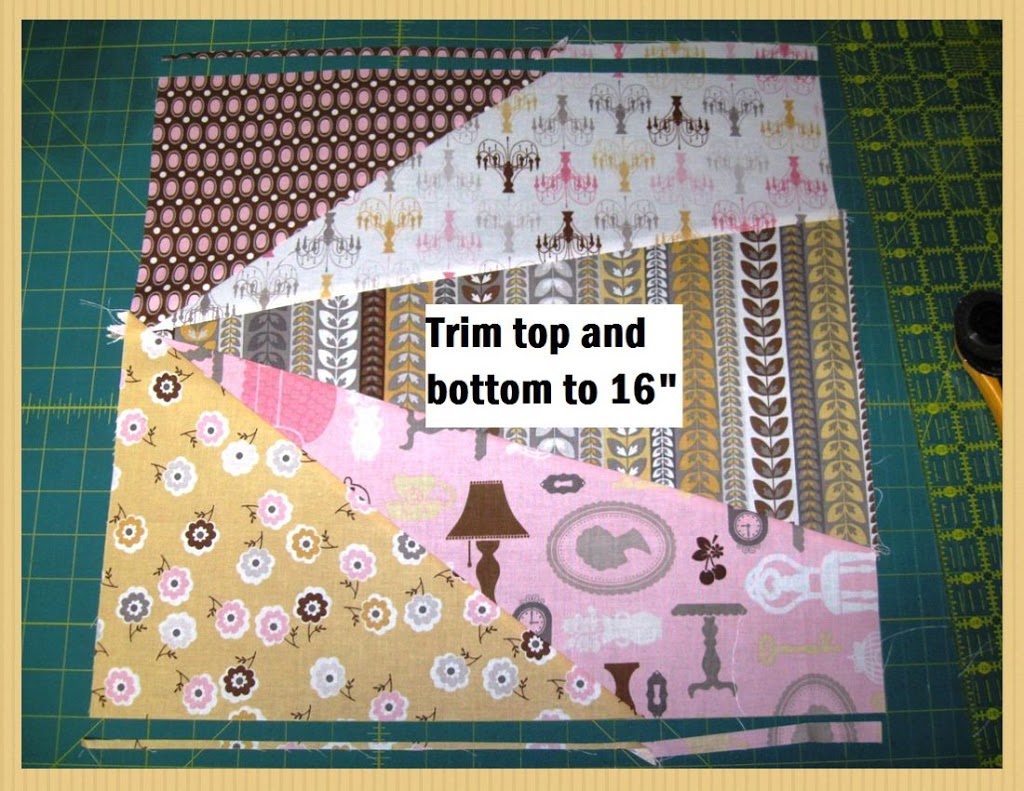
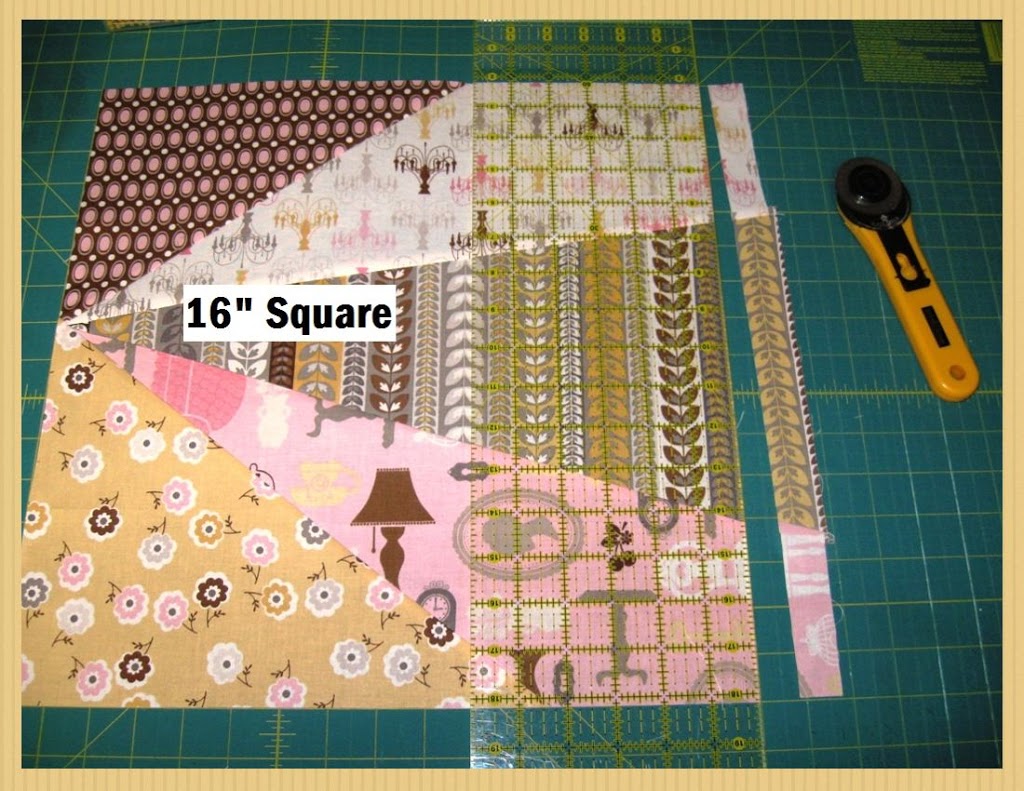
Centering your block on your mat, trim the top and the bottom so that the block measures 16″ tall. There won’t be to much to trim so make sure before you cut that your block is centered and you can trim across the entire top and bottom of the block.
Without moving your block, align your rulers horizontal lines along the top and bottom of your block. This will ensure your next cut is straight. Now slide your ruler towards the left until you have aligned the center point (where the white, grey, and pink all meet up) with the 1/4″ horizontal line on your ruler. Trim along the edge of your ruler.
One final trim. First though, you will need to align your block so the left side, top, and bottom of your block are all aligned with lines on your mat. Now simply measure over 16″ from the left hand side, align your ruler, and trim your block to 16″ square.
If you were chain stitching and trimming assembly line then you will now have 5 blocks done. If you are doing them individually repeat the steps to create the remaining 4 blocks in this set.

Now, repeat steps 1, 2, and 3 for the remaining 4 sets of 5. Be sure when cutting your angles to select different start and end points. This will add variety to your quilt. When you are finished you should have (25) 16″ square blocks.
STEP 4 – CUTTING THE YARDAGE
Cut the 1 1/8 yard of solid fabric into (26) 1 1/2″ x WOF strips. Then sub-cut 10 strips into (20) 1 1/2″ x 16″ strips. The excess can go in your scrap bin. Trim the selvage from the remaining 16 WOF strips. Sew the strips in sets of 2, end to end, to create (8) 1 1/2″ x 86″ strips. Set the sashings aside. (Trust me, when you are ready for them you will be excited that they are ready to go.)

STEP 5 – SEWING THE QUILT TOP
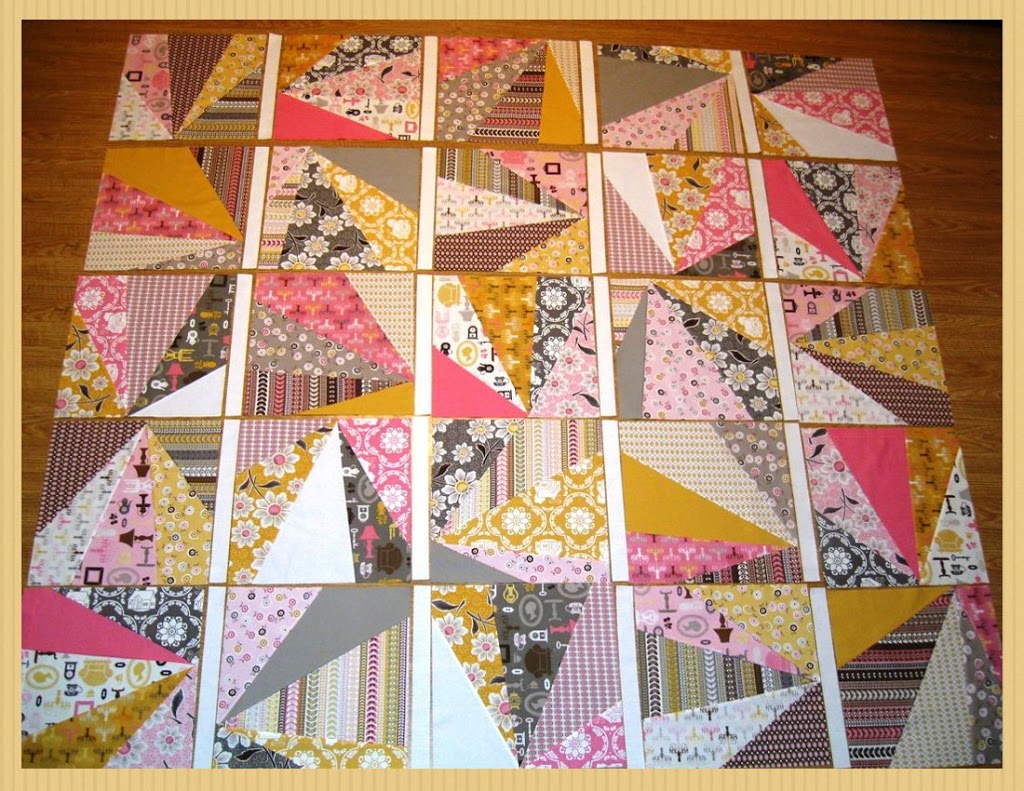
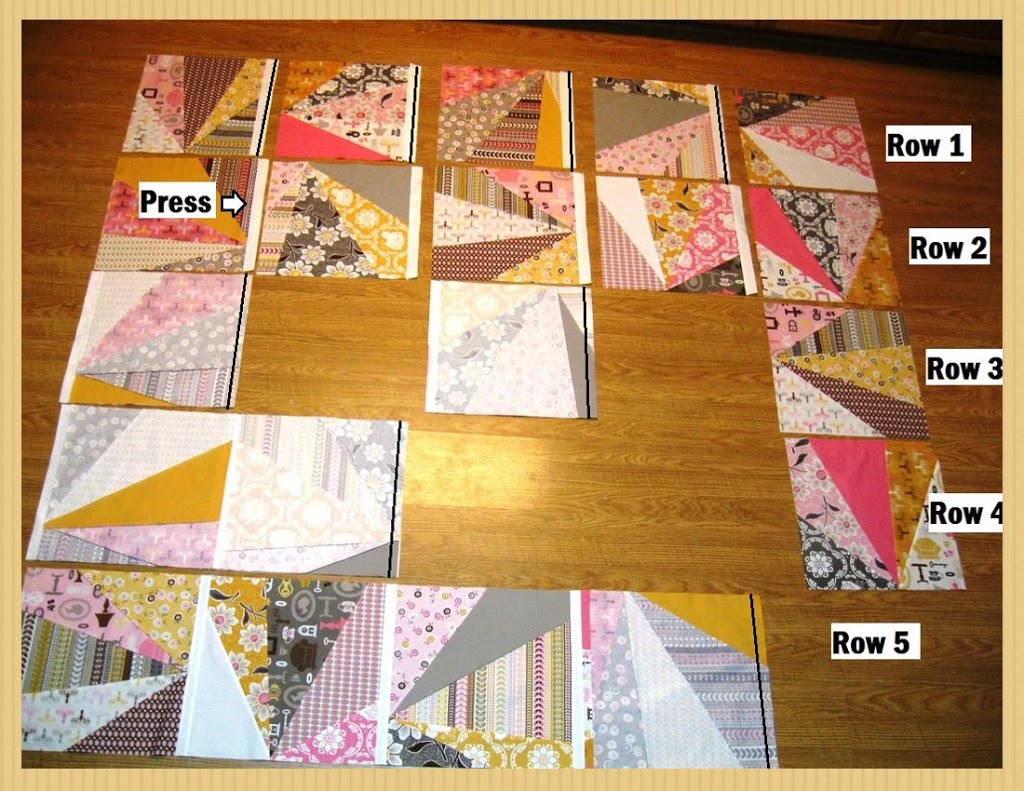
Now with your sashing and your blocks you are ready to put your quilt top together. Start by placing your blocks in a 5 x 5 layout. Spin your angles as much as you like to get lots of variety. Play with the layout until it is pleasing to the eye. Then add a 16″ sashing piece between each of the blocks in the 5 rows as shown.
Now you can sew the rows together. For those beginners, here is how I like to sew my rows 🙂 First, I place the sashing pieces along the right hand side of the blocks with right sides together and then sew a 1/4″ seam along the edge. I don’t bother with pins, just align as you go (Picture in Row 1). Next, I press my seams towards the sashing (Pictured in Row 2). Then I place block 2 onto block 1 and block 4 onto block 3 with right sides together. I sew a 1/4″ seam once again not bothering to pin and then press towards the sashing again (Pictured in Row 3). Now place blocks 3 and 4 onto blocks 1 and 2 with right sides together and sew along the edge and then press towards the sashing (Pictured in Row 4). Lastly, place block 5 onto the end of your row with right sides together, sew a 1/4″ seam, and press towards the sashing (Pictured in Row 5). Repeat for all 5 rows 🙂
Once your rows are made you can sew them together to create your top. This is the same process as doing the rows, just on a longer scale. Start by placing a sashing strip between each of the rows and at the top and bottom of the quilt. Sew the sashings, press, and then trim the excess. Now sew rows 1 and 2 together and rows 3 and 4 together. The one thing you want to watch when you are sewing the rows together is to take care to align the vertical sashings. You will want to pin the rows to ensure they stay lined up. Then repeat this to sew 1 and 2 to 3 and 4. And then finally add row 5. Make sure to always press towards the sashing.
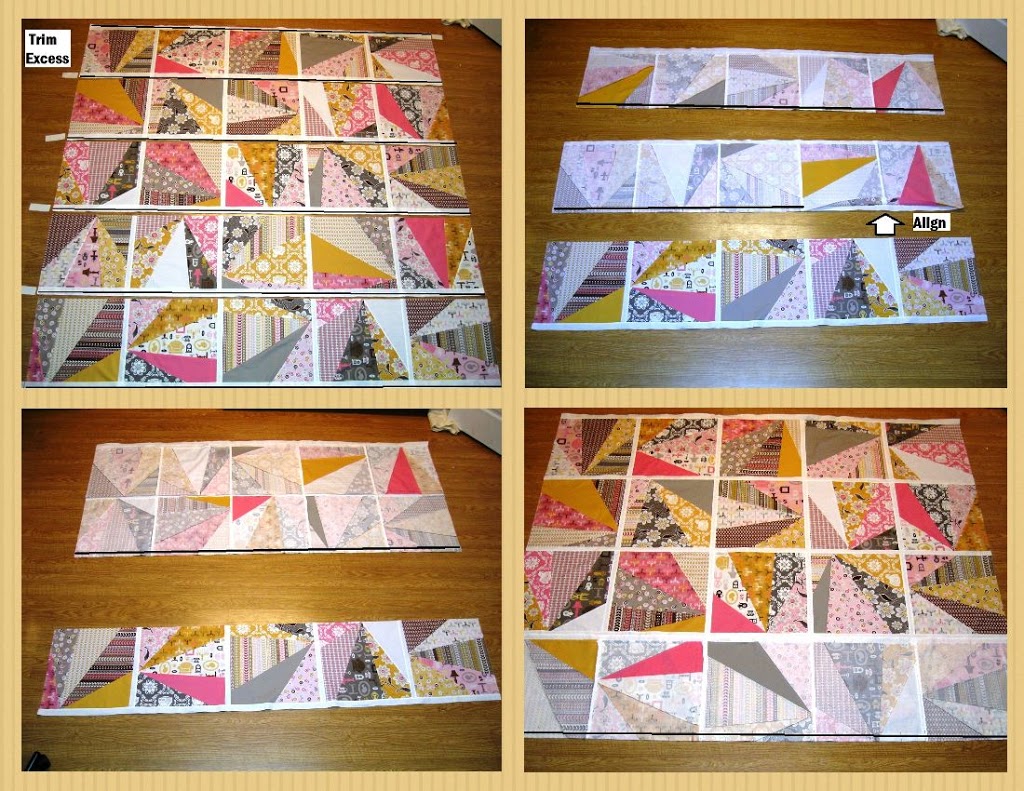
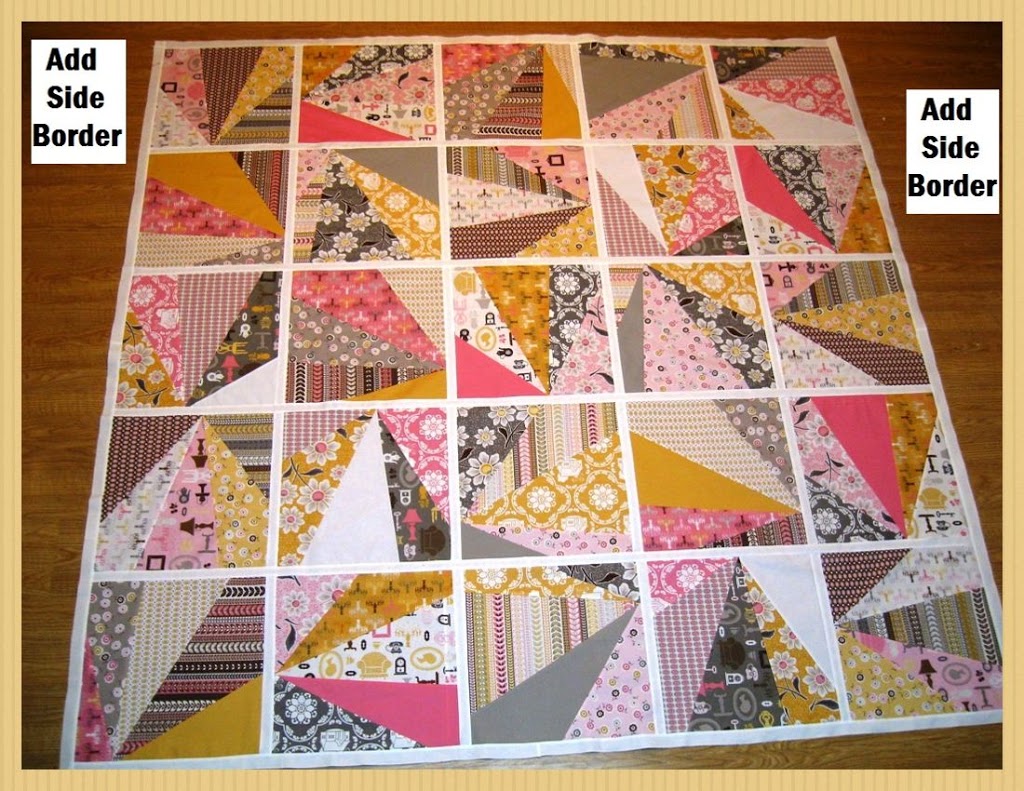
And then all you have left is to add a sashing strip to either side of the quilt finishing your border. Just place the strips onto the quilt sides with right sides together and sew a 1/4″ seam aligning as you go. Trim the excess and press towards the sashing. And your top is complete!!!
STEP 6 – FINISHING IT UP
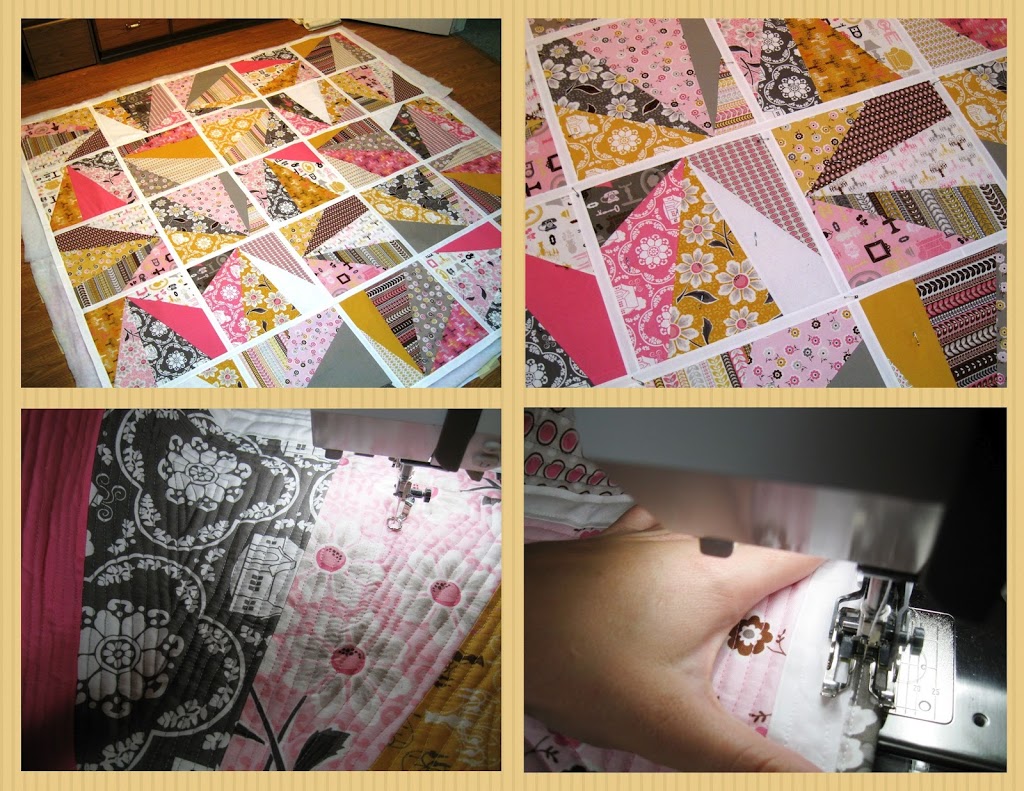
Now to turn your quilt top into a quilt. Make your quilt sandwich. I find these easiest to do if you tape your quilt back to a hard surface. Then baste your quilt sandwich. I use pins to baste but you can use spray, whatever you fancy 🙂 Now on to quilting. I choose to quilt each shape in the block with a straight line echo quilting using my free motion foot. If you want to quilt yours the same way I did mine see the video tutorial below for a quick rundown on how to do it 🙂 And last but not least, use 22 of your remaining 18″ print strips to create a binding strip and then bind your quilt. And you are done!!!
Now just sit back and enjoy your beautiful Refracted Quilt!!! It’s perfect for summer picnics, a bedspread, or just to cuddle up with 🙂

Thank you so much to the wonderful team at U Create for having me here today 🙂 It has been a pleasure!! And if you make your own Refracted Quilt I would love to see it!!! You can add it to my Inspired by Happy Quilting Flickr Group here!!!
Until next time . . . Happy Quilting!!!


What an absolutely beautiful quilt! And she makes it look do-able!!!
Have been looking for the perfect excuse to purchase a big fat quarter bundle…now I have it. Thanks!
What a beautiful quilt. Happy Birthday Melissa
No pinning? Wow you are amazing.
I love this quilt! What a great inspiration…and a great excuse for a new bundle 😉
What a gorgeous quilt! And a beautiful tutorial – well done! Will try this one day…
Love the tutorial and the video, Melissa. I’d love to try that quilting technique!
What a great tutorial! And I love this quilt. It has a modern feel to it and I have the perfect fabrics in mind. Thanks so much for sharing your ideas.
What a beautiful quilt! I love the modern look. I have fabrics in mind and can’t wait to try out this pattern. Thanks so much for sharing your great tutorial!
What a great tutorial!! I love this quilt. It can be made so many ways. Thank you Melissa!!
Fantastic quilt! A great way to use some fat quarters too!
bellissimo! =)
This is gorgeous and would be a great stash-buster.
You don’t know how much I wish I had the patience to quilt. This is absolutely lovely! Good work and thank you so much for posting this :-]
I’m loving that there are instructions on her blog for a child’s size of the same quilt!! Can’t wait to get started!
Great tutorial, can’t wait to get started on my own!
Thank you so much for this! I’m going to use it for a quilt top for one of my kiddos.
My goal for this year was to teach myself how to quilt and I used this pattern to make my first one! The instructions were easy to follow and very forgivable with some of the mistakes I made. It turned out beautiful! Thank you for sharing!
Very unique and stunning quilt and detailed, easy-to-follow tutorial. Thank you! I just finished my refracted quilt top, so I’m onto basting. I used 20 total blocks in mine, at 15″ each so my quilt came out at 65″ x 81″. I wasn’t totally in love with the individual blocks but once I added the sashing it all came together so well. Plus I found the perfect backing fabric, so I’m excited to finish this!