I wanted to make a special friend a baby quilt, but I am not a big fan of the whole binding part of quilt making. So I tried my hand at a bindless baby quilt and to my surprise this it only took my 1 hour to make…start to finish!
![]() Supplies:
Supplies:
1 yard fabric (we’ll call fabric A)
1 1/2 yards coordinating fabric (fabric B)
1 1/2 yards of white flannel (I used this instead of batting)
Matching scraps (if you want to embellish with shapes)
Clear thread

Step 1: Cut 5 inches from the top of Fabric A.
Step 2: Cut a 3 inch strip of Fabric B making sure your strips is the width of Fabric A. You will sew this 3 inch strip to the top of the large pieces of Fabic A. Then sew the 5 inch strip of Fabric A to Fabric B. This creates your quilt top.
 Step 3: Lay your backing (Fabric B) down right side up. Lay you quilt top right side down on top of the backing. Lay the flannel (or batting) on top of the back of your quilt top. Square it off by making sure all sides are straight and equal length.
 Step 4: Pin all the way around except for about a 5 inch opening at the top.
 Step 5: Starting at one end of the 5 inch opening, sew around the quilt stopping at the other end of the 5 inch opening. (1/4” seam allowance).
 Step 6: Clip the corners. Turn the quilt right side out using the 5 inch opening.
 Step 7: Iron the entire quilt nice and flat. Turn the raw edges of your opening under 1/4 inch and press with hot iron. Pin the edges together.
 Step 8: Starting at the pins sew a 1/8” top stitch all the way around the quilt.
 Step 9: Cut 3 coordinating diamonds from your scrap stash (or get some perfectly matching fat quarters at the fabric store). I made my diamonds bigger than the pink strip. Pin the two outside diamonds in place; sew around using your clear thread. This not only looks super cute, but it helps tack both sides of the quilt together while giving the blanket a quilted look. Lastly, sew on the middle diamond.
 Step 10: Just to complete the quilted look, I sewed around random diamonds on Fabric A with my clear thread.
 Step 11: Iron it really good, fold it up and give to baby!
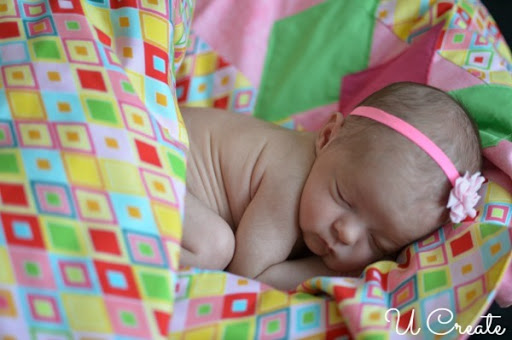 I think she likes it! I loved sewing this and plan to make many more! It was so easy; even a timid sewist can make this quilt!


I didn’t turn the edges of the diamonds under. I like a little fraying on the applique. 🙂 Great question. Thanks for taking the time to leave a comment.
Thanks for your sweet compliment. Give this project a try. You will be amazed at how easy it is.
Beautiful
Thank you! Xx