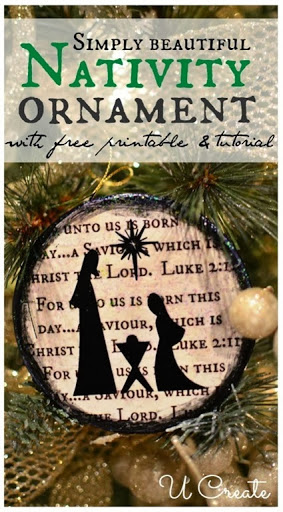
The ornament I decide to create is based on the wildly popular Nativity Stocking Holders I made last year. These ornaments are quick and easy to make…and it’s a craft the kids can help with as well.

I used black vinyl and my Silhouette machine to cut the Nativity image. You can also do a Google search for “Nativity Silhouettes” and pick your favorite image, print it and cut it out. You DO NOT need to use vinyl to make this craft.
Click here to download the Luke 2:11 “For unto us a Child is Born…” printable.

Step #1: Print out the Luke 2 printable. I printed mine 4×6 which fits 2 on a page. However, I will print it even smaller when I make it again. Crinkle up your printed page.

Step #2: Flatten the page out and trace around your ornament. When you cut the circle out make sure to cut inside the line so it doesn’t fit perfectly to the edge of your ornament.

Step #3: Paint the paper mache ornaments. I painted one red, one green and one black. The black is by far my favorite!

Step #4: Once the paint dries, paint a thin layer of Mod Podge on the front of your ornament AND on the back of your paper circles. This helps prevent the paper from bubbling when you glue it to the ornament. Lay the paper circles on the front of the ornament and smooth it out. You can still see wrinkles in the paper, don’t worry.

Step #5: Paint a thin layer of Mod Podge on the top of the paper circles. {I used Antique Matte Mod Podge; it creates a little yellowing look.}

Step #6: Once the Mod Podge is dry, apply the vinyl. Take the paper backing off to reveal the sticky side of the vinyl. Center it and lay it on top of the ornament. Using your fingers, press the black vinyl down really well. Slowly lift the transfer paper off starting in one corner and working diagonal.


Step #7: Paint the edges of the paper black to create a kind of frame around the Holy Family.

Step #8: I added a thin layer of clear glitter paint on top of the finished product just to add more of a Christmas/snowy feel.

This would be so cute tied to neighbor gifts, teacher gifts, or presents under the tree.
POST BY:


so pretty!!! I love the finished product and so simple too. I have some glitter mod pogde that I should use to do something like this :o) EMily@nap-timecreations.com
This ornament is so cute! Thank you for posting this! I love how it matches the stocking holders I made a few weeks ago. Do you mind letting us know where you bought the wooden circle ornaments? I was thinking of trying Hobby Lobby. Thanks!
Emily, I got the circle ornaments at Michael’s. They are paper mache and were hanging by the other DIY ornament stuff. Hope that helps.
this is great! I have a glass ornament that I bought a few years ago to paint like stained glass, but never got around to it. I am going to give this a try with that. If it works as well as I’m thinking, then I will have to make some more for my cookie exchange, after Christmas. It will make a nice take home for the ladies attending. In addition to the cookies, of course. 😉
Is your nativity scene from the Silhouette store? I love it 🙂
Where do you get the vinyl pieces?
I would love to have my sunday school class make these!
Lisa
How do you Mod Podge over the scripture print without the ink smearing? tia!
Hi Terri,
I don’t use a ton of Mod Podge so it doesn’t smear much.
Will you have the vinyl silhouettes available in this size for this craft in your Etsy shop?
This is so adorable! What a great idea for neighbor gifts, or just for fun!
Just out of curiosity, do you have an editable version, or would you be able to make one that says For unto “you” is born this day…? We read the King James version of the Bible and it says “you” instead of “us”. If not, no worries. Just thought I’d see.
Thanks!
Sorry, it’s not an editable version. I thought I copy and pasted it from the King James bible text…oops.
These are so beautiful and I would love to make them with my class. Would you know the diameter of the paper mache circles?