U Create

It's a good day to create!

  • pinterest
  • facebook
  • instagram
  • twitter
  • rss
  • crafts
    • crochet/knit
    • jewelry
    • kids crafts
    • paper crafts
    • sewing
      • bags
      • boys-clothing
      • girls-clothing
      • women-clothing
      • pillows
      • quilts
  • home decor
    • bathroom
    • build it
    • frames
    • kids
    • kitchen
    • office
  • recipes
    • desserts
    • dinner
    • snacks
    • soups
  • parties
    • baby shower
    • birthday
    • games
    • gift wrapping
    • party decor
    • party favors
  • printables
  • holidays
    • Christmas
    • Easter
    • Father’s Day
    • Halloween
    • July 4th
    • Mother’s Day
    • New Years
    • St. Patrick’s Day
    • Thanksgiving
    • Valentine’s Day
  • gifts
    • baby
    • electronics
    • graduation
    • teacher gifts
  • About
  • Be My Guest
  • Advertise
  • Contact
  • pinterest
  • facebook
  • instagram
  • twitter
  • rss

12 Nov

Frosted Pear Ornament Tutorial

Frosted Pear Ornament Tutorial by Sand and Sisal

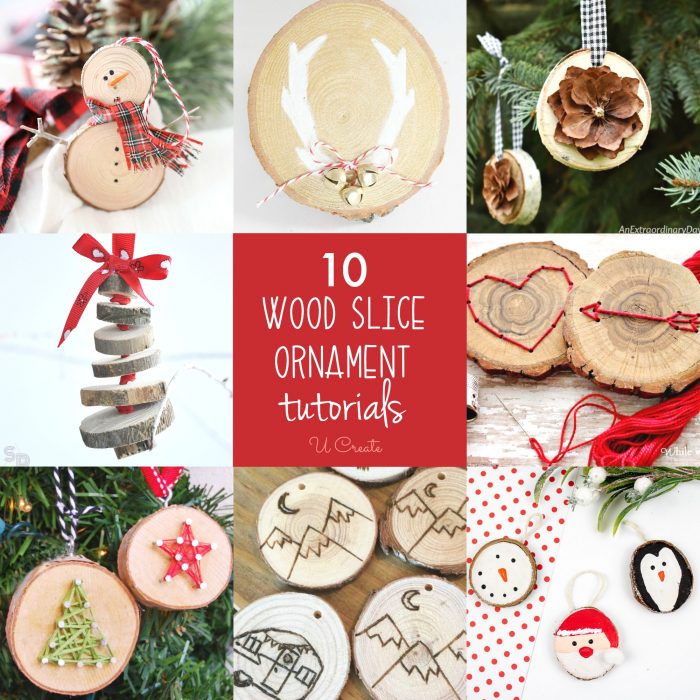
Sending sandy, sea salt breezy greetings from Sand & Sisal to y’all! I’m so honored to be here on U Create today. Kari featured my blog and my PB NOEL Sign the very 1st week I launched my blog years ago, and helped put me on the bloggy-map and I’m forever grateful to her for her generosity.

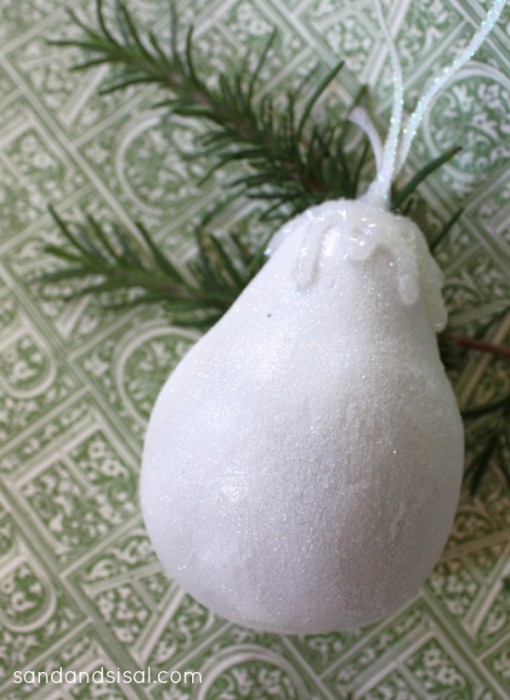
I love easy, beautiful decor crafts. Today I want to share with you how to make these simple and pretty Frosted Pear Ornaments.

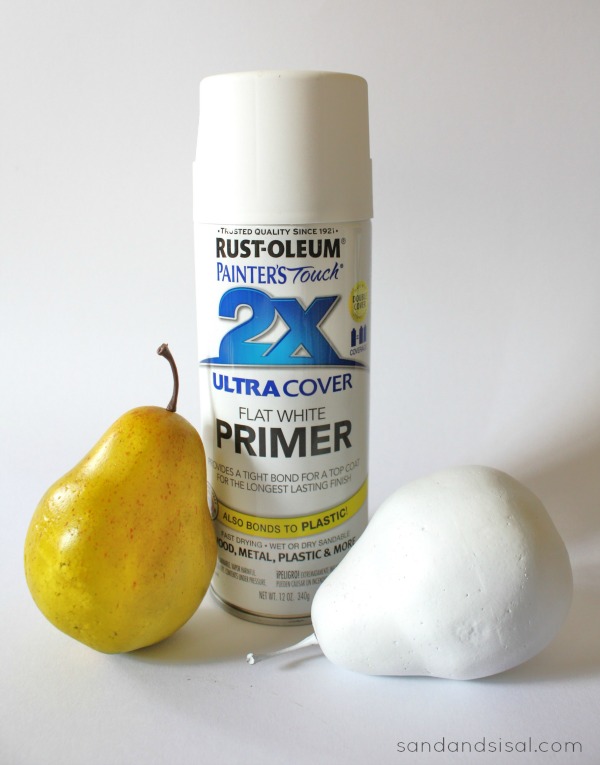
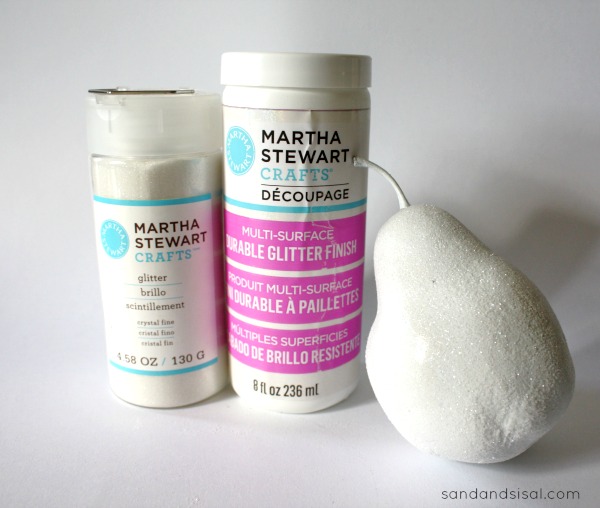
To make Frosted Pear Ornaments you will need the following items:

  • faux decorative pears (available at most craft stores, or big box supermarkets)
  • white spray primer or white craft paint
  • ultra fine white glitter & white tinsel glitter
  • decoupage medium (Martha Stewart Glitter Decoupage or Mod Podge)
  • hot glue gun
  • ribbon

STEP 1) Spray your faux pears with a nice coat of white primer or feel free to use white craft paint. Allow to dry.

How to make frosted pears ornaments

STEP 2) Coat the pears with a layer of decoupage medium. I used the Martha Stewart Glitter Decoupage.

STEP 3) While still tacky, sprinkle the ultra fine white glitter over the entire pear surface. Allow to dry.

Christmas Ornaments - Frosted Pears

Step 4) With your hot glue gun, drizzle a layer of hot glue over the top of the pear, so it looks like frosting dripping down. Immediately sprinkle the hot glue with the white tinsel glitter.

Frosted Pears

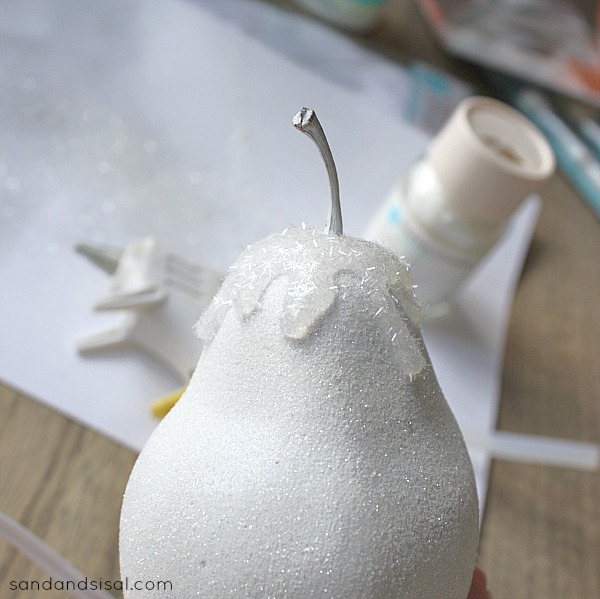
Step 5) Create a loop out of ribbon and hot glue the ribbon to the base of the stem.

Frosted Pear Ornament

These Frosted Pear Ornaments are very easy to make in a short amount of time and will stand sparkle with a pearly shimmer on any wreath or Christmas tree.

For more holiday decor ideas, you are welcome to come over and visit Sand & Sisal! I’d love to hear from you!

Happy Crafting!

Kim

10 Wood Slice Ornament Tutorials
Clothespin Snowflake Ornament Tutorial

You may also like these

Christmas coloring poster and pages by U CreateMerry Christmas Coloring PosterChristmas ornaments - free embroidery patterns by U CreateEmbroidered Christmas OrnamentsChristmas Holiday Coloring PosterHoliday Christmas Art Set -- free download by U CreateHoliday Christmas Art PrintablesFree Printable "Color Your Own" Christmas BannerMerry Christmas Coloring Banner
Previous Post: Nativity Ornament Tutorial
Next Post: DIY Mod Podge Ornaments

Comments

  1. Kari Sweeten says

    November 12, 2013 at 7:06 PM

    Gorgeous, classy ornament Kim. Thank you for sharing your never-ending talent with us today!

    reply to this comment >
  2. Zoe Cayetano says

    November 12, 2013 at 7:25 PM

    Ohh lovely! Love this.

    xoxo Zoe
    http://thatszoe.blogspot.com/

    reply to this comment >
  3. Dee D says

    November 12, 2013 at 6:02 PM

    That is an awesome idea. I am so going to try this. Thanks for sharing.

    reply to this comment >
  4. Carol says

    November 12, 2013 at 6:11 PM

    Absolutely beautiful!

    reply to this comment >
  5. Becky Marie says

    November 12, 2013 at 6:53 PM

    Oh my…that is so elegant! Great job!

    reply to this comment >
  6. Crow's Creek Primitives , Vintage Burlap Lace and Lavender , The Crafter's Nestled Nook says

    November 12, 2013 at 8:36 PM

    Love it ! TFS

    reply to this comment >
  7. Rohan Singh says

    November 13, 2013 at 7:45 AM

    Well, I really fond of craft items and I love to use those. Mostly I like wooden handicrafts as these are available in a wide range and are very beautiful. This is also a great crafted creation and thanks for availing us with the tutorial as well.

    reply to this comment >

Leave a Comment Cancel reply

Your email address will not be published. Required fields are marked *

Recipe Rating


Popular Posts

DIY Mothers Day Vase

DIY Mothers Day Vase

DIY Mother's day painted herbal pots

DIY Painted Herb Pots for Mother’s Day

DIY Pressed Flowers for Mother's Day

DIY Pressed Flower Frame: A Beautiful Handmade Mother’s Day Gift

Handprint Mother's Day Gifts Tutorial

Modern Mother’s Day Handprint Art (Grandma version, too)

“Open When” Letters for Mom (A Meaningful Mother’s Day Gift Idea)

DIY Heritage Recipe Block Tutorial for Mother's Day

DIY Heritage Recipe Blocks: A Sentimental Mother’s Day Gift

  • pinterest
  • facebook
  • instagram
  • twitter
  • rss
 
Privacy Policy
Back to Top

Copyright © 2026 U-Create • All Rights Reserved • Site Design by Emily White Designs