
I can scarcely believe that I have the honor and the privilege to be guest posting here at Ucreate today! Kari’s blog has been on my must-read list for longer than I can remember. I am absolutely thrilled to be here!
My name is Amy, and my little corner of the blogging world is known as Positively Splendid. My goal is for my blog to be a little haven of crafting and DIY inspiration, and a place where creative people of all skill levels can come and feel right at home. Because I feel strongly that everyone should be equipped to create something beautiful on their own, each and every project at Positively Splendid is explained to the last detail with step-by-step photo tutorials. I like to think of each tutorial as sitting down with friends to learn something new together! I would love for you to stop in for a visit!
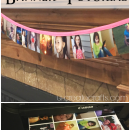
Today I’m going to share a tutorial for a set of darling mix-and-match dress-up canvas wall hangings I recently made for my daughter’s room. If you ever loved playing with paper dolls when you were little (or if you still do!), you will absolutely adore this project!

Ready to see how to make your own set? Let’s get started!
For this project, you will need…
Hanger Printable Dress Piece Templates (3) 12-inch canvases
Acrylic paint and foam brushes
Painter’s tape Ink-jet iron-on transfer sheets
Fusible Peltex (a very heavyweight type of interfacing)
Various fabrics
Dress piece templates
Coordinating thread
Basic sewing supplies: machine, shears, etc.
Hot glue
Ribbon, rhinestones, buttons and other embellishments
Prep Work
Paint a 2-inch border around the perimeter of each canvas, making sure to paint on the sides, as well. Use your painter’s tape to ensure nice, crisp lines. Allow your canvases to dry completely.
step 1 Print the hanger printable linked above onto an iron-on transfer sheet. (Consult the product packaging for printer settings.) Now, cut as closely as possible all the way around each of your hanger designs. Position a hanger at the top center of each canvas, and iron each into place. (Be sure to use a pressing cloth to avoid getting paint on your iron.) Peel away the backing paper from your transfers.

step 2 Fuse your Peltex to the wrong side of your fabrics according to the product instructions. Trace your dress piece templates onto the interfacing side of your fused fabric. To make three canvases, you will need 6 pieces total: 3 main dress pieces and 3 bottom pieces. Be sure to mix and match the fabrics you use as you are tracing so your dresses turn out nice and vibrant! Cut out all of your dress pieces. Head to your sewing machine and carefully edge stitch all the way around the perimeter of each piece. This stitching is purely decorative, but it really does make this project shine!

step 3 Now, the dress-up fun really begins! Embellish your dress pieces with ribbon “belts” and buttons, rhinestones, gems, or whatever else suits your fancy. When applying the ribbon, I recommend using hot glue to adhere it to the back of your piece to conceal the raw edges. Use 1/4″ ribbon to make two dress “straps” and adhere them to your canvas with hot glue, as shown. Also hot glue each of the bottom dress pieces to its respective main dress piece. Now, hot glue the entire dress to your canvas with hot glue. You are finished!

I gussied my canvases up even more with a bit of ribbon tied around the top corner of each. The bold, bright colors here make me smile! As I mentioned earlier, I made this set for my daughter’s room, but I think these would be terrific in a sewing/craft room, too!


Very Cute!
Thank you! I just saved those. I’m sooo gonna do them in my craft area using my own fave fabrics. What a chic idea.
Love, Amy!
Love this idea!
Love how she writes tutorials!
Love transfer paper and canvas!
Love playing paperdolls!
I’m in love!
This would look fabulously fantastic in my daughter’s Paris room with adjusted colors of coarse! MmmAzing!
Wow!! What a great idea! These are perfect!
Absolutely adorable, Amy! I love the bright colors and the dimension of all of the elements you used. Fabulous!
Those are way cute! I love them!
Krystine
http://lucyluvinyl.blogspot.com/
Great project Amy!! Love these! 🙂
What a great idea! I love them!!
These are fantastic, little girls and big girls would just love them!! I wonder if I can persuade hubby that I need a daughter!
These are adorable, but I’m not surprise…Amy always make the cutest stuff!
These are so stinkin’ cute! I love them!
Amy, these are just darling! Love the mix of pattern and colors. Too cute!
This is an adorable idea. Great job! I’ve got a friend who LOVES to buy clothing and these would be super cute to give her as a gift to hang in her dressing area. LOVE THIS! Thank you.
That is such a gorgeous idea! I’m saving this for my daughter’s big girl room (she’s only 5 months, so it could be a while…maybe I’ll make some for my craft room in the meantime!).
these are SUPER cute!! once i get *my* own crafting/sewing room, these would be perfect for my walls! 🙂
This is the cutest thing i’ve ever seen! If i had a daughter, i would do this right now! I’m faving it for later for sure!
Absolutely darling! I want to re-do my daughter’s room now:o)
SOOOO excited to make these! THANK YOU!!
I can’t wait to make these!beautiful craftsmanship.
Thank you for this post! It is the perfect gift for my niece! I only hope mine will look somewhat what yours looks like!
I featured you today! Woot Woot! 🙂 Graat job!
Amanda
http://www.todaystoptwenty.blogspot.com
Hi, Amy!
I loved your projects with this cute dresses!!! I loved all details!!!
Thanks to the tutorial.
Hugs.
Marlei
Hi Amy,
What a great idea. To be honest i was a little worried when you mentioned you will need a sewing machine as i dont have much experience.
I also tried making something for my daughters wall and i found a really neat site which saved me from all the sewing.
They sell iron on fabric sheets. I have only used the glitter sheets and i got to say it really only took me a few minutes to cut and iron the dress on. I hope this helps someone who is not as skilled as amy. hehe.
To be honest i just got laze. hehe.
Thanks amy for the idea. Its given me something to do with my little one.
Roxy
I love these canvas art projects- they are so ‘girlie’ and remind me of the paper dolls of the 70’s, but more glam:)- I can’t find a printable for the dresses or hanger, though, and I think my daughter and friends would like to make these for their dorm.AllI get is tons of ads, and no template.I know you have sponsors and have to display their ads, but I dont see anything elssseCan you advise?