U Create

It's a good day to create!

  • pinterest
  • facebook
  • instagram
  • twitter
  • rss
  • crafts
    • crochet/knit
    • jewelry
    • kids crafts
    • paper crafts
    • sewing
      • bags
      • boys-clothing
      • girls-clothing
      • women-clothing
      • pillows
      • quilts
  • home decor
    • bathroom
    • build it
    • frames
    • kids
    • kitchen
    • office
  • recipes
    • desserts
    • dinner
    • snacks
    • soups
  • parties
    • baby shower
    • birthday
    • games
    • gift wrapping
    • party decor
    • party favors
  • printables
  • holidays
    • Christmas
    • Easter
    • Father’s Day
    • Halloween
    • July 4th
    • Mother’s Day
    • New Years
    • St. Patrick’s Day
    • Thanksgiving
    • Valentine’s Day
  • gifts
    • baby
    • electronics
    • graduation
    • teacher gifts
  • About
  • Be My Guest
  • Advertise
  • Contact
  • pinterest
  • facebook
  • instagram
  • twitter
  • rss

19 Nov

DIY Geometric Ornaments

DIY Geometric Christmas Ornaments by Owens Olivia

Hello U-Create readers!  I am Nancy, and I blog at owen’s olivia.

If you pop over, you will find me sewing while also trying to redecorate my home.   But, I typically don’t sew for my home.

Today’s tutorial is super easy.  Like easy peasy.  You can try this with tweens and older, but the gluing may be more difficult for younger crowds.   Let’s get started!

Geometric Ornament Tutorial by Owens Olivia

Supplies:

– Print out your shapes for free here.

– 80 lb weight paper, or greater (The higher the weight, the less fragile your ornament will be.)

– Craft adhesive spray

– Decorative paper, fabric, and/or pens

– Hot glue

– Needle with a large eye

– Small wood beads

– DMC Pearl floss, or embroidery floss
1.  Spray adhesive to the wrong side of your decorative paper.  Press firmly onto your 80 lb weight paper smoothing out any wrinkles.

2.  Tape your template onto a window with good light.  Place your decorative paper right side down onto the template.  Trace the pattern.  (If using decorative paper with heavy print, I would trace first, then glue the heavier weight paper on second.)

How to Make Geometric Ornaments by Owens Olivia

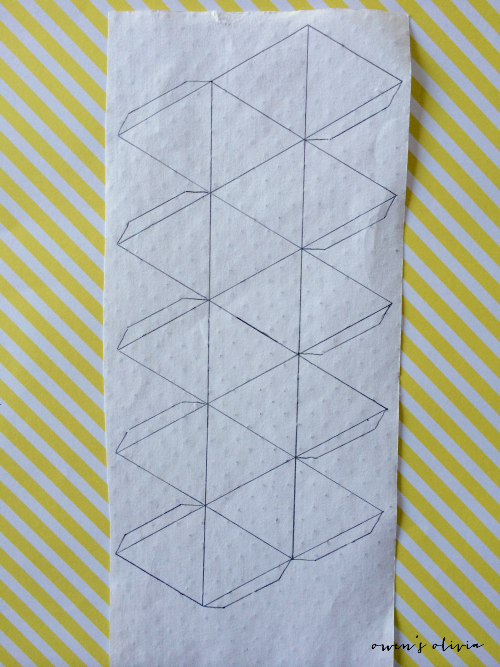
3.  Cut out the template, and score along each line.

Ornament Tutorial

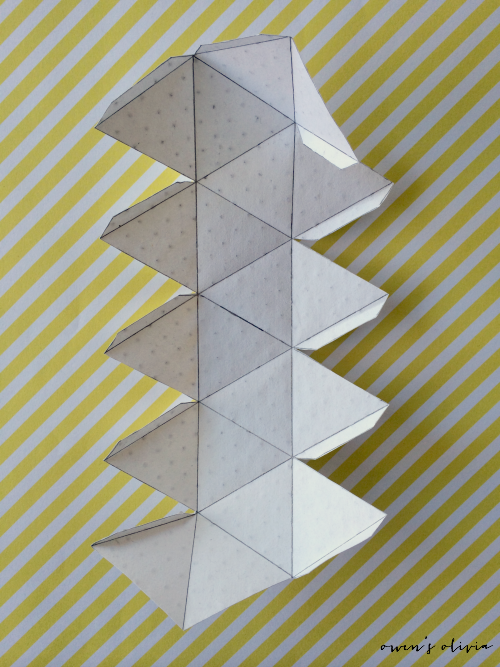
4.  Glue the pieces together as indicated in the printout.  You can also fold the paper together, and it should sort of come together on its on.  Stop about three quarters of the way to insert the string.

5.  Take a long piece of thread and fold in half.  Place it inside of the ornament so the there is a loop at the top and tails coming out of the bottom of the ornament.  Glue the string into place.  Finish gluing the ornament together.

6.  Take another piece of thread and tie a knot around the bottom of the ornament.  This will help give the tassel a fuller look.  Add as many threads as you would like.

7.  Thread your needle with the tassels and run it through the bead.  Tie of the string at the bottom of the bead, if necessary.


DIY Geometic Ornaments by owens olivia

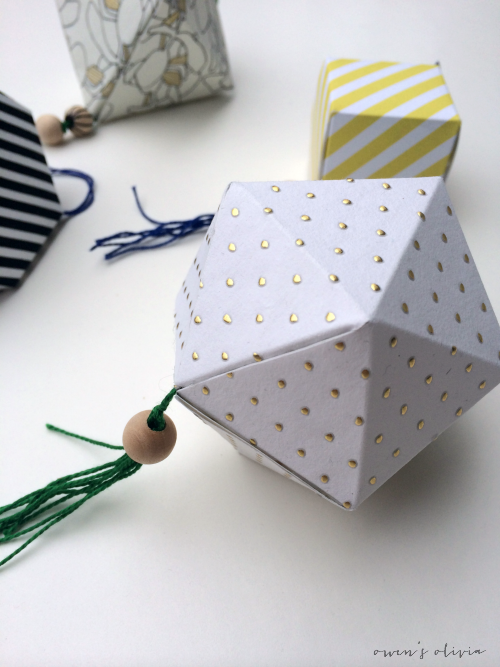
Super easy, right?!  There is so much you can do with these.  You should also check out my Felt Acorns, which can be used as ornaments or as a decorative item on its own.  Find the tutorial here!

xx nancy

Felt Acorn Tutorial

You may also like these

Christmas coloring poster and pages by U CreateMerry Christmas Coloring PosterChristmas ornaments - free embroidery patterns by U CreateEmbroidered Christmas OrnamentsChristmas Holiday Coloring PosterHoliday Christmas Art Set -- free download by U CreateHoliday Christmas Art PrintablesFree Printable "Color Your Own" Christmas BannerMerry Christmas Coloring Banner
Previous Post: Do You Want to Build a Snowman
Next Post: Quilted Christmas Ornament Tutorial

Comments

  1. Ursula says

    November 19, 2014 at 8:52 PM

    These geometric ornaments are darling! In the past I’ve thought of making a few from an old pin but the instructions were a little overwhelming. Thank you for the easy to follow tutorial 😉 pinning

    reply to this comment >
  2. Tanya says

    November 20, 2014 at 3:02 AM

    These are so beautiful!!

    xoxo, Tanya
    twelveOeight

    reply to this comment >
  3. Sarah @ Just the Bees Knees says

    November 20, 2014 at 6:26 PM

    Love these Nancy!!

    reply to this comment >
  4. Susan the farm quilter says

    November 21, 2014 at 5:07 AM

    These are adorable and perfect for anyone’s home decorating this Christmas!!

    reply to this comment >
  5. Kari Sweeten says

    November 24, 2014 at 8:14 PM

    Nancy your ornaments are amazing! Thanks for sharing your awesome tutorial with us today!

    reply to this comment >

Leave a Comment Cancel reply

Your email address will not be published. Required fields are marked *

Recipe Rating


Popular Posts

Fathers Day Printable Interview by U Create

Father’s Day Interview Printable Kids Can Fill Out

DIY Mothers Day Vase

DIY Mothers Day Vase

DIY Mother's day painted herbal pots

DIY Painted Herb Pots for Mother’s Day

DIY Pressed Flowers for Mother's Day

DIY Pressed Flower Frame: A Beautiful Handmade Mother’s Day Gift

Handprint Mother's Day Gifts Tutorial

Modern Mother’s Day Handprint Art (Grandma version, too)

“Open When” Letters for Mom (A Meaningful Mother’s Day Gift Idea)

  • pinterest
  • facebook
  • instagram
  • twitter
  • rss
 
Privacy Policy
Back to Top

Copyright © 2026 U-Create • All Rights Reserved • Site Design by Emily White Designs