Tools: Mod Podge, Wood Block, Scanner, Paint Time: 30 Minutes. Difficulty: Easy.
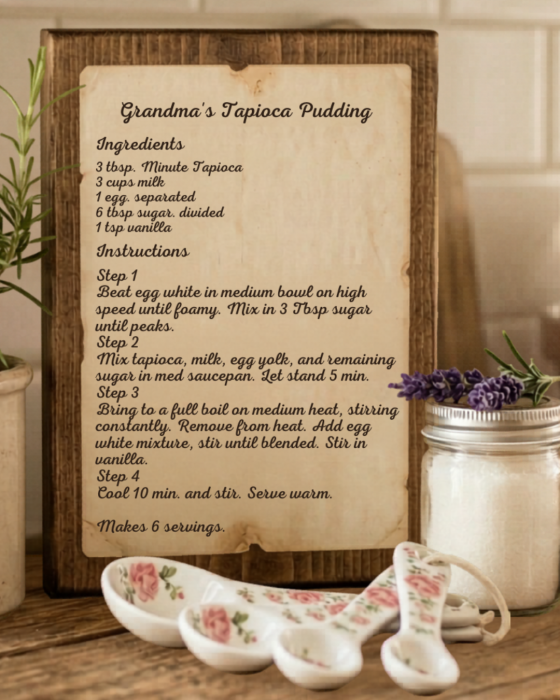
There is something beautiful about making a favorite family recipe that has been passed down through generations. Memories in the kitchen are priceless and a recipe can bring all of those good feelings back. One of my very favorite thing I remember my grandma making when I was a child and until the end of her life was her tapioca pudding. I can smell it when I think about it and it was such a comfort food that my siblings and I cherished. She has since passed and we make her tapioca every year on her birthday. It’s a special tradition.
I wanted to share a way to honor that history and keep those recipes alive in a beautiful, decorative way that would also be a great Mother’s Day gift.
Today, I’m showing you how to make a DIY Heritage Recipe Block and it’s the easiest way to transform an old recipe into priceless kitchen decor. This project is inexpensive, sentimental, and best of all, can be completed in about 30 minutes!
Grab your Mod Podge and your printed recipe and let’s create something special for Mom or Grandma.
Supplies
- An Original or Printed Recipe Card: The real star of the show. (Tip: If you don’t have an original, type it out in a beautiful script font and use the same steps!)
- Wooden Block: You can use 4×6 or 5×7 scraps from your garage (just sand the edges!), or buy pre-cut wooden plaques or blocks from the craft store.
- Matte Mod Podge: This is my go-to for a clean, non-shiny finish that feels professional.
- Foam Brush: For smooth, even coats.
- Acrylic Paint or Stain: For painting or staining the edges of the block.
- Sandpaper (optional): To distress the edges.
- Clear Spray Sealant (optional): For extra protection against kitchen splashes.
DIY Heritage Recipe Block
Step 1: Prep Your Recipe Card
Start by choosing a recipe you want to preserve. I used my grandma’s tapioca pudding recipe, which made this project feel especially meaningful. You can use a handwritten card if you have one, or type the recipe and print it in a vintage-inspired style.
Step 2: Prep the Wooden Block
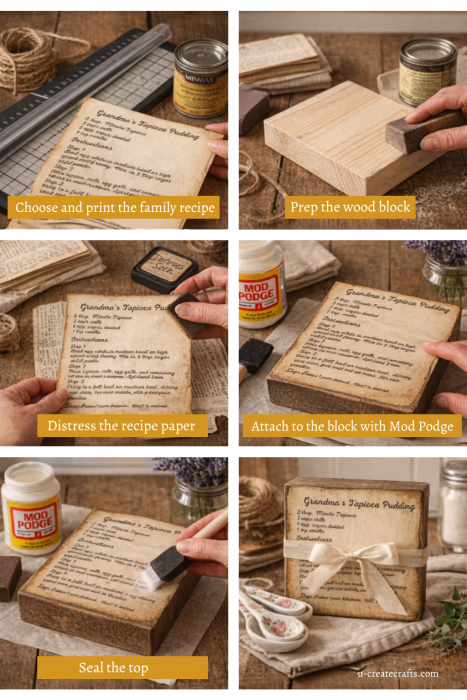
Cut your wood block to the size you want and sand the surface until it feels smooth. If you’d like an aged or rustic look, you can lightly stain the wood before adding the recipe. Let it dry completely.
Print your recipe on cream or vintage-style paper, then trim it to fit your block. To give it an heirloom look, gently distress the edges with brown ink or lightly rub the edges with sandpaper.
Step 3: Apply the Recipe with Mod Podge
Brush a thin, even layer of Mod Podge onto the front of the wood block. Carefully place the recipe on top and smooth it out with your hands so there are no bubbles or wrinkles. Let it dry.
Step 3: Apply Sealer and Distress
Once the paper is dry and attached well, brush a light coat of Mod Podge over the top to seal it. If you want an even more worn, vintage finish, you can lightly sand the edges again after it dries.
Let everything dry completely before displaying your recipe block in the kitchen, on a shelf, or as part of a Mother’s Day gift.
A Meaningful Mother’s Day Gift
I love how this project turns a meaningful recipe into something you can actually see and enjoy every day. It would make such a thoughtful gift for a mom, grandma, sister, or daughter.
TIP: You could even pair it with measuring spoons, a favorite baking dish, or the ingredients to make the recipe for an extra sweet Mother’s Day gift.
Happy Creating!


Leave a Comment