I can’t even tell you how excited I am about being here on Ucreate! I feel like royalty. Kari asked me to share a little about me and my shop. So here goes. I learned to crochet when I was little. My mom has AMAZING patience and took the time to teach me. I was terrible. Later on when I was pregnant with my first baby I decided to pick it back up and try a blanket (scary!) for my new little one. I was greatly improved and fell instantly in LOVE with crochet! Through the years I have started making my own patterns and some (ok about a million) gifts for people I love. Finally opened my Etsy shop Made by Heather B, and here I am now!
I love to share my talent with others and I love introducing people to the art of crochet. I always feel that we should use our talents to help others. I came up with the idea that I could make beanies for people that may need them to do a little to give back. It is one of the few things I can do from home with three small kiddos running around and makes me feel like I am doing something to give back. I love my family, I love helping others, and I love crochet! On to the tutorial . . . .
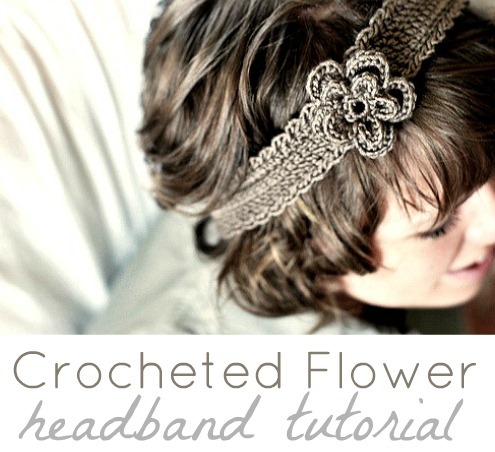
Medium Width Crocheted Headband with Flower
Materials needed:
Size F (3.75mm) crochet hook
3 oz Worsted Weight yarn
Blunt yarn needle (tapestry needle)
Scissors
1 – 5/8 or 7/8 button
Thread for sewing the button on.
Abbreviations:
Ss: slip stitch
Sc: single crochet
Hdc: half double crochet
Dc: double crochet
Htc: Half triple crochet
Pattern:
This item is made to fit the individual; therefore there no EXACT numbers are given.
Chain LOOSLY until the chain measures about 1 inch short of the length around your head UNSTRETCHED.
Row 1: Hdc in second chain from hook and in each chain across.

In last chain work 6 dc in the SAME chain.

Row 2: (you will now be working in the free loops of the foundation chain) Hdc in each stitch across. Work 3 hdc in the 3rd stitch of the 6 hdc cluster. Work another 3 hdc in the 4th stitch of the 6 hdc cluster.

Row 3: hdc in each stitch across. Chain 5 loosely and connect with a ss to the 5th stitch of the 6 hdc cluster at the beginning of row 2 forming a loop for the button. DO NOT FASTEN OFF.

Edging:
*Chain 2 skip one stitch and ss in the next stitch* continue around the entire headband till the 1st chain of the button loop. Fasten off leaving a long tail to weave in.

Weave in the Tails of yarn with the blunt tip needle.
Sew on the button to the end of the headband OPPOSITE the button loop.
Make flower.
Flower:
Make a slip knot.
Chain 2

Base: work 10 sc in second chain from hook.
Join with a slip stitch in top of first sc.
Round 1: chain 3, skip one stitch of the base round, ss in next stitch, repeat around (5 chain 3 spaces)

Round 2: working around the first chain 3 section, ss, sc, hdc, 3-dc, hdc, sc, ss (all in first chain 3 section creating the first petal. Repeat for the remaining four petals. Join with a ss at the end of the round.

Round 3: chain 5, ss in the stitch BETWEEN two petals. Repeat 4 more times joining with a slip stitch.
Round 4: working the same way as the first row of petals in round 2. ss, sc, hdc, dc, 3-htc, dc, hdc, sc, ss in each of the five chain 5 sections. Tie off.
Weave in the tail of yarn coming from the center of the flower using your blunt large eyed needle. Cut off excess.


Using the blunt needle again with the remaining yarn tail of the flower secure flower to the headband, being careful to avoid the main band, and not pulling tightly. This will allow the flower to maintain its shape and slide along the band for positioning.

Congratulations!
You are finished! Now enjoy making a bunch of these for family and friends.


I have always wanted to know how to do this. I will be making this TODAY!! Thank you!
Heather! You make this look super easy, even for an intimated crochet crafter like me!!
How cool that these were in the Film Festival swag bags at Park City!!
Heather, This is precious. Do you have a blog? If so would you share the address with us. Thanks, Lori
Hey Ladies! I am glad you like the tutorial. If you have any questions about it feel free to email me. heatherbeardall{at}gmail{dot}com. Also Kari Thanks again for working through all of the picture problems!
Lori Sorry I don’t have a blog as of yet, but I do have an Etsy site (link is in the tutorial intro) that you can check out.
I want to see finished pictures if you make some! It was great being here!
LOVE this
I was looking for something crafty to make for a friend’s daughter when I came across this post! This is perfect–I’m going to work on this tonight:-)
Hi Heather, thanks for sharing your tut. I am struggling with the 2nd row instructions.
I did the 6 hdc at the end of row 1 but I don’t know how to get back to #3 for a hdc.
Could you try to explain it to me.
thanks tons.
Kim
Kim-
I am sorry that it was confusing to you. You are more working AROUND the foundation chain rather than in rows.
So on the picture right before row two you will see that the 6 HDC curves around to form an arch of sorts back toward the foundation chains.
So instead of working in the top stitches you just made you will be looping around and working the the foundation chain AGAIN, just in the back loop this time.
HDC all the way across the foundation again and that will put you at the 3 hdc, 3 hdc at the end two chains of the first “row”.
Let me know if that helps or you need more clarification. I can send you the PDF file if you would like that is a little more in depth. Just shoot me your email address. (heatherbeardall{at}gmail{dot}com) Thanks!
I’m currently trying to work this pattern, but row 2 has me a little confused.
Row 2: (you will now be working in the free loops of the foundation chain) Hdc in each stitch across.
????????????????????
Work 3 hdc in the 3rd stitch of the 6 hdc cluster. Work another 3 hdc in the 4th stitch of the 6 hdc cluster.
How do I get back around to the cluster? get to the end of row 2 and turn, come back? repeat the cluster on the other end and come back? Your pictures, while wonderfully done, are so close in that I can’t solve this for myself. Thank you!
Bah, she beat me to it. Guess I should hit refresh every hour or so! So I guess I’m just gonna work an extra 6 more hdc to get around that curve on the other end. That’ll do!
yes, sorry again. I wrote it wrong on this tutorial and none of my testers of myself caught it so GOOD JOB!
So yeah misimpulsive you are right! Just work 3 hdc, 3 hdc at the end of row 2 in the two TURNING CHAINS at the start of row 1.
NOT in the cluster at the end of row 1. Sorry again for the confusion! Hope this helps to clarify everything! 🙂
Heather that is great but no clue how to do any of it. Love ya Dad
Heather, You never cease to amaze me! You are so talented and do so much!! Love, MOM 🙂
hi! thanks again for the great tutorial. I didn’t have the right weight yarn so my headband turned out a bit thicker than I would have liked. My daughter loves it and that’s all that counts right? I posted a picture on my blog.
Love this. I can’t wait to get my stuff from your Etsy store!
The headband is darling – however I have searched how to make a htc. Everything I have read says a hdc and a htc are the same stitch, just called by different names, yet you have both stitches in this pattern. Can you clarify this for me? Thanks! I just brought up your etsy store and am excited to check it out. Good Luck!
A htc is a stitch where you yarn over twice, insert the hook into the stitch, draw up a loop, yarn over, draw through two loops (leaving three loops still on the hook), yarn over and draw through the remaining 3 loops on the hook. hope that helps!
I just made one for my 6 month old. It’s adorable!! Thank you for the pattern!
Great job on the tutorial. I’m just getting back into crocheting and NEED good tuts like this! I’m going to check out your Etsy shop too.
Shasta @InTheOldRoad