
Hi! My name is Carrie. I’m a mother of three and I like to make stuff. My own mother taught me how to sew at a very young age and ever since, most of “my stuff” has been made on the sewing machine. Before the mini-van, I graduated with a degree in Fashion Design and worked designing little girls clothing for a little company that rhymes with Cold Gravy. While designing for money has become a thing of the past, designing for pleasure will always continue on. And honestly? I get to live a way more creative life now than I did back then. Since joining Wardrobe Refashion almost 4 years ago, I have become an avid refashioner, spending more time in thrift stores and at estate sales gathering materials and supplies than in fabric stores.
Beyond my creative side, my interests span from mountain biking & running to public school advocacy and karaoke. I talk about it all on my blog This Mama Makes Stuff. So happy to be a guest on Ucreate today to share a favorite vintage handkerchief refashioning project.

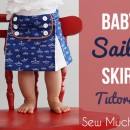
One of my favorite things to make out of vintage handkerchiefs is baby bloomers. Paired with a simple onesie, they make a wonderful and unique baby gift and if you happen to have a grandmother who collected hankies, you can create a beautiful and usable heirloom.
Download Heirloom Bloomer {size 0-3} Pattern Here
For me, the most time consuming part of this project is picking the handkerchiefs.

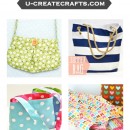
You will need four hankies to make one pair of bloomers. The hankies can be different sizes, but all the edges should be straight or have small scallop. Hankies with large scalloped edges don’t work as well for this project. Check for stains and tears, remembering you might be able to cut around them.
With Easter on it’s way, I finally decided on four blue-themed traditional floral hankies.

You will also need 1/8″ soft stretch baby elastic (for the legs) and 1/2″ knit elastic (for the waist).
Step 1: Cut out 2 front & 2 back bloomer panels, one piece from each handkerchief, lining up hem edge of pattern to hemmed edge of hankie.

If you cut each hankie piece with the right side facing up, make sure to flip the pattern piece to cut second panel of front & back. I like to cut each piece separately so I can place the panel exactly how I want it on each hankie.

Once you have two fronts and two backs cut out, sew right front to right back and left front to left back at outseam. Finish seam edge with serger or zig-zag. Open pieces up and press.
(seam allowances are 1/4″)

With a removable marking pencil, mark 3/4″ up from hem edges on right and left leg for elastic placement.

With a small zig-zag stitch, sew an 8″ long piece of elastic 3/4″ up from hemmed edge along your mark, stretching as you sew, matching halfway point of elastic to halfway point of bloomer to ensure even gathering. (if you have a particularly chunky or slim baby, adjust elastic measurement as needed)

Lightly steam the leg elastic on each piece to even out ruffles.

Place two leg pieces, right sides together, matching fronts and backs, and sew front and back crotch seams. Finish seams with serger or zig-zag.

Open bloomers up, putting seams you just sewed at center front and center back. Press. Match short, little inseam and sew. Finish seam with serger or zig-zag.

Turn bloomers right side out. Press where needed.

Press in casing, folding over raw edge 1/4″ and folding again 5/8″

Edge stitch folded casing around waist, leacing a 1″ opening at center back. Thread a 14″ piece of 1/2″ wide elastic through waist casing (if you have a particularly chunky or slim baby, adjust elastic measurement as needed).

Sew elastic together by overlapping 3/4″. This causes less bulk than closing the elastic with a traditional seam.

Sew waist opening closed.

You’ve now finished your first pair of heirloom bloomers!


oh so cute! i dont have girls or handkerchiefs but makes me want both:)
I have loads of hankies and girls to make them all a pair. I love handkerchiefs.
Great tutorial! Perfect for any little girl.
Wow! This is so sweet! I can’t wait to give these to someone!
Awesome! Thanks for posting!
Absolutely the most adorable bloomers I’ve ever seen! Thanks for sharing!
Holy cuteness!
so cute! I don’t think I could cut into those hankies though!
Those are so cute! I’m bookmarking this for sure!
Neat Idea! Those would be so cute on my little one, I have to make some for her. Thanks for the tutorial!
Loven this!!!!! So cool!!
Just a quick note to let you know that a link to this post will be placed on CraftCrave.com in the Handcraft category today [26 Mar 02:00pm GMT]. Thanks, Maria
Oh wow! I have a ton of vintage hankerchiefs that my mother in law gave me and I have been stumped on what to do with them!! What a GREAT idea! thanks for sharing!
I will be making these. I have an entire drawer full of hankies! Thanks for the pattern.
Amy T.
SEW CUTE!!! Need to make one for my friends g. daughter ♥
Those are the cutest things ever! But why isn’t anyone modeling them? 🙂 ha ha
that is adorable! I’m just not sure I can make myself cut up my vintage hankies…
gah so cute. i don’t have girls or hankies either but i agree with sharon, this makes me want both!
What a great little gift to make for a couple of my friends with younger daughters…very cute and creative! You really do find some of the most creative things on here! Thanks once again for sharing =O)
Love it! Come link at my party: Thursday’s Treasures!!
http://treasuresfortots.blogspot.com/2010/03/thursdays-treasures-week-15.html
molto carini un idea molto originale brava mariella
Than you so much!
Very cute !! Great idea.
Do they make hankies big enough to make these in adult size?
What about vintage pillow cases?
Wow, those are beautiful. What a fantastic idea. Thanks so much to both of you, I’ll be linking.
Just made my first pair! So cute! TIP: My hankies were very thin, so I used a coffee filter to stabilize my seams, especially when sewing on the elastic, worked great! Thank you for this wonderful tutorial!
These are just precious!
Love this idea. I have a few handkerchiefs from my grandmother and mother in-law and this will be a great way to use them. I have bookmarked this and will be back to sew them.
So Pretty!I’m new to thrifty sewing, how would I make these in larger sizes?
omg! so easy!! i just made one.. thanks
wow~so easy and pretty! should try to make one for my lil Aimee~ thanks for sharing 😉