U Create

It's a good day to create!

  • pinterest
  • facebook
  • instagram
  • twitter
  • rss
  • crafts
    • crochet/knit
    • jewelry
    • kids crafts
    • paper crafts
    • sewing
      • bags
      • boys-clothing
      • girls-clothing
      • women-clothing
      • pillows
      • quilts
  • home decor
    • bathroom
    • build it
    • frames
    • kids
    • kitchen
    • office
  • recipes
    • desserts
    • dinner
    • snacks
    • soups
  • parties
    • baby shower
    • birthday
    • games
    • gift wrapping
    • party decor
    • party favors
  • printables
  • holidays
    • Christmas
    • Easter
    • Father’s Day
    • Halloween
    • July 4th
    • Mother’s Day
    • New Years
    • St. Patrick’s Day
    • Thanksgiving
    • Valentine’s Day
  • gifts
    • baby
    • electronics
    • graduation
    • teacher gifts
  • About
  • Be My Guest
  • Advertise
  • Contact
  • pinterest
  • facebook
  • instagram
  • twitter
  • rss

5 Mar

Pottery Barn Inspired Mosaic Tutorial

PB Inspired Mosaic Tutorial by Remodelaholic

I am so excited to be here at U create, I feel like I’ve made it to the big times, I want to break out in song… “Start spreading the news…”! But you wouldn’t hear me anyway, right? So, moving on. Thank you so much Kari for letting me share this little project! Let me introduce myself, I am Cassity from Remodelaholic.

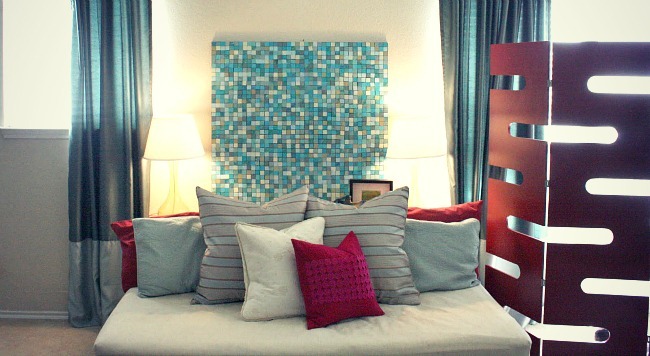
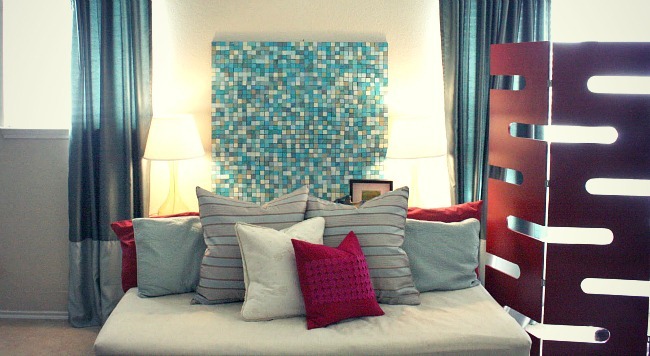
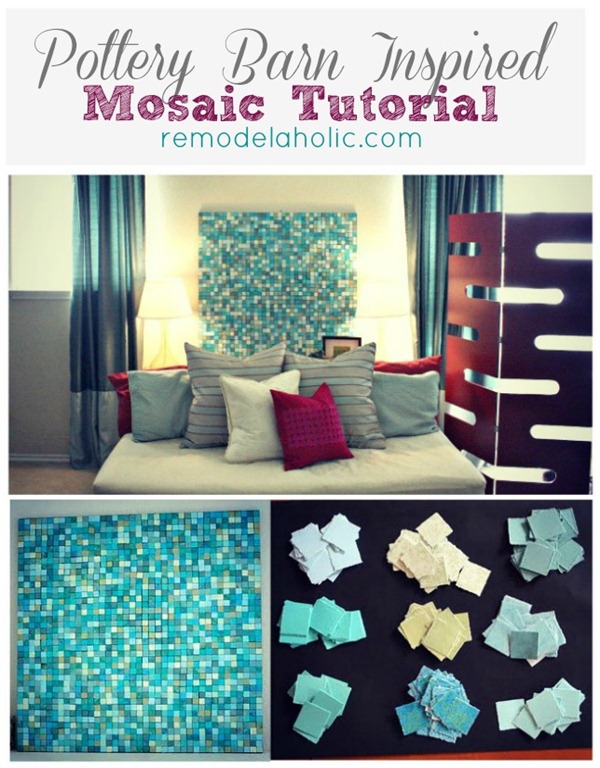
I have whipped up a little pottery barn inspired art work tutorial for y’all. Seen here:

DIY Paper Mosaic
See, while looking through my trusty catalog I saw this (below), and I loved the mosaic piece of art. So, I set my trusty little mind to figuring out a way to make this for myself, and now you can too.
( like my scrawl on the picture… that is how I remember random ideas that float around in my brain…)

Supplies

Paper cutter

Scrapbook paper

(in the colors of your decor)

Paint

(for background, in color of your choice, I used black)

Paper glue

Modge Podge

Piece of wood or Art canvas

(mdf or osb something inexpensive! Have this cut to your desired dimensions,

both Home Depot and Lowes will cut 4 x 8 foot boards down,

or they sell smaller 2′ x 4′ pieces usually on an endcap…,

I wanted mine to fill a larger space, so I did mine at 3′ x 3′)

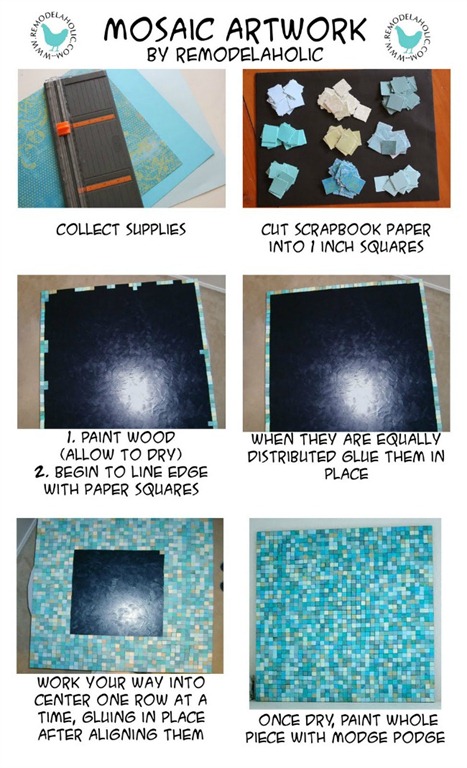
mosaic tutorial

DIY Paper Mosaic
There you have it. An easy work of art that can be custom made to match any decor.

If you get the chance, please stop by Remodelaholic you will find tons of tutorials!
 

You may also like these

DIY Quilt Block CoastersDIY Quilt Block CoastersDIY Painted Flag TutorialPainted Flag Window TutorialShine Bright Fabric PillowsShine Bright Throw PillowsHow to make a yarn wig for Halloween costumes!Easy Raggedy Yarn Wig TutorialThe Piano ProjectThe Piano Project
Previous Post: Reversible Handbag Tutorial
Next Post: Heirloom Bloomers Tutorial

Comments

  1. Veronica says

    March 5, 2010 at 12:09 PM

    Love it! We built a fireplace in our living room and I have been searching for something for the mantle. I didnt want tacky and I didnt want to spend a ton of money.. heading to home depot tomorrow.. thanks!!!!

    Veronic

    reply to this comment >
  2. Jess B says

    March 5, 2010 at 12:55 PM

    That’s gorgeous!! I may have to attempt that!

    reply to this comment >
  3. Nancy @ Live love laugh says

    March 5, 2010 at 1:10 PM

    Grat idea! I think my son would love this for his college apartment…an inexpensive and easy great look! He also enjoys “creating”!
    ~Nancy

    reply to this comment >
  4. kermiefrg says

    March 5, 2010 at 1:48 PM

    Amazing! You gotta have a lot of patience to do something like that!

    reply to this comment >
  5. Miss Tiff says

    March 5, 2010 at 3:22 PM

    I luv it! I’m headed over to visit you. I liked ur intro too. Start spreading the news…(:

    reply to this comment >
  6. Kari @ Ucreate says

    March 5, 2010 at 3:47 PM

    AMAZING tutorial and love your fun personality, too! lol
    Thank you for taking time to be a creative guest on Ucreate!!

    reply to this comment >
  7. L ~DIY Diva~ says

    March 5, 2010 at 4:35 PM

    I love this tutorial and will surely follow your blog! Great job!

    reply to this comment >
  8. Gabrielle @ i.craft says

    March 5, 2010 at 11:42 PM

    Simply awesome! Love it!

    reply to this comment >
  9. Kristina says

    March 5, 2010 at 5:01 PM

    Very cool! I love it.

    reply to this comment >
  10. JulieChats says

    March 5, 2010 at 5:27 PM

    What a great idea! I can’t wait to try that!

    reply to this comment >
  11. Crystal Hendrix says

    March 5, 2010 at 6:09 PM

    That would also make an AWESOME quilt!

    reply to this comment >
  12. Sandi @the WhistleStop Cafe says

    March 5, 2010 at 6:34 PM

    What an awesome project! Now I need to check out those turorials… I can find all kinds of trouble!

    reply to this comment >
  13. Sweet.Kiwi.Crochet says

    March 5, 2010 at 7:52 PM

    Wow! This is amazing! I’ve been looking for a new headboard but haven’t had the money. I will be trying this this weekend!
    Kandice
    http://www.sweetkiwicrochet.blogspot.com
    http://www.sweetkiwicrochet.etsy.com

    reply to this comment >
  14. Danielle says

    March 5, 2010 at 8:11 PM

    This is amazing! I will definitely have to make a long skinny rectangle to fit above my bed.

    reply to this comment >
  15. Remodelaholic says

    March 5, 2010 at 8:20 PM

    Thanks for all the wonderful comments! I am glad you all like the mosaic!

    reply to this comment >
  16. Julie says

    March 5, 2010 at 8:34 PM

    This is awesome, I think I can do it!

    reply to this comment >
  17. Rene W. says

    March 5, 2010 at 10:37 PM

    Beautiful! I want my husband to use this design to create a small waterfall – thank you for the tutorial! 🙂

    reply to this comment >
  18. Victor says

    March 5, 2010 at 10:54 PM

    Very nice.
    I shall surely spread the word!

    reply to this comment >
  19. Crazy Daisy says

    March 6, 2010 at 6:44 PM

    Wow! That is amazing! I might have to give that a try THIS WEEKEND! 🙂

    reply to this comment >
  20. Craftify It! says

    March 6, 2010 at 8:06 PM

    K—that took some time…all those little squares! But it looks amazing, I like it better than the Pottery barn one. Great job!

    reply to this comment >
  21. rose says

    March 7, 2010 at 7:41 PM

    oh i am SO doing that this week! THANKS!

    reply to this comment >
  22. michelle@somedaycrafts says

    March 7, 2010 at 11:36 PM

    I featured this at somedaycrafts.blogspot.com

    reply to this comment >
  23. Rachel@oneprettything.com says

    March 8, 2010 at 2:14 AM

    Oooh I love this! Yay, yay, yay… I can’t wait to make one! I’ll be linking as well.

    reply to this comment >
  24. Pam @ Design Fanatic says

    March 8, 2010 at 3:48 AM

    What a great project!

    reply to this comment >
  25. Upstatemomof3 says

    March 8, 2010 at 5:17 AM

    Oh my goodness!! That is so impressive!! I would never have the patience nor the ability to do that. It looks awesome!!

    reply to this comment >
  26. June says

    March 8, 2010 at 1:04 PM

    Very creative!

    reply to this comment >
  27. Kaysi says

    March 8, 2010 at 6:59 PM

    Wow!!! That looks like a lot of work, but it looks so great too! I LOVE the colors and really want to try this

    reply to this comment >
  28. Calamity Anne says

    March 9, 2010 at 12:17 AM

    INCREDIBLE!!! That’s going into my craft to-do file! Thanks for sharing!

    reply to this comment >
  29. Sandy says

    March 9, 2010 at 1:18 AM

    I think this would be a beautiful kitchen back-splash… I’m looking for some tiny tiles… then going to try it… thanks for the idea!
    Sandy
    http://thewondersofdoing.blogspot.com/

    reply to this comment >
  30. Bonnie @ House of Grace says

    March 9, 2010 at 1:41 AM

    looks great!

    reply to this comment >
  31. Beth at Aunties says

    March 9, 2010 at 1:42 AM

    You are way too cute! Love the song… and it is in my head now:)
    I truly loved your mosiac. It turned out fabulous! I might do this in a family room we are redoing… Thank You for spreading the News!

    reply to this comment >
  32. Jane says

    March 9, 2010 at 4:32 AM

    Wow! You are good. I thought your picture was the PB example! Excellent!

    reply to this comment >
  33. Polly says

    March 9, 2010 at 5:54 AM

    Awesome!!

    reply to this comment >
  34. Mom2my9 @ 11th Heaven says

    March 9, 2010 at 12:42 PM

    This is absolutely gorgeous and it looks so easy! Thank you so much for linking up to Homemaker Monday with this tutorial!!

    reply to this comment >
  35. Amy @ The Bell Family says

    March 9, 2010 at 2:04 PM

    Love this!! Thanks for a fab idea!

    reply to this comment >
  36. Stacey @ Fun to Craft says

    March 9, 2010 at 2:48 PM

    I absolutely LOVE this! I love the clean look of it. Such a great idea. Thanks for the tutorial!!

    I would love for you to join up to my Spring has Sprung party and share this Friday! There is a giveaway too. 🙂

    reply to this comment >
  37. Kelli @ RTSM says

    March 9, 2010 at 6:19 PM

    What a great idea! This is SUPER cute and I really thought it was tile at first!

    reply to this comment >
  38. Amanda says

    March 10, 2010 at 3:11 AM

    That’s fabulous! I love mosaics, and this is a great tutorial, thank you! Can’t imagine how long this must have taken you 🙂

    reply to this comment >
  39. The Persimmon Perch says

    March 9, 2010 at 8:37 PM

    Brilliant! Thanks for sharing with Made it Monday! Jules

    reply to this comment >
  40. The DIY Show Off says

    March 9, 2010 at 9:49 PM

    Cassity – you’re awesome! It’s great to see her here on U create!

    I’m honored to have it linked to the DIY Project Parade. 🙂

    Roeshel

    reply to this comment >
  41. Hoosier Homemade says

    March 10, 2010 at 12:55 AM

    Wow! That’s beautiful! Thanks for sharing the how-to!
    I’m visiting from Tip Junkie!
    ~Liz

    reply to this comment >
  42. Heather says

    March 10, 2010 at 4:56 AM

    Wowzers…that is awesome! Your take turned out beautifully, thanks for sharing!

    reply to this comment >
  43. Anonymous says

    March 10, 2010 at 2:04 PM

    I found it!!!!! This is what is going over my fireplace. You rock! I am SO at home depot tonight!

    reply to this comment >
  44. Amanda says

    March 10, 2010 at 4:22 PM

    Beautifully done!

    reply to this comment >
  45. Sonia says

    March 11, 2010 at 6:04 AM

    Whoa, love this!! I always loved mosaic but was afraid to do it with tiles ‘coz of the heavy work..but this sure is fun!!

    reply to this comment >
  46. Elizabeth says

    March 11, 2010 at 6:02 AM

    Wonderful idea! I am so going to have to try this!

    reply to this comment >
  47. Caro says

    March 11, 2010 at 2:05 PM

    you got my wheels turning! It’s just SO GORGEOUS! I wonder if I cna’t take this idea for a backsplash! Hmmm!! Maybe with a few coats of very thick varnish!!

    reply to this comment >
  48. Denise says

    March 11, 2010 at 2:14 PM

    Love this. Not sure if I have the patience to cut all these!
    Following you over from Shabby Chic Cottage!
    I am a follower!
    Please stop by!
    http://extremepersonalmeasures.blogspot.com/

    reply to this comment >
  49. shopannies says

    March 11, 2010 at 4:48 PM

    love it I have friends that make stepping stones out of broken glass I must say this looks grand

    reply to this comment >
  50. fawnda says

    March 11, 2010 at 1:42 PM

    WOW! This is beautiful! I love the colors you used! Awesome job!

    reply to this comment >
  51. Lori says

    March 12, 2010 at 1:15 AM

    I love it. I did something like this, but with paint chips from Lowes. It turned out great.

    Thanks for joining Get Your Craft on Thurs. Please come by next week for another great party.
    Lori

    reply to this comment >
  52. Low Tide High Style says

    March 12, 2010 at 3:08 AM

    Holy cow, that is gorgeous! I thought it was glass tile!

    Kat 🙂

    reply to this comment >
  53. Becky@Beyond The Picket Fence says

    March 12, 2010 at 3:16 AM

    That is incredible–the blues are beautiful. Thanks so much for linking up!

    reply to this comment >
  54. Alison from MyDesignDreams says

    March 12, 2010 at 8:24 AM

    This is a cool idea… I actually do “real” mosaic tile art (meaning, with glass/ceramic tiles!) and have one similar to yours hanging in my bedroom – a lot more time intensive and messy, but can be beautiful and substantial. If you ever want to post a tutorial on how to do the real thing, I’d love to do one for your blog!

    http://www.mydesigndreams.com

    reply to this comment >
  55. Sandi@ Rose Chintz Cottage says

    March 12, 2010 at 3:33 PM

    I love mosaic art! Good job!

    reply to this comment >
  56. renee says

    March 12, 2010 at 6:14 PM

    This is wonderful – I’m very inspired to give it a try. Thank you for the tips.
    ~renee

    reply to this comment >
  57. AshTreeCottage says

    March 12, 2010 at 6:14 PM

    Now that’s using the “little gray cells”. Great job!

    Love,
    Susan and Bentley
    xxoo

    reply to this comment >
  58. Marianne@Songbird says

    March 12, 2010 at 8:09 PM

    That looks adorable, nice project!

    reply to this comment >
  59. Anonymous says

    March 14, 2010 at 5:50 AM

    i counted your squares and i think i came up with more than 36 from top to bottom … so did i count wrong or are your squares or board a different size than you mentioned.

    if you have a 36 inch square and 36 squares … then none of the black would show …

    it looks really prett … but i have to stress over the details!

    reply to this comment >
  60. Carmie, the Single Nester says

    March 15, 2010 at 4:12 PM

    This is just outrageously beautiful! Great job!

    reply to this comment >
  61. Miss Mustard Seed says

    March 18, 2010 at 2:42 AM

    My word. I cannot believe that is made out of paper! It seriously looks like tile. How gorgeous. I may have to try that technique on something. All of those teeny little squares will be the end of me, though.

    reply to this comment >
  62. jenjen says

    March 18, 2010 at 5:56 AM

    Wow – that is an awesome project! Just amazing!!!

    Thanks so much for linking up to my party! I really appreciate it!

    XOXO
    Jen

    reply to this comment >
  63. Mom2Ian says

    March 20, 2010 at 12:39 PM

    Note to self: Replace the artwork behind the couch ASAP!

    reply to this comment >
  64. Amy {The Red Chair Blog} says

    March 20, 2010 at 11:21 PM

    Great project! Thank you for sharing this!

    reply to this comment >
  65. Marianne & Clayton says

    March 21, 2010 at 4:08 AM

    This is so brilliant. I am starting it on Monday. Thank you! I love mosaics and sea glass and this looks like the most perfect marriage of the two. So great!

    reply to this comment >
  66. Holly says

    March 22, 2010 at 4:31 AM

    Too fabulous! Love it!

    reply to this comment >
  67. Krystine says

    March 24, 2010 at 12:28 PM

    http://www.ultimateweddingcontest.com/entries/40394?sort=time

    I really appreciate it! Thank you

    reply to this comment >
  68. Marianne says

    October 6, 2011 at 4:31 AM

    I’m going to buy supplies tomorrow. What type of wood did you use and how did you mount it? Plywood?

    reply to this comment >
  69. Kelly says

    September 1, 2012 at 11:35 AM

    what an awesome idea!!! Thank you so much for sharing this…at first glance I thought it was made from glass tiles….I am sooo inspired to try one of these!!!!!

    reply to this comment >
  70. Jana Stutler says

    September 1, 2012 at 3:14 PM

    Fabulous!

    reply to this comment >
  71. Jana Stutler says

    September 1, 2012 at 3:14 PM

    Fabulous!

    reply to this comment >

Trackbacks

  1. 7 Amazing Ideas to Use Mosaics in Home Decor « Lady Gadget Online says:
    June 6, 2015 at 4:47 PM

    […] 6. Pottery Barn Inspired Mosaic Tutorial from U Create […]

    Reply

Leave a Comment Cancel reply

Your email address will not be published. Required fields are marked *

Recipe Rating


Popular Posts

New Year's Eve Minute to Win It games by U Create

New Year’s Eve Minute To Win It Games

Free Printable "Color Your Own" Christmas Banner

Merry Christmas Coloring Banner

Free Pattern: Fall Turkey by U Create

Fall Turkey Printable

Free Printable Pumpkin Games

Halloween Printable: Bugs and Kisses

Halloween Minute To Win It Games

  • pinterest
  • facebook
  • instagram
  • twitter
  • rss
 
Privacy Policy
Back to Top

Copyright © 2023 U-Create • All Rights Reserved • Site Design by Emily White Designs