This is Jill, from Homemade by Jill, and I’m delighted to be your guest blogger today!
I am a stay-at-home mom of a crazy-cute little boy (Oscar), and in my free time I dabble in crafts. These days I spend a lot of time sewing, but I also love paper crafts, crochet, and baking. I just enjoy making things. Figuring out a new project is like solving a puzzle for me. I find it easy to envision the finished product, so the fun part is deciphering the process. Getting it right is a real thrill, even when I’m met with varying degrees of success.
Blah, blah, blah … talking about myself is no fun. On to the tutorial, shall we? Silhouettes seem to be a bit trendy in home décor right now, and I’ve been looking for the perfect project to incorporate one into my apartment.

Materials needed:
-
Fabric – solid color for the pillow front and a nice print for the back (prewashed and pressed)
-
Piping
-
Paint – acrylic or fabric paint will do
-
Stencil brush
-
Sewing supplies – sissors, thread, ruler, iron, etc.
-
12 Inch Pillow Form
1. Create your silhouette template
-
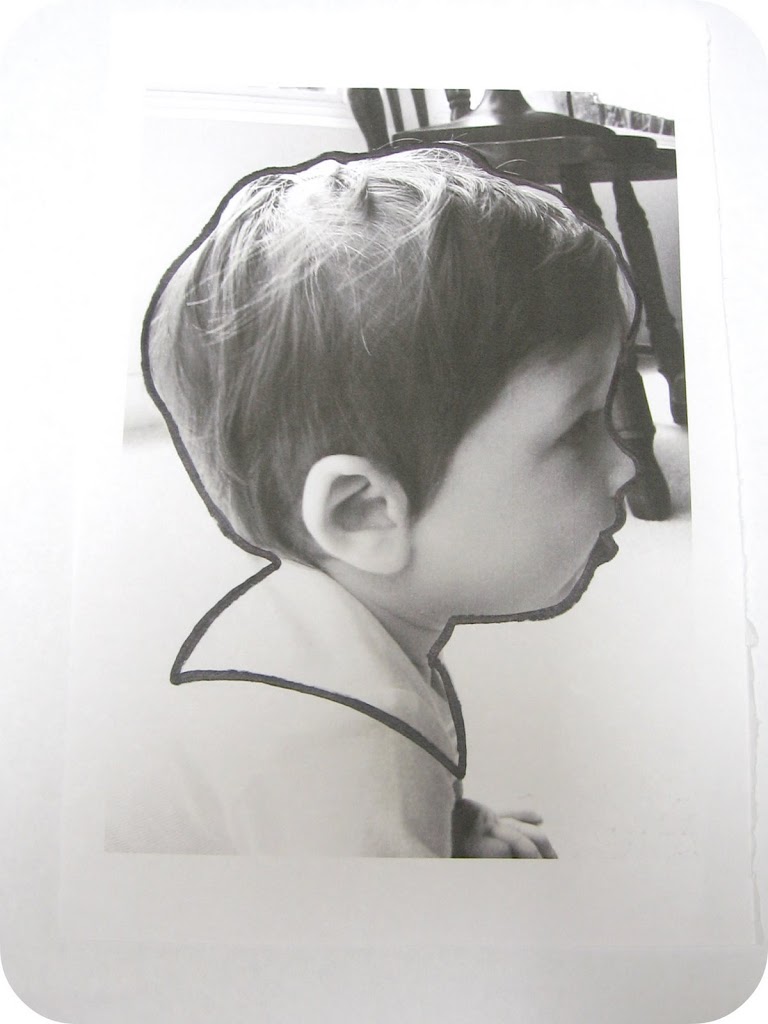
Take a profile picture of your desired model and print (mine is a 5×7).
-
Outline the profile with a black sharpie. I flipped my paper over and traced the sharpie outline from the other side to give me a nice, clean, black and white image.
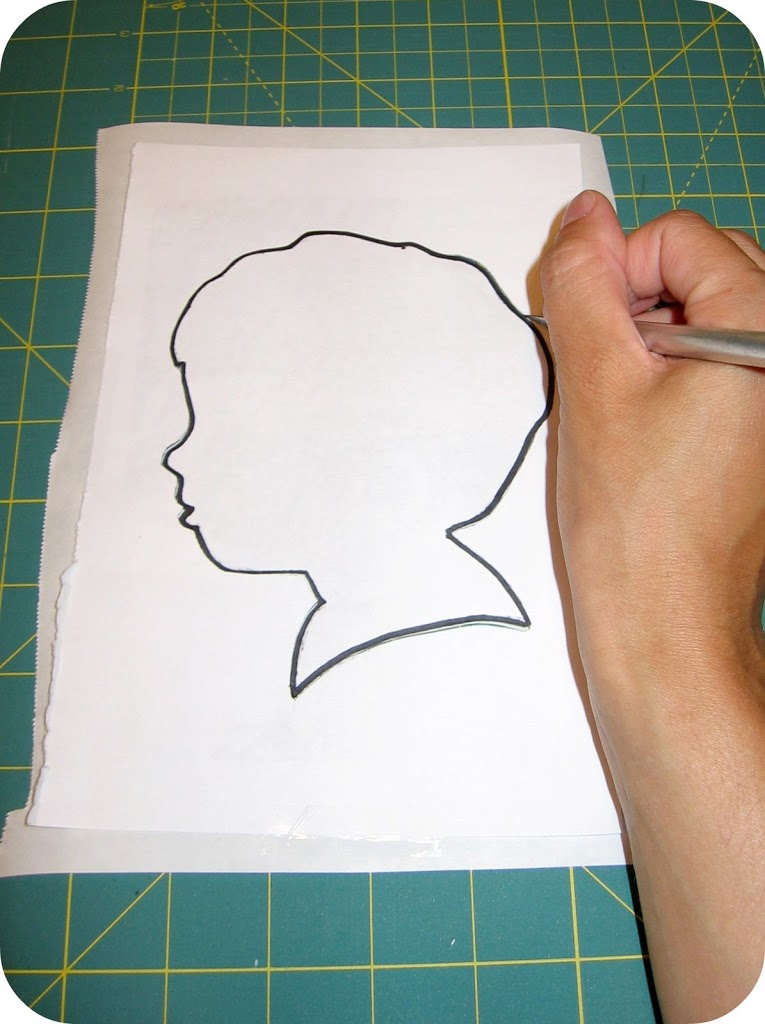
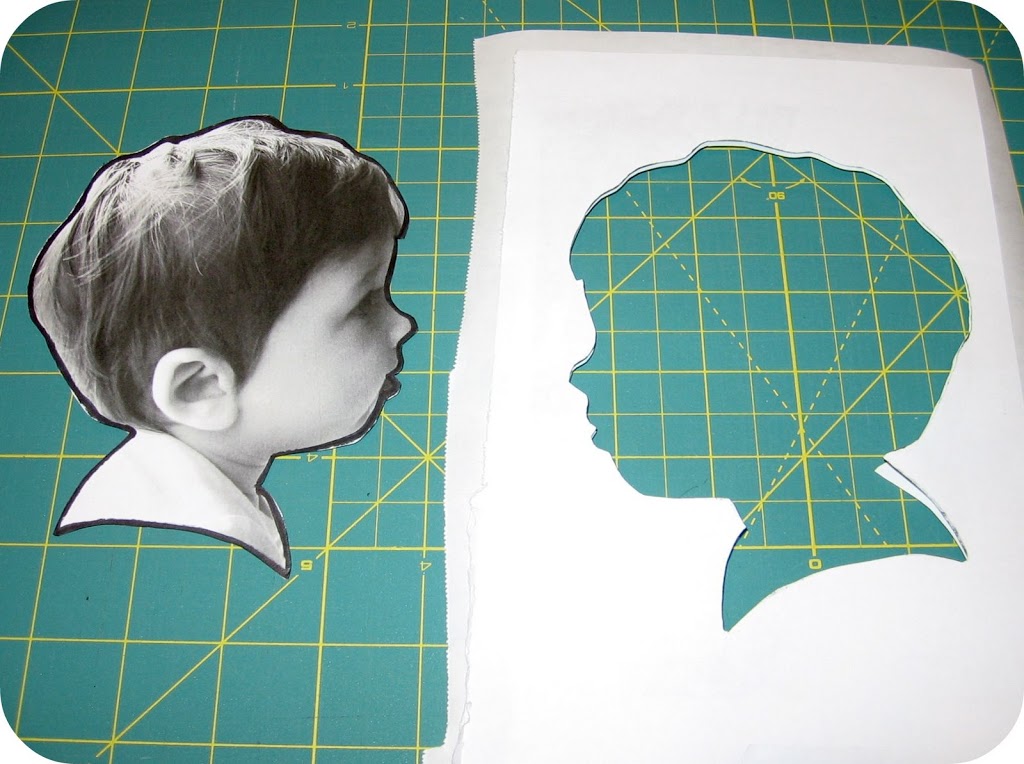
2. Make a freezer paper stencil
- Lay the outlined profile on top of a piece of freezer paper and tape to secure.
- Cut along the outline using a sharp x-acto knife. You now have a freezer paper stencil of your silhouette.
3. Cut your fabric
- 12 ½ x 12 ½ inches (cut one out of solid color fabric)
- 12 ½ x 9 ½ inches (cut 2 out of printed fabric)
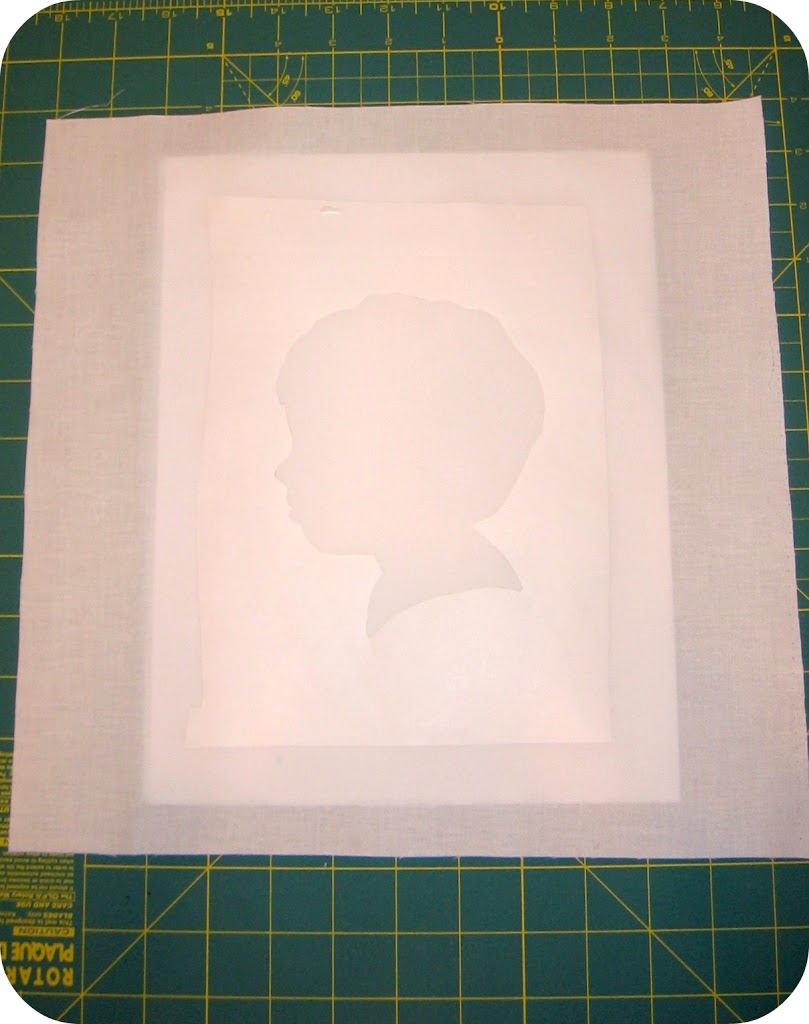
4. Stencil your silhouette
- With the waxy side down, iron your freezer paper stencil to the front piece of fabric. It should be firmly attached.
- Using a stencil or foam brush, paint a thin coat over your stencil. Let the paint dry and add additional coats, if necessary (I used two coats).
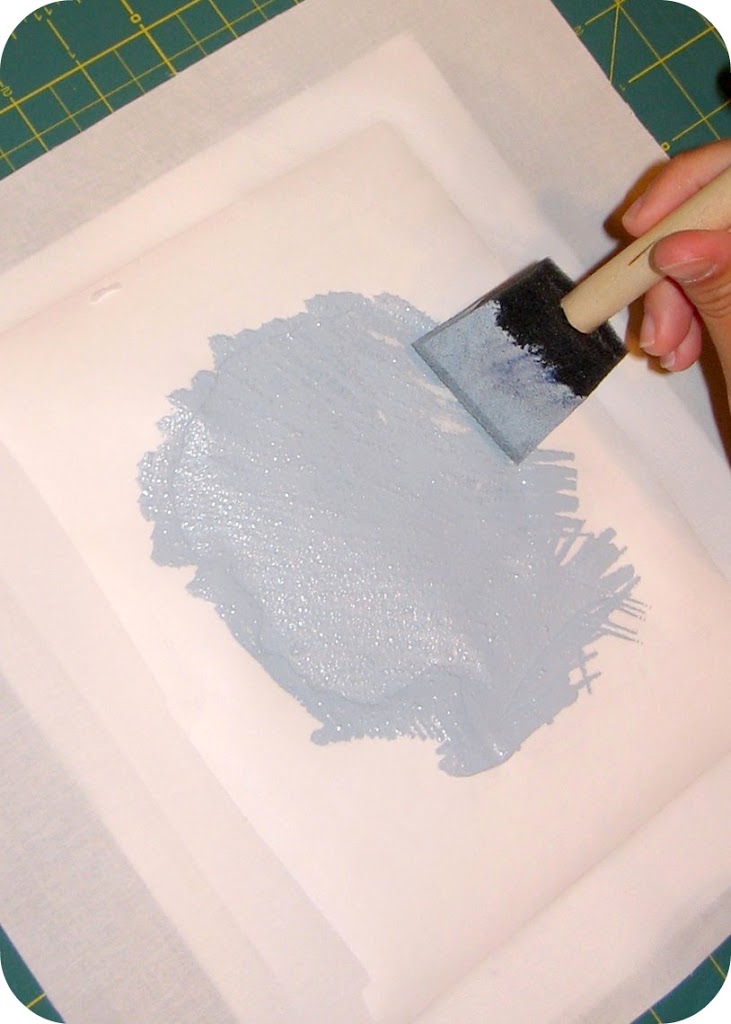
- When the paint is completely dry, peal away the freezer paper stencil.
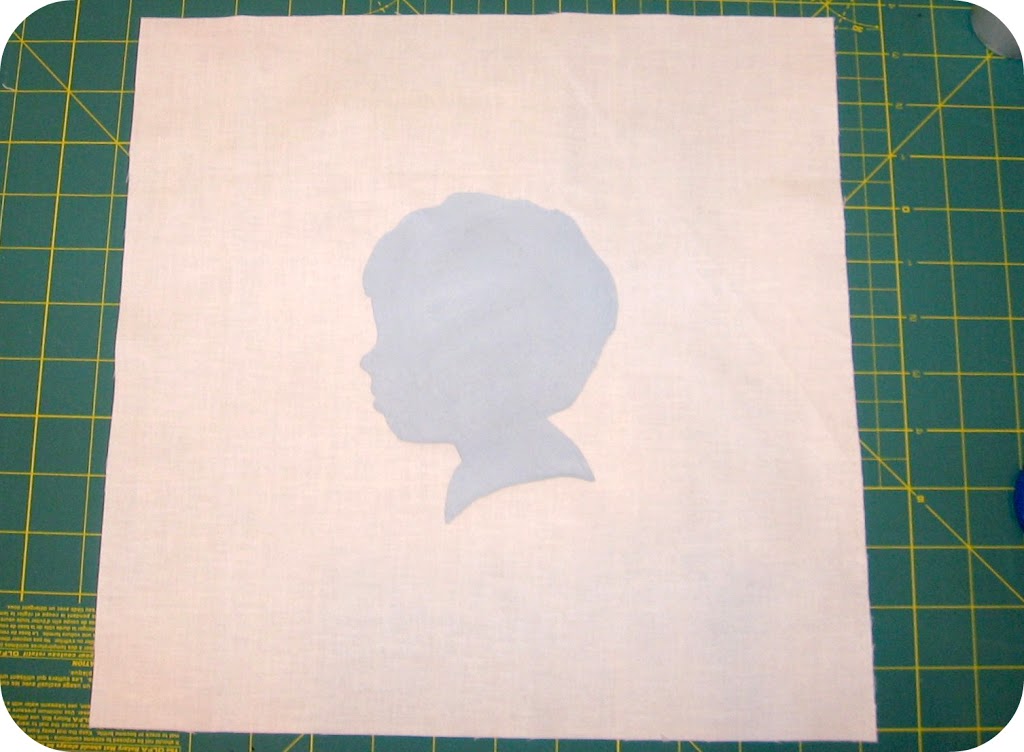
5. Heat-set your paint according to the manufacturer’s instructions (I laid a piece of fabric over my painted image and applied a hot iron for 30 seconds).
Let’s start sewing!
6. Prep your two back pieces of fabric for sewing
-
Fold the edge back ¼ inch and press.
-
Then fold back another inch and press.
-
Repeat with the other piece of fabric.
-
They should now measure 12 ½ x 8 ¼ inches each.
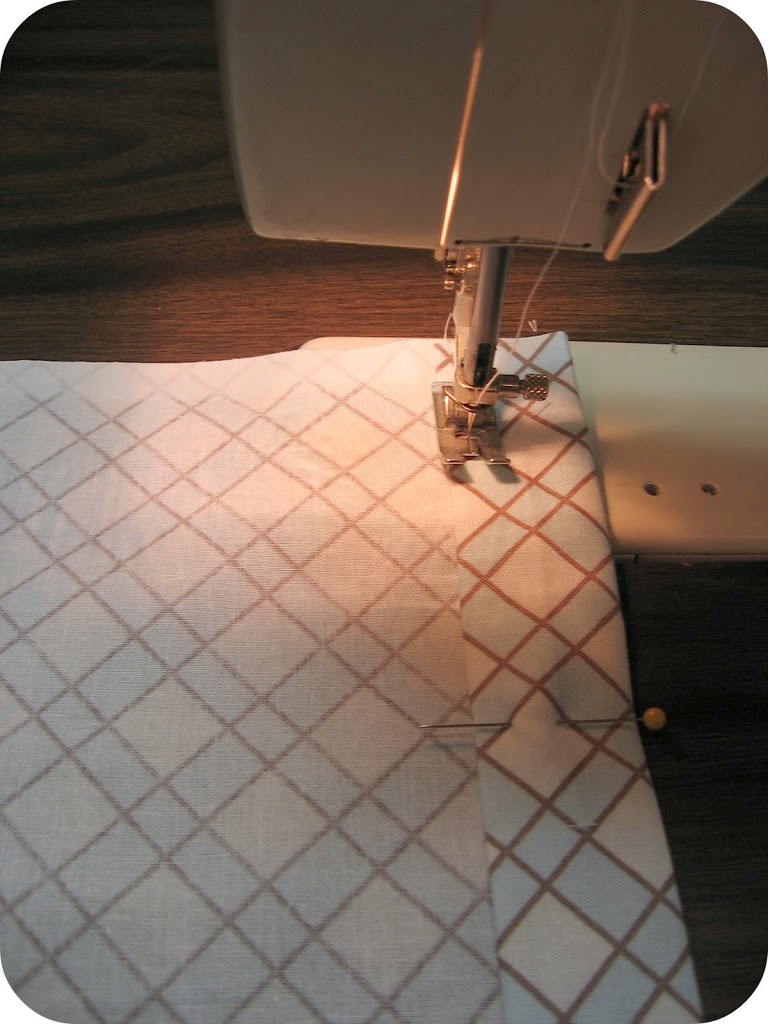
7. Sew the hem on each back piece of fabric
8. Trim your fabric corners
You know how your pillow insert is really fluffy in the middle and less fluffy in the four corners? If you sew a straight square pillowcase, the corners can be a little loose and will wing out a bit. We are going to trim the corners of the fabric to alleviate this. This is a little tip I learned in sewing class at Martha Stewart (or perhaps this is general knowledge and I’m just a fool?).
- Measure a quarter inch in from the very corner of your fabric and mark the point using a washable marking pen or pencil.
- Make more marks 2 inches up from the corner on either side.
- Draw a line connecting the three points. It should look like this:
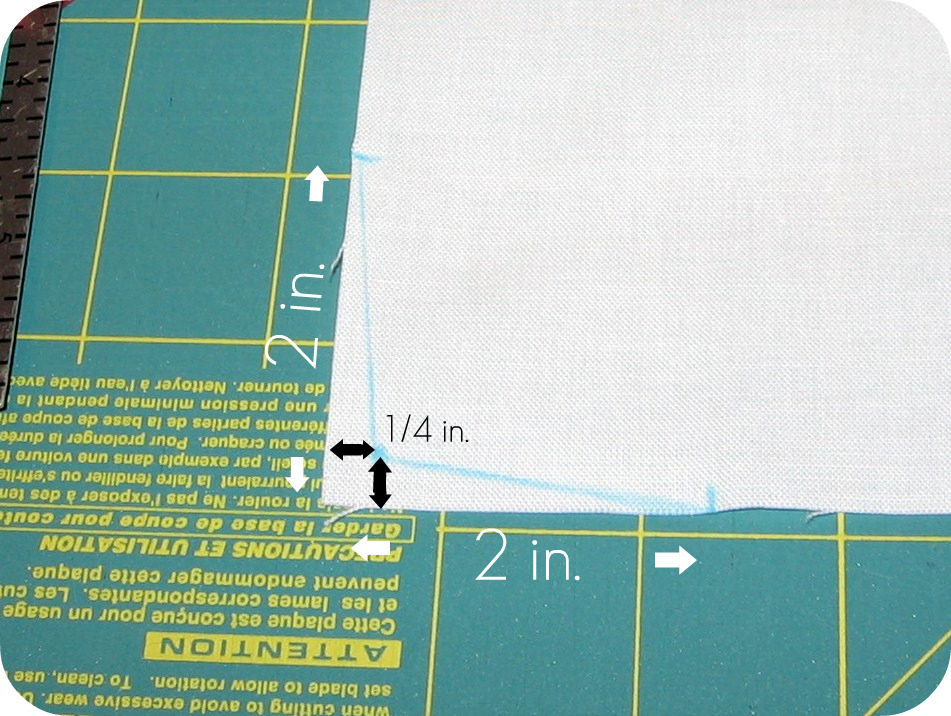
- Cut those little triangles outside your marked lines right off.
- Repeat on all four corners of the front piece and the two raw corners of each back piece (don’t trim the hemmed edges!)
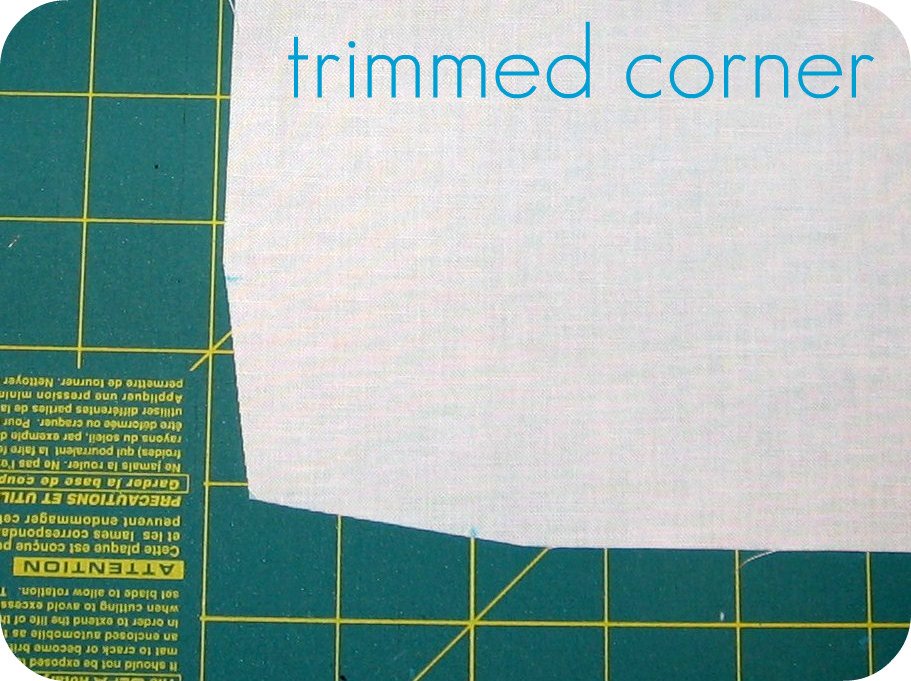
The first time I tried this, I was nervous it would look wonky, but trust me … works wonders!
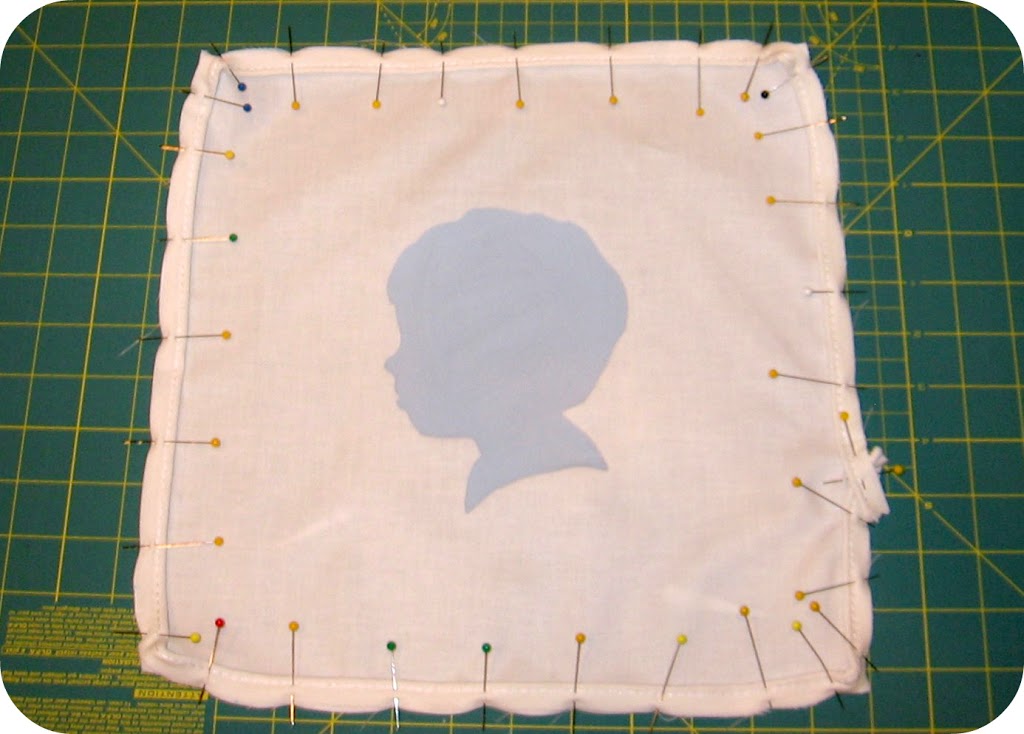
9. Pin the corded piping to the front piece of fabric, lining up the raw edges
(sidenote: I am a little embarrassed that my secret is out. Yes, I am an obsessive pinner. You probably don’t need to pin this much, but I get a little nervous about the piping sliding around and looking wonky.)
10. Attach your piping
- Put a contrast colored thread in your bobbin.
- Sew the piping to the front piece of fabric, following the existing stitch line on the piping as closely as possible. Slow and steady around those corners!
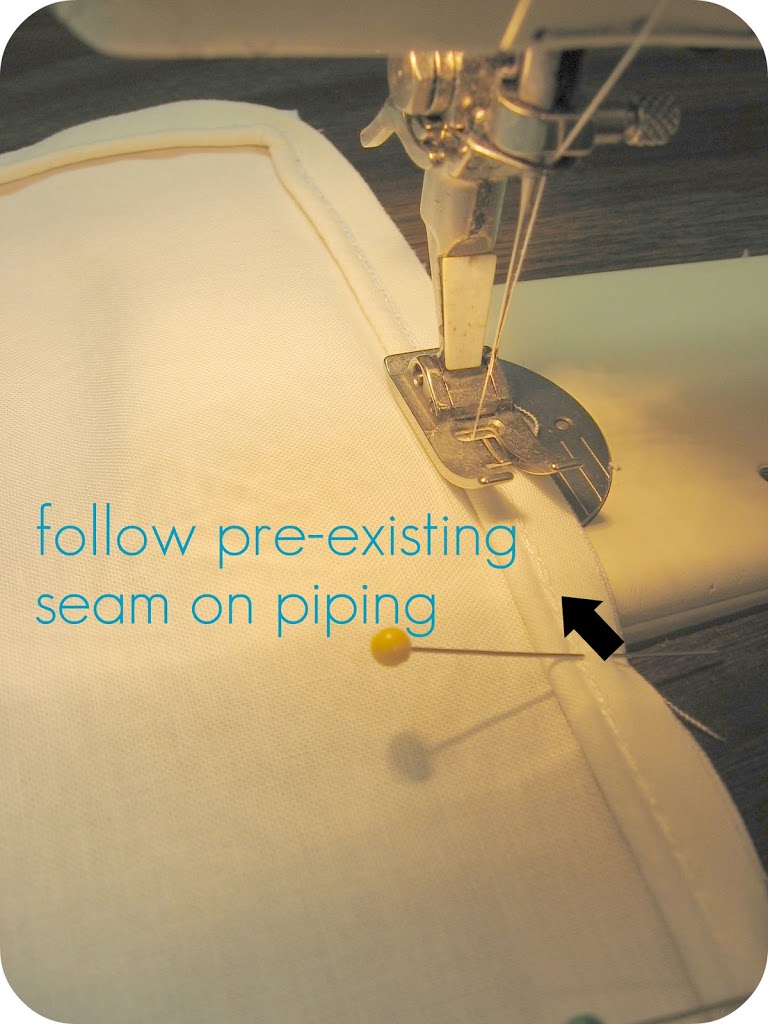
- Overlap the beginning and end of the piping, angling the raw ends towards the outside edge (you don’t want them exposed on your finished pillow).
- When you turn your fabric over, you will easily be able to see your stitch line due to the contrast thread. This will help you in the next step.

11. Attach the back fabric pieces
- Lay the back pieces of fabric on top of the front piece of fabric, right sides together.
- Line up the raw outside edges. The hemmed edges will overlap several inches down the middle of the pillow.
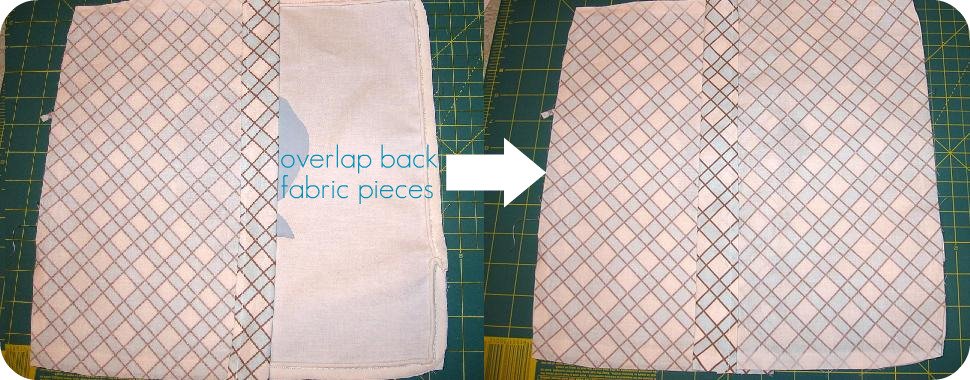
- Pin the fabric together from the front side of the pillowcase. You want to be able to see the contrast stitch line as you sew.
- Following the contrast stitch line as closely as possible, sew around the entire pillowcase.

12. Trim all edges with pinking shears, if you have them.
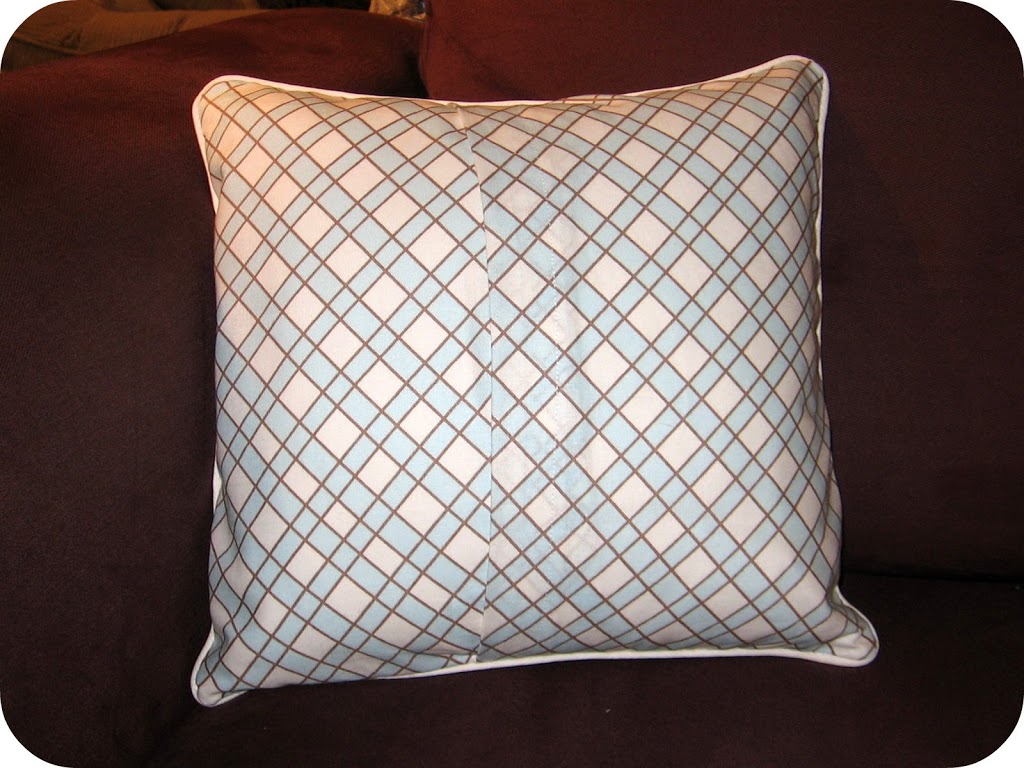
13. Turn the pillowcase right side out and insert the pillow form
And you are done!
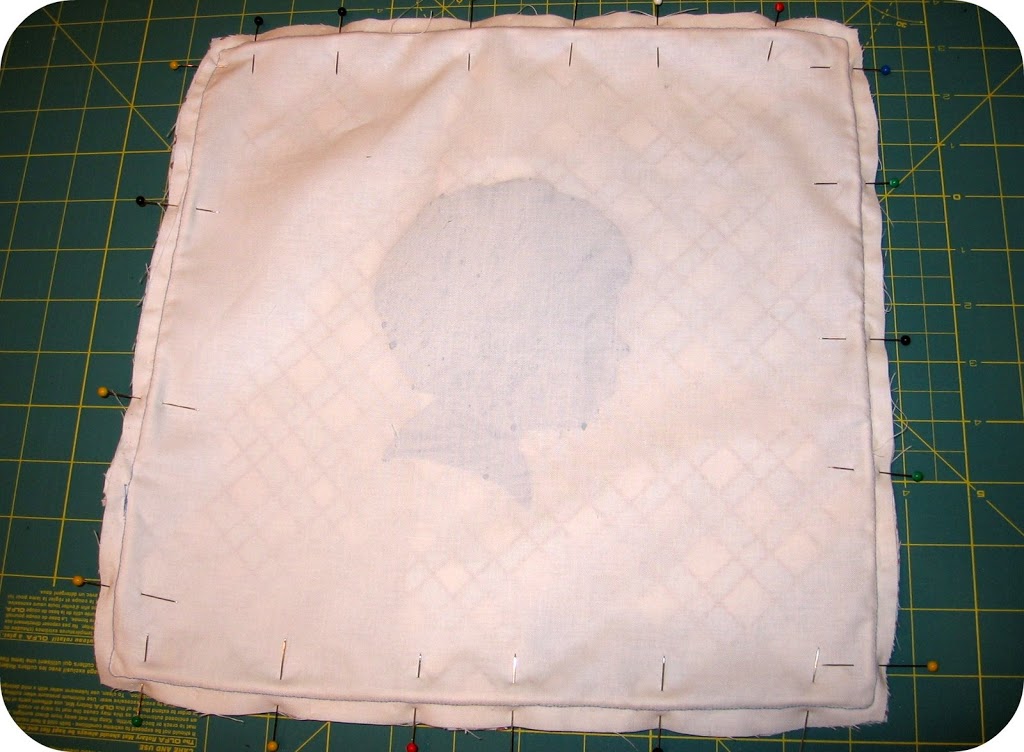
 This is what it looks like from the back.
And the front:

Thanks for letting me join you today!
I hope you’ll stop by Homemade by Jill sometime for more tutorials and project ideas.


Using fabric paint always makes me nervous – I have absolutely no justification for this, but I just don’t trust the stuff. Can someone please tell me I’m crazy? Or at least tell me you’ve washed things with fabric paint on them hundreds of times with no ill effects? Thanks.
Love it!
That is one GREAT tutorial!
Cute idea!!! Thanks for the tutorial.
Oh my goodness! This is an awesome idea! I am totally making these of my kids. Thank you for bringing the idea and for sharing the tutorial!! YAY!
how fun!
Isn’t Jill amazing?! She always comes up with great tutorials. I am so glad she took time out of her schedule to share this with Ucreate. Thanks Jill!
That is so cute! I love silouettes!
That is too cute! I can’t wait to make my own.
What a great project for my children to do for the county fair. Yours turned out great, thanks for sharing.
I always wanted to try this. Great tutorial thanks!
So great, Jill! I just got a sewing machine for my birthday. Once I learn how to actually use it I’ll put this on my to-do list. Haha!
That’s so cool. LOVE!
I use a zipper foot for my piping (I’m too cheap to buy a cording foot)and put the piping on the BOTTOM as I sew, it is one of those “tricks of the trade” that I learned from my mom… who is in the trade. SHe also taught me those clipped corners! DId you know you were so professional?? 🙂 Using contrast thread was genius… you could totally ensure awesome piping.
This would be so so cute in a nursery. Or if I do two, I could do my husband and myself and put them in our room! Or gifts for grandparents! Jill, the options are endless. Awesome, and thanks for the tutorial!
Oh I love that!
That is fantastic! I’m totally going to have to do this. I’ll be linking as well.
I love this idea! I’ll have to try it out. Thanks!
You made this look so easy! I love the color you chose as well, so fresh!
This is such a fantastic idea, I’ll be adding this to my GrandParents Day crafts round-up! This just might be my favorite find so far.
Ohhhh y just love it, is a great present for a mum!!!!!
I have looked all over for these very instructions-THANK YOU!!!!♥
LOVE THIS!! I am going to try this with an iron-on sheet rather than paint… and a leaf silouette to match our family room. Got no cute kidlet silouettes to trace just yet 🙂 Thank you Jill! Thank you Kari!
This is a WAYYYYYYYYY late comment but i love this completely. I will be doing some soon!!
I love this idea. I used it to make these pillows http://alwaysmakingstuff.blogspot.com/2010/02/wedding-shower-gift.html
Love love LOVE! I have been on a silhouette kick lately, but I had never thought to put them on a pillow. Thanks for the great idea and tutorial!
that is a great idea! i was looking for something for my mother in law and this is perfect!
ive never done piping, im nervous, but nothing a seam ripper cant fix right??
This is wonderful. You make it look so easy, I think I’ll have to try!
Awesome, Thanks! You made this easy but what an amazing gift that grandma will LOVE. Great tutorial, thanks so much!
Very good info. Lucky me I discovered your site by accident
(stumbleupon). I’ve book marked it for later!
Welcome! So glad you found us!