U Create

It's a good day to create!

  • pinterest
  • facebook
  • instagram
  • twitter
  • rss
  • crafts
    • crochet/knit
    • jewelry
    • kids crafts
    • paper crafts
    • sewing
      • bags
      • boys-clothing
      • girls-clothing
      • women-clothing
      • pillows
      • quilts
  • home decor
    • bathroom
    • build it
    • frames
    • kids
    • kitchen
    • office
  • recipes
    • desserts
    • dinner
    • snacks
    • soups
  • parties
    • baby shower
    • birthday
    • games
    • gift wrapping
    • party decor
    • party favors
  • printables
  • holidays
    • Christmas
    • Easter
    • Father’s Day
    • Halloween
    • July 4th
    • Mother’s Day
    • New Years
    • St. Patrick’s Day
    • Thanksgiving
    • Valentine’s Day
  • gifts
    • baby
    • electronics
    • graduation
    • teacher gifts
  • About
  • Be My Guest
  • Advertise
  • Contact
  • pinterest
  • facebook
  • instagram
  • twitter
  • rss

12 Apr

Statement Bracelet Tutorial

How to Make a Statement Bracelet

Hi everyone,

Hope you all had an amazing Easter, what a great opportunity to spend some relaxing/hectic time with family and friends. I hope you got some time to craft as well, if not lets hope the weekend brings it. I am so happy to be sharing a special DIY with all of you.

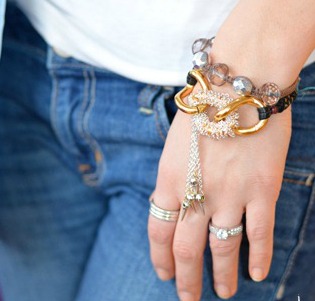
I’m going to show you how to make a cool statement bracelet. This one will look great combined with both studs and pearls (I’ve already done both and loved it!). Hopefully you will have most of the gear in your craft box, if not there’s nothing like a weekend getaway to Michaels for some goodies.


Hope you are as excited as me to get started!

ucreateDIYbracelet

Supplies Needed:

super glue

leather string

thick gold chain (three links)

gauge wire

waxed string

a lock

4 silver beads/charms

thin silver chain

ferdig ucreate2 (1)


  1. Glue the thin silver chain to the centre link in the gold chain. This is not a necessity it just makes it easier to spin the chain around the entire link.
  2. Finish the whole link and tie the chain together with some gauge wire. I added to extra pieces of chain just to get a bigger “tassel”
  3. Attach the charms or beads to the end of the chains with gauge whire.
  4. Tata, all 4 done.
  5. Tie three pieces of leather string to the gold link with waxed string, I love waxed string, it just stays put and holds together really well.
  6. 7. Tie the lock on with waxed string.


Have fun with it, I sure did!

POST BY…Katrine at Make It and Fake It

You may also like these

How to Make a Rosette BraceletJersey Bracelet Tutorial by JuJuBBraided Ribbon and Chain Necklace TutorialTONS of Tassel TutorialsTONS of Tassel TutorialsAmazing Macrame Tutorials!Amazing Macrame Tutorials2-Minute Crafts: Mini Spool Necklace
Previous Post: DIY Highchair Makeover
Next Post: DIY Velcro Bow Tie

Comments

  1. projectdowhatyoulove says

    April 12, 2012 at 6:54 PM

    So cute! Love the chunky metal! 🙂

    Natalie
    http://www.projectdowhatyoulove.wordpress.com

    reply to this comment >
  2. Lisa says

    April 12, 2012 at 11:05 PM

    Very pretty and easy for someone who is new to making jewelry! Thanks!

    reply to this comment >
  3. K says

    April 13, 2012 at 9:01 AM

    I am so happy you guys liked it 🙂

    love K

    reply to this comment >

Leave a Comment Cancel reply

Your email address will not be published. Required fields are marked *

Popular Posts

Cactus Valentine Printables by U Create

DIY Cactus Valentine Printables

Valentine Candy Wrapper Printables

Valentine Candy Wrapper Printables

Free Valentine Coloring Pages by U Create

Free Valentine Coloring Pages

Kiss The Year Goodbye New Years Eve Printable Tags

10 DIY Wood Slice Ornaments

Thankful Turkey Headband

  • pinterest
  • facebook
  • instagram
  • twitter
  • rss
 
Privacy Policy
Back to Top

Copyright © 2021 U-Create • All Rights Reserved • Site Design by Emily White Designs