
What you need:
–Pattern Piece One
–Pattern Piece Two
-One fat quarter for outer. This will be what you sew the pintucks on, so the pintucks show up better with a fabric that isn’t very busy. Depending on how large you make your pintucks, you will most likely have some left over.
-One 10” x 16” piece of fabric for inside of pouch. I liked the patterned fat quarter so I used that, but didn’t use the whole piece obviously.
-One 10” x 16” piece of fusible interfacing
-pintuck foot (optional: I’ll talk about this more later—you don’t have to use one!)
-twin needle (if using pintuck foot)
-button, snaps, velcro, or magnetic snap for closure. I will just be showing the button in this tutorial.
-wash and iron fabric
-use about a 1/4” seam, maybe a little bigger if desired

About the pintuck foot: I love this foot! If you have ever made pintucks, you know how tedious it can get without the foot. With that being said, the pouch is not large so you don’t need to sew a ton of pintucks. If you are new to making pintucks, Sew Much Ado has a tutorial HERE on how to make them without the pintuck foot. See Kate Sew has a tutorial HERE how to make them with a pintuck foot.

I used this size of twin needle:

If you wanted larger pintucks you can get a twin needle that has larger spacing between them.
One more thing before we start. I wanted to show you the difference (pictured below) between the pintucks by using a different stitch. On the left, you’ll see a pintuck made using See Kate Sew’s tutorial, using a straight stitch and tension set at 9. On the other two, I used a zig-zag stitch set at 0, tension set at 9. I liked how the straight stitch method created the larger stitches and also the pintuck was raised a little bit more. I’m sure this can be accomplished on either stitch, but in case you don’t want to guess, that’s how these were made. Also, I recommend a high quality 100% polyester thread. On my practice run I didn’t use very good quality thread and it kept breaking with the tension set so high.

First start by folding your fat quarter in half and make a crease.

You can space your pintucks however you’d like. You should have plenty of fabric with the fat quarter if wanting to make the pintucks larger or spaced closer together. I had nearly half of my fat quarter left after making pintucks on the other half of fabric. You can move the needles to one side to make the pintucks spaced differently. First, sew down the crease you made. No need to backstitch as you will be cutting out the pattern pieces from this.

I spaced my next pintuck along the furthest groove of the foot.

Just keep sewing pintuck after pintuck until you have enough to fit and cut out your pattern pieces. It would make a fun option to put the pintucks on the diagonal when cutting out your pattern!

Cut out your pattern pieces—the outer pintucked fabric, the inner lining, and fusible interfacing.

Iron the interfacing to the lining fabric by following the interfacing instructions. If using a magnetic snap closure, this is where you’ll want to put that in.

Now is a good time to sew on any labels you have. I sewed mine onto the back middle of the outer fabric.

Place the right sides of the outer fabric together and the right sides of the interfaced lining together. Pin. Sew all the way around the two layers on the outer. On the lining, leave a 3” space at the bottom for turning the pouch later on (I’m pointing to where my space will be). Make sure to backstitch where you begin and end.

Clip curved corners of what you just sewed.

Turn the lining fabric right side out.

Place the lining inside the outer fabric, right sides together.

Pin around the flap and opening of pouch as pictured below and sew.

At the corners, stop with the needle down, lift your presser foot, turn the fabric a 90 degree angle and continue sewing.

Clip corners and curves.

Turn pouch right side out through opening in lining and stitch the lining closed, close to the edge.


Press the pouch well and topstitch along the flap and edges of opening.

Add your closure, which in my case just meant sewing a buttonhole and the button on.

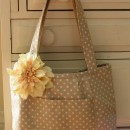
All finished!


Great for sticking inside your purse or diaper bag to hold make-up or other small items.


Thanks so much for having me today Kari and Becky! I’m looking forward to seeing all the creative ideas!


Christie I’m crazy about those pintucks!! Fun color and thanks for the pattern!!
muito bonito…
parabéns, com abraços de MF
I have wanted to sew pintucks but have been a little intimidated, now I’m going to give it a try.
Thanks for having me today!!
oooh I love this! I have got to get a pin tuck foot! thanks for sharing the pattern!
I didn’t even know that foot even existed! Thanks for sharing!
I love that foot!!! And the bag is lovely….
It’s a great tutorial! Thank you!!! :o)
Really cute idea – I love pintucks. Have you tried a magnetic closure?