Tools: Terra Cotta Pots, Potting Soil, Acrylic Paint, Foam Pouncer, Small Plants. Time: 45 Minutes. Difficulty: Easy.
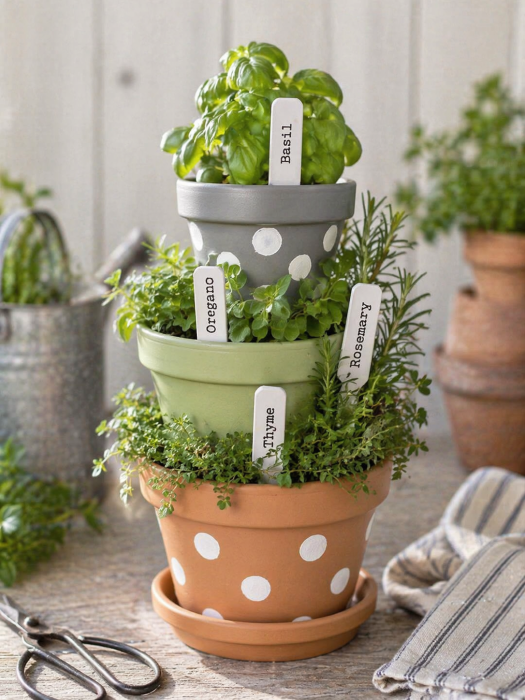
This mini stacked herb planter tower makes such a fun gift for anyone who loves being in the kitchen. Fresh herbs are always a treat for a home cook, and turning them into a painted stacked planter makes the whole gift feel a little more thoughtful and special. It’s a pretty handmade idea for Mother’s Day, but it would also be perfect for a foodie friend, neighbor, hostess, or anyone who would love snipping fresh basil or thyme right at home.
Supplies:
- 1 large terra cotta pot with saucer for the bottom
- 1 medium terra cotta pot
- 1 small terra cotta pot for the top
- potting soil
- small herb plants such as basil, thyme, oregano, and rosemary
- acrylic craft paint in soft garden colors (optional)
- white acrylic paint for polka dots (optional)
- foam pouncer, round sponge, or paintbrush
- clear sealer for outdoor use, optional
- small rocks or pebbles for drainage
- wooden plant markers
- strong glue or adhesive putty, optional for added stability
Instructions:
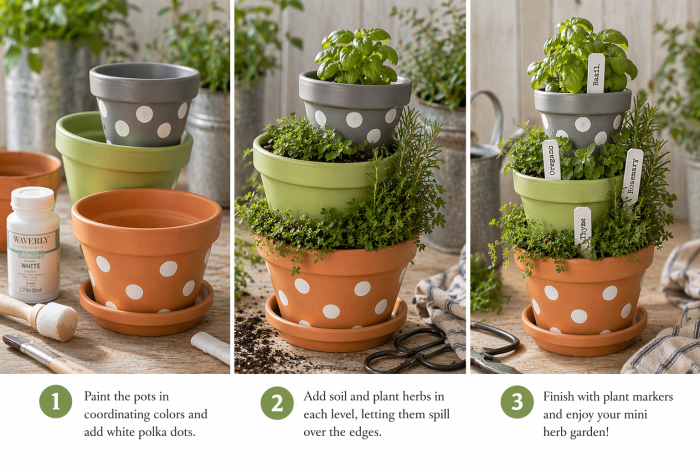
Step 1: Start by cleaning the pots and letting them dry completely. If your pots are dusty, wipe them down with a damp cloth so the paint will stick better.
Step 2: Paint each pot in a soft, pretty color. The mockup look works beautifully with one natural terra cotta pot mixed with muted painted pots like sage green, soft gray, or dusty blue. Let the first coat dry, then add a second coat if needed.
Once the base colors are dry, add simple white polka dots to a couple of the pots. A foam pouncer will give you the cleanest circles, but the end of a paintbrush handle can work too. Keep the dots slightly imperfect so the finished project still feels handmade and charming.
Step 3: If you want this planter to hold up outdoors, finish the painted pots with a light coat of clear sealer after the paint is fully dry.
Step 4. Stack the pots. To assemble the stack, place the largest pot on its saucer first. Fill it partway with potting soil and add your lowest herb around the rim. Thyme works especially well here because it stays low and spills over the edge in a pretty way. Nestle the medium pot into the soil at a slight angle so it looks stacked and tucked into the larger one. Add more soil around it to hold it in place. Plant oregano on one side and rosemary on the other so you get a nice mix of texture and height. Add the top pot last. Fill it with soil and plant basil in the center so it becomes the tallest, fullest part of the arrangement. Press everything in gently and add a little more soil wherever the pots need extra support.
Tuck in any final herbs or trailing pieces around the sides until the stack feels full and balanced. Wipe off extra soil from the rims and touch up the paint if needed.
Step 5. Finish it with simple wooden herb markers if you’d like. They make the planter feel extra polished and help tie the whole herb-garden look together.
Set the finished stacked herb pots in a sunny spot and water lightly after planting. Herbs like basil will need regular sun and consistent watering, while rosemary prefers not to stay too wet, so be careful not to overwater the whole arrangement.

Whether you give this mini herb planter to Mom, a grandmother, a favorite teacher, or a fellow foodie, it’s a gift that feels thoughtful without being complicated. It’s pretty enough to display, practical enough to enjoy every day, and a fun way to turn a simple planting project into something truly gift-worthy.
POST BY: Kari Sweeten


Very cute! I love the pots.
thank you! they were so easy and fun to make!
Those pots look awesome. Pinning the post for future reference.
So glad you like them!
Kari, these turned out PERFECT! What a great gift idea!!
Thanks Amy…and thanks for providing me with inspiration to do this “mini” version! 🙂
Love how they turned out Kari!! So pretty!!
Thank you Tam!
Love these! Now I know what to do for my Mother-In-Law!
Thanks so much for sharing!!
You are so welcome Kristy! Have fun making them!
Kar, those are sooooo cute! Seriously, great job. Can’t wait to make mine.
Thanks Beck!
Love the fun colors and stackable pots!
Thank you Katie – I’m in a major polka dot mood lately!
I love these!! I think I will do a moss and succulent mini-version!!! xo
Ooo…I would love to see that Taci!