U Create

It's a good day to create!

  • pinterest
  • facebook
  • instagram
  • twitter
  • rss
  • crafts
    • crochet/knit
    • jewelry
    • kids crafts
    • paper crafts
    • sewing
      • bags
      • boys-clothing
      • girls-clothing
      • women-clothing
      • pillows
      • quilts
  • home decor
    • bathroom
    • build it
    • frames
    • kids
    • kitchen
    • office
  • recipes
    • desserts
    • dinner
    • snacks
    • soups
  • parties
    • baby shower
    • birthday
    • games
    • gift wrapping
    • party decor
    • party favors
  • printables
  • holidays
    • Christmas
    • Easter
    • Father’s Day
    • Halloween
    • July 4th
    • Mother’s Day
    • New Years
    • St. Patrick’s Day
    • Thanksgiving
    • Valentine’s Day
  • gifts
    • baby
    • electronics
    • graduation
    • teacher gifts
  • About
  • Be My Guest
  • Advertise
  • Contact
  • pinterest
  • facebook
  • instagram
  • twitter
  • rss

25 Jun

Frayed Rosette Headband Tutorial

Hello! My name is Alicia and I have the blog Budget Beautiful DIY.

Four years ago, I left a career as a hairstylist in a gorgeous salon to stay home with my two munchkins. Going from two incomes to just one has brought out my creative side not only with finances, but also with fun handmade projects. Between changing diapers, attempts at cooking, and reading books to my kids, I whip up little crafts to bring a touch beauty to our lives.

Frayed Rosette Headband Tutorial

Supplies List:
-fabric
-needle and thread
-headband (I used one covered in fabric from Target)
-hot glue gun
-button, vintage earring, or rhinestones

Make sure all your strips are cut on the bias (on the “bias” means to cut your fabric on an angle so the threads in the fabric are running on the diagonal). This way you don’t have strings shedding off your headband.

step 1

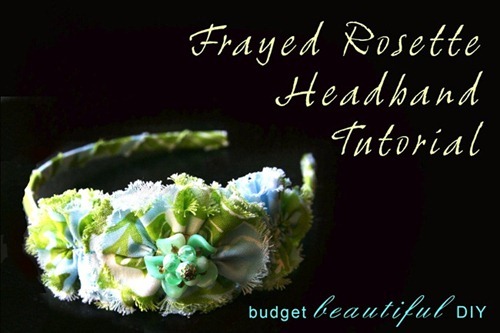
Cut one strip of fabric 2″ X 9″
Cut two strips of fabric 1 1/2″  X 9″
Cut two more strips as long as you can make them 1″ wide to wrap your headband with.

step 2

Step One: Take the widest strip and fold in half lengthwise about 3/4 of the way as in the picture.

step 3
Step Two: Sew along the long folded edge and pull the stitching to gather it.
step 4

Step Three: Sew the short ends together so you have a ring.

step three

Step Four: Squash the circle a little to make an oval and sew the middle together on the backside so it stays an oval shape.

step four

Step Five: Repeat steps 1-4 on the 1 1/2 ” strips.
Now you should have three ovals that look like this.

step 5

Step Six: Fray the edges of the ovals by pulling on the fabric with your fingers.

step six

Step Seven: Fray one side of your long 1″ strips. Then simply wrap your headband in the strips of fabric pulling the fabric a little so it forms to the arch of the band. Wrap at a slight angle and overlap just a little. I put a dab of hot glue on the underside of the headband with each wrap of fabric.
If you need both strips to completely cover the headband, place your “seam” on the top  where you’ll be gluing your rosettes.

step seven
Step Eight: Hot glue the ovals onto your headband placing them a little to the side. The largest oval should slightly overlap the smaller ones. If you’d like, add a button, rhinestones, or a vintage earring like I did.

You’re finished!

headband

 Budget Beautiful DIY

You may also like these

Garden of Grandchildren free printable for Mother's DayGrandma’s Garden Paper Flower BouquetMothers Day DIY VasesDIY Mothers Day VaseDIY Address Planter by U CreateDIY Address PlanterDIY Summer Flower ideasDIY Summer Floral IdeasDIY Spring Floral Arrangements by U CreateDIY Spring Floral Arrangements
Previous Post: Free Chevron Pattern Templates!
Next Post: Fabric Frame Tutorial

Comments

  1. DASI GLAM says

    June 25, 2011 at 6:46 PM

    Thank you! That’s just so cute!

    reply to this comment >
  2. Mary on Lake Pulaski says

    June 25, 2011 at 4:30 PM

    Beautiful! Thanks for the tutorial!

    reply to this comment >
  3. Kelly @ Run With Glitter says

    June 25, 2011 at 9:46 PM

    SO pretty! Thank you for sharing!

    reply to this comment >
  4. Stacey says

    June 25, 2011 at 10:53 PM

    Uh-OH!!!! I love that…Gonna have to try it! Thank you.-Stacey (http://www.hazelmoonfly.com)

    reply to this comment >
  5. VickiT says

    June 26, 2011 at 3:13 AM

    Such a beautiful headband Alicia. Thank you so much. Good luck in your new adventures of little ones, learning/attempts to cook and being super creative in finances. I remember those challenges a number of years ago myself. You can do it! Just think you are able to spend the best times with your kids amongst this new adventure – when they are young. That’s the best part in my opinion.

    reply to this comment >
  6. Angie says

    June 26, 2011 at 6:00 AM

    Thanks! That is adorable!

    reply to this comment >
  7. B.jane says

    June 26, 2011 at 2:31 PM

    Very cute!!!

    reply to this comment >
  8. Maxine & Berdie says

    June 27, 2011 at 2:34 PM

    Thanks for telling me what cutting on the bias means!!!!! I have seen that so many times and am like what are you talking about. I went to Joanns and was looking around for something to help me with my bias problem and they had a machine for over $100 that made bias tape??? Good thing I didn’t get it lol. Thanks for the tutorial!

    reply to this comment >
  9. Acorn Caron says

    June 27, 2011 at 10:41 PM

    Wow Alicia you create some beautiful things, I love your blog too!

    reply to this comment >
  10. Tania says

    June 28, 2011 at 8:41 AM

    so pretty

    reply to this comment >
  11. Tori says

    July 16, 2011 at 4:12 AM

    This is such a lovely headband!

    reply to this comment >
  12. Anonymous says

    September 25, 2012 at 4:06 AM

    love it..

    reply to this comment >

Leave a Comment Cancel reply

Your email address will not be published. Required fields are marked *

Recipe Rating


Popular Posts

New Year's Eve Minute to Win It games by U Create

New Year’s Eve Minute To Win It Games

Free Printable "Color Your Own" Christmas Banner

Merry Christmas Coloring Banner

Free Pattern: Fall Turkey by U Create

Fall Turkey Printable

Free Printable Pumpkin Games

Halloween Printable: Bugs and Kisses

Halloween Minute To Win It Games

  • pinterest
  • facebook
  • instagram
  • twitter
  • rss
 
Privacy Policy
Back to Top

Copyright © 2023 U-Create • All Rights Reserved • Site Design by Emily White Designs