U Create

It's a good day to create!

  • pinterest
  • facebook
  • instagram
  • twitter
  • rss
  • crafts
    • crochet/knit
    • jewelry
    • kids crafts
    • paper crafts
    • sewing
      • bags
      • boys-clothing
      • girls-clothing
      • women-clothing
      • pillows
      • quilts
  • home decor
    • bathroom
    • build it
    • frames
    • kids
    • kitchen
    • office
  • recipes
    • desserts
    • dinner
    • snacks
    • soups
  • parties
    • baby shower
    • birthday
    • games
    • gift wrapping
    • party decor
    • party favors
  • printables
  • holidays
    • Christmas
    • Easter
    • Father’s Day
    • Halloween
    • July 4th
    • Mother’s Day
    • New Years
    • St. Patrick’s Day
    • Thanksgiving
    • Valentine’s Day
  • gifts
    • baby
    • electronics
    • graduation
    • teacher gifts
  • About
  • Be My Guest
  • Advertise
  • Contact
  • pinterest
  • facebook
  • instagram
  • twitter
  • rss

4 Feb

XOXO Table Runner Tutorial

Hello, this is Anne Weaver. I’m the Sewing editor over at Craft Gossip. I’m super excited to be guest blogging today at UCreate! There are so many cool crafts here, and I’m honored to be able to show you something from my own studio. 

I’ve got a fun little Valentine’s Day project to show you. It’s a no-sew X’s and O’s table runner. Oh, and it’s reversible, too! That means you get two looks from one project. I love me a twofer!
(Here’s the other side of the same tablerunner pictured above.)
Here’s what you need:
–Patterns for the X and the O
  • Download the X template
  • Download the O template
–Temporary marking pen, either water soluble or air erasable
–Scissors
–Rotary cutting supplies – rotary cutter, grid mat, acrylic ruler. These aren’t absolutely necessary, I suppose, but they do make it easier to keep your letters all lined up nice and straight.
–12″ x 34″ of fusible webbing, and 2 pieces of coordinating fabric. (This will make a table runner that’s approximately 31 inches long and spells out XOXOX. You can make it longer by adding more X’s and O’s. For each additional OX you want to add on to the end, you’ll need to add another 14″-15″ inches to the length of your fabrics and fusible webbing.)
Here’s how to make it:
1. Follow the manufacturer’s instructions to fuse the two pieces of fabric together back to back using the fusible webbing. I tend to be nervous about getting fusible junk all over my iron, so I trimmed 1/2″ off the width and length of the fusible first. That gave me a 1/4″ safety margin on all 4 edges of the fabric.

My two prints don’t exactly coordinate. This is what happens when you bring an opinionated 6-year-old with you to the fabric store.
2. After you’ve fused the fabric, cut it down to 10″ tall. Use your rotary cutter to make sure that you’re cutting straight lines. If you trimmed your fusible to be smaller than the fabric, be sure that you trim off the bits on the edge that are not fused. We want to end up with a double-sided piece of fabric that is 10″ x 33″.

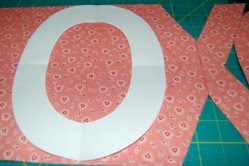
4. Cut out your X template and lay it down on the fabric so that the center of the X is aligned with the center of your fabric. The top and bottom of the X should be just about even with the top and bottom of your fabric. If it’s just a hair off, go ahead and extend the lines of the X to the fabric so you’ll know that they are straight. Trace around the X.

(I don’t know if you can see the lines I drew- they’re there, but the printed fabric kind of camouflages them.)
5. Now, cut out the O template and lay it down just to the right of the X so that the edges slightly overlap. (The overlap connects the letters.)

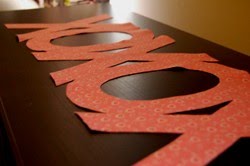
6. Continue working down the table runner, tracing your letters. When you get to the end of your fabric, go back and start at the middle again, this time overlapping and working to the left.

You can see that I’ve already started cutting some of my letters. This is because I was using an air-erasable marker and some of my lines were already starting to disappear. If you cut as you go like I did, be careful that you DON’T cut the edge where the next letter will overlap.

7. Cut your fabric on the lines that you drew, and your table runner is done. Easy, peasy, lemon squeezy.

Lay it directly on the table:

Or layer it on a table cloth:

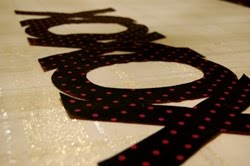
Or on another table runner:

Thanks for joining me today over here at UCreate!

You may also like these

Free Printable Valentine Windmill TagsDIY Doily and Twine Banner {for Valentine Mantel}Free Valentine Quilt PatternsValentine Lip Balm Printables by u-createcrafts.comValentine Lip Balm PrintablesDIY Valentine Mason Jar Gift with Free Printable Tag
Previous Post: DIY Elastic Headbands
Next Post: Burlap Valentine Heart Tutorial

Comments

  1. Denise Felton says

    February 4, 2010 at 1:44 PM

    Absolutely brilliant! I’m making one tonight!

    reply to this comment >
  2. The Brown Pigeon says

    February 4, 2010 at 1:54 PM

    Love it! Wish I had a rotary cutting set though… 🙁

    reply to this comment >
  3. Kitschalicious says

    February 4, 2010 at 3:20 PM

    You had me at “no sew”! I love this! Amazing!

    reply to this comment >
  4. Lisalulu says

    February 4, 2010 at 3:33 PM

    very cool, I love all your ideas and designs. you can be I won’t miss any of your posts.

    reply to this comment >
  5. Amanda K says

    February 4, 2010 at 6:20 PM

    This is so cute! I think I will make one tonight! I already have the fabric in my stash!! yeah!!

    reply to this comment >
  6. Becky says

    February 4, 2010 at 2:40 PM

    OH MY HECK! Darling!!!

    reply to this comment >
  7. Care says

    February 4, 2010 at 2:51 PM

    SO fun!! …and it’s great to see you on U-Create, Anne!

    I love Valentine’s Day!!

    reply to this comment >
  8. Kari @ Ucreate says

    February 4, 2010 at 3:10 PM

    Anne,
    This is so fabulous!! I love how you can layer it over a table cloth or put it directly on the table. LOVE IT!! Thank you again for taking time to be on Ucreate!

    reply to this comment >
  9. Christie says

    February 4, 2010 at 4:22 PM

    Such a cute idea! Thanks for sharing!

    alemonsqueezyhome.blogspot.com

    reply to this comment >
  10. michelle@somedaycrafts says

    February 4, 2010 at 4:36 PM

    Cute! Cute, Anne!

    reply to this comment >
  11. Jess says

    February 5, 2010 at 12:10 AM

    Okay, that is seriously cute!

    reply to this comment >
  12. Brooke says

    February 5, 2010 at 2:39 AM

    I love this and it looks so cute and so simple… Looks can be decieving though so I know its probably tougher then it looks.

    reply to this comment >

Leave a Comment Cancel reply

Your email address will not be published. Required fields are marked *

Recipe Rating


Popular Posts

Fathers Day Printable Interview by U Create

Father’s Day Interview Printable Kids Can Fill Out

DIY Mothers Day Vase

DIY Mothers Day Vase

DIY Mother's day painted herbal pots

DIY Painted Herb Pots for Mother’s Day

DIY Pressed Flowers for Mother's Day

DIY Pressed Flower Frame: A Beautiful Handmade Mother’s Day Gift

Handprint Mother's Day Gifts Tutorial

Modern Mother’s Day Handprint Art (Grandma version, too)

“Open When” Letters for Mom (A Meaningful Mother’s Day Gift Idea)

  • pinterest
  • facebook
  • instagram
  • twitter
  • rss
 
Privacy Policy
Back to Top

Copyright © 2026 U-Create • All Rights Reserved • Site Design by Emily White Designs