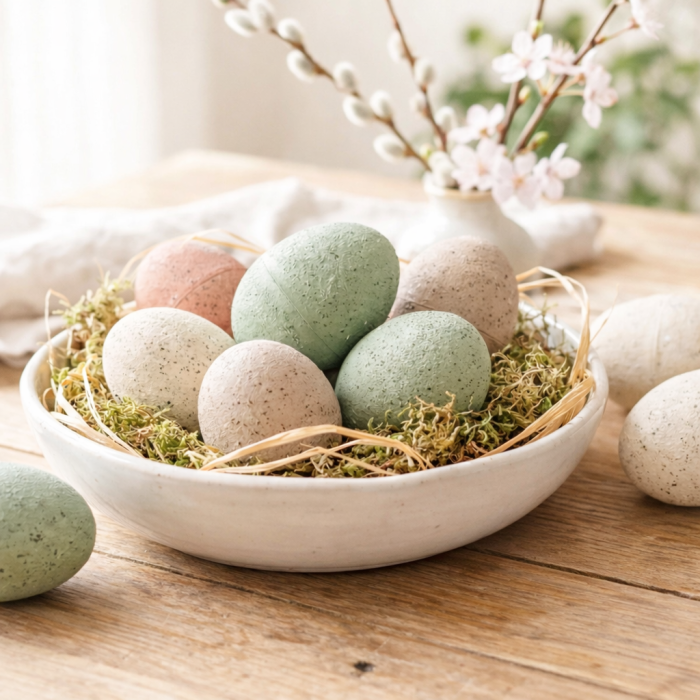
How to Make Beautiful Textured Stone-Look Eggs for Spring Decor
If you love soft, neutral spring decor with a natural, collected feel, these DIY stone eggs are such a beautiful project to make. They have that weathered texture that looks high-end and handcrafted, but they’re actually simple to create with a few basic supplies.
Today I’m sharing exactly how to make them step by step.
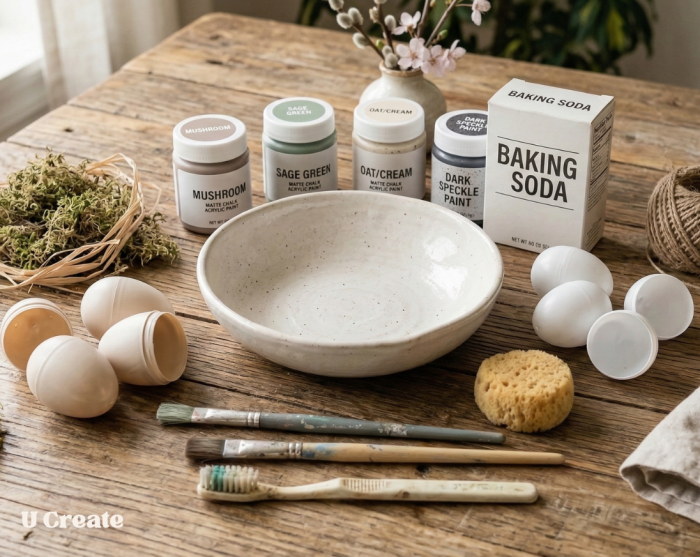
Supplies
- Plastic craft eggs, paper mache eggs, or hollow faux eggs
- Lightweight spackling paste or joint compound
- Acrylic paint in soft neutral shades
- Black or dark brown acrylic paint for speckling
- Paintbrushes
- baking soda
- Palette knife, butter knife, or old craft brush for applying texture
- Fine grit sandpaper or sanding block
- Matte sealer or clear matte spray
- Paper towels or drop cloth
Step 1: Prep Your Eggs
Start with clean, dry faux eggs. If you’re using plastic eggs, make sure they are snapped closed tightly. You can even add a tiny bit of hot glue inside first if you want them to stay firmly shut.
Craft Tip: Paper mache eggs work beautifully for this project too because they already have a slightly natural surface.
Step 2: Add the Stone Texture
Using a palette knife, old brush, or even your fingers, spread a thin layer of lightweight spackling paste over each egg.
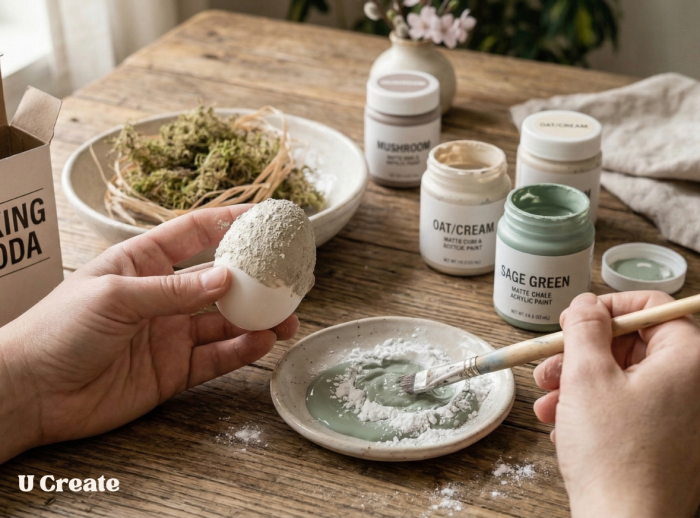
You don’t want the coating perfectly smooth. The charm of these eggs comes from the uneven, worn texture, so let there be little ridges, bumps, and imperfect areas. Keep the layer fairly thin so it dries well and doesn’t crack too heavily. Set the eggs aside to dry completely. Craft Tip: If you want even more stone-like grit, stir a little baking soda into the spackle before applying it.
Step 3: Sand Lightly
Once the texture is fully dry, lightly sand the eggs with fine grit sandpaper. This helps knock down any sharp ridges while still keeping that beautiful aged texture. You’re not trying to make them smooth — just softened and natural-looking. Wipe away any dust with a dry cloth or paper towel.
Step 4: Paint the Base Color
Now it’s time to add the soft stone-inspired color. Paint each egg in a muted, earthy shade like cream, warm white, soft taupe, dusty blush, or sage green. Don’t worry about making the coat perfectly even. Slight variation only adds to the organic look. Let the first coat dry, then add a second coat if needed.
Step 5: Add Dimension With Dry Brushing
To give the eggs that realistic stone finish, lightly dry brush a second color over the surface. Use a nearly dry brush with a small amount of lighter or darker paint and gently sweep it across the textured areas. This catches the raised spots and creates dimension that makes the eggs look more like aged stone or plaster.
Step 6: Create the Speckled Finish
For that natural stone look, add tiny speckles using watered-down black or dark brown paint.Dip a stiff brush into the paint, then use your finger to flick small specks across the eggs. Start lightly and build up slowly.
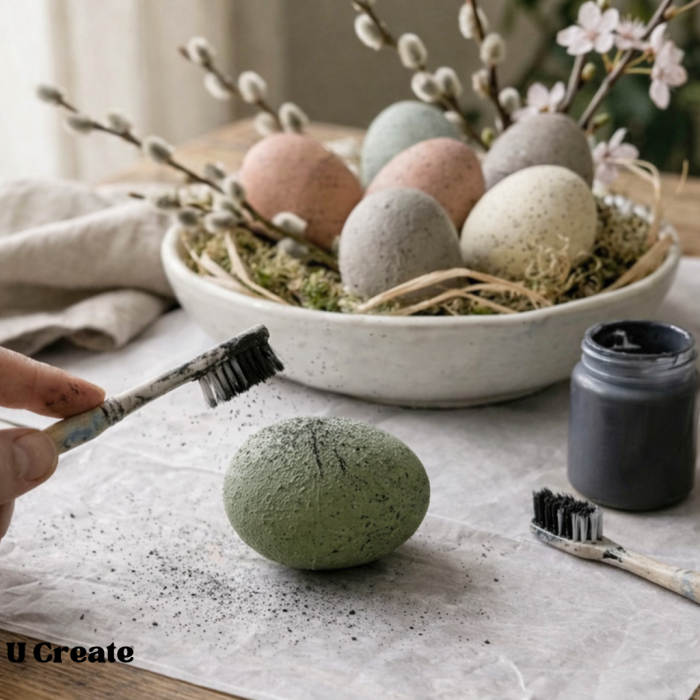
You can also dab on subtle speckles with a sponge if you want a softer look. Let everything dry completely.
Tip: Protect your workspace before flicking paint — the speckles can travel farther than you think.
Step 7: Seal the Eggs
Once your eggs are fully dry, apply a matte sealer to protect the finish. A matte finish works best here because it keeps the eggs looking soft, chalky, and stone-like. Avoid glossy sealers, which can take away from the natural effect. Let the sealer dry according to package directions.
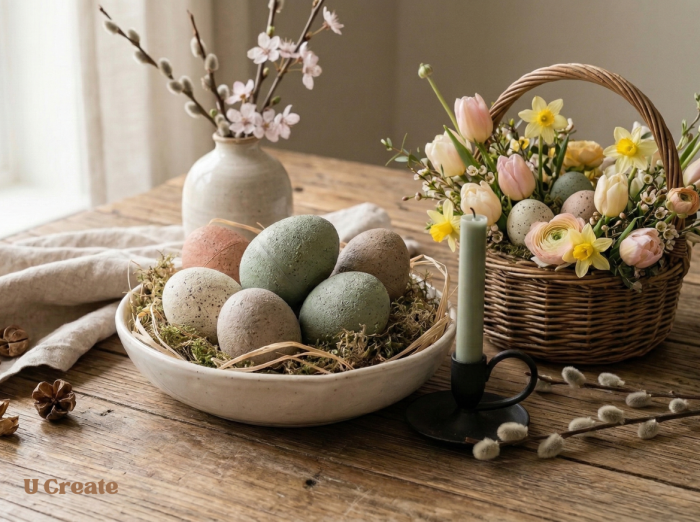
How to Style
These textured eggs are so pretty displayed in simple, natural ways. Here are a few ideas:
- arrange them in a shallow bowl with moss
- place them on a coffee table tray with candles
- use them as part of an Easter centerpiece
- add them to a shelf with ceramic vases and spring branches
- display them in a dough bowl for a soft seasonal touch
Enjoy your newest Easter DIY decor!
HAPPY CREATING!


Leave a Comment