Hi! I’m Karin and I blog over at Leigh Laurel Studios. I create patterns and tutorials for sewing, embroidery, home & garden projects and crafts with kids. Balancing creativity with chasing two small children around is a common theme! If you pop by, please feel free to leave a comment or ask a question; I do my best to respond to everyone.
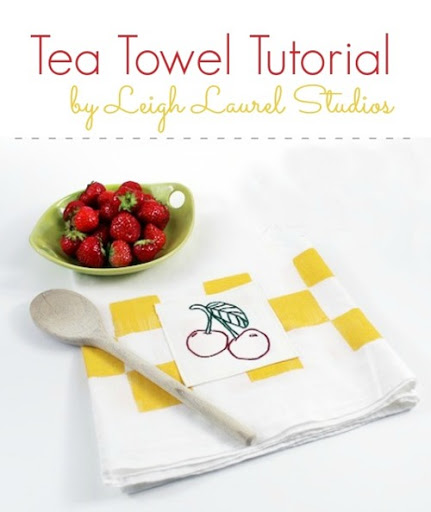
I’m thrilled to be sharing this project with you on U Create. Making this tea towel is fun and combines two crafts I love — hand printing and embroidery.
For the hand printing you will need:
-Tea towel (the one pictured is a 28 x 29″ flour sack towel from The Vermont Country Store)
-1 – 2″ square block to print the squares — I used the back of a letterpress stamp that is 1 3/4″ square
-Fabric paint — I added a bit of white to the bright yellow to soften it a little
-Foam paintbrush
-Masking tape or painter’s tape (I used Frog Tape; it’s easier to keep wide tape straight)
-Ruler
For the embroidery you will need:
-This downloadable pdf of the cherries
-Disappearing ink marker or fine tip permanent marker
-Red and green embroidery floss — I used DMC #s 498 and 3818
-Square of white fabric large enough to fit in your embroidery hoop (finished cut size is 5 x 5″)
-Embroidery hoop and needle
-Sewing machine with white thread, or needle and thread if you’re hand stitching the embroidered square onto the towel
Step 1: Prewash and iron all fabric. Measure 2″ from the bottom edge and mark with a disappearing ink pen or chalk pencil. Repeat for other side to create a straight line 2″ from the bottom edge. Apply tape under the marks you just made, being careful to keep the tape as straight as possible.
Step 2: Mark the height of the block above the tape line. Repeat so you have two marks. Repeat for other side.
Step 3: Add tape line above second mark, lined up with mark on right side.
Step 4: Mix the paint to achieve the color you want. Apply paint to the block with the foam brush, being careful to keep the sides clean. Starting on the bottom left, stamp the squares onto the fabric. Reapply paint before each square is printed. Bottom left first, then align the top square with the top right corner of the first square and keep it level with the top piece of tape. Continue all the way across the fabric.
Step 5: Remove the top strip of tape. Aligning the bottom corners of the block with the corners of the row underneath, stamp the squares all the way across to form the third row. Allow to dry, following manufacturer’s instructions.
Step 6: While the paint is drying, start the embroidery. Print the pdf and use a light box or sunny window to trace the design onto the fabric.
I make dots with permanent marker directly onto the fabric, but you can do a full outline with disappearing ink if you prefer. For my tutorial on how to make this little felt needle book, go here.
Step 7: Embroider the design using three strands of embroidery floss. I used split stitch everywhere except the spots on the cherries where I used backstitch.
I kept the backside of the embroidery as clean as possible so there wasn’t much of anything to show through to the front other than the design.
Step 8: Centering the design, cut a 5″ square. I folded and pressed the sides first to be sure I had the placement I wanted.
Step 9: Press the sides in first, then the top and bottom.
Step 10: Center the embroidered square on the printed tea towel. Pin and topstitch with 1/8″ seam allowance.
You’re done! I’d love to see pictures of your completed project. I can be found here:
Leigh Laurel Studios blog
A few of my favorite tutorials: Child’s family portrait embroidered and turned into a pillow, How to make pots for succlents out of PVC, and How to make washable bean bags for hula hoop ring toss.
I hope you enjoy your tea towel, and I look forward to hearing from you and seeing you on my blog!
xo Karin

So cute. I love to sew and stamp. This looks like fun.
Thanks for sharing.
Debbie
Thanks so much Debbie; I hope you enjoy the project!
Karin