U Create

It's a good day to create!

  • pinterest
  • facebook
  • instagram
  • twitter
  • rss
  • crafts
    • crochet/knit
    • jewelry
    • kids crafts
    • paper crafts
    • sewing
      • bags
      • boys-clothing
      • girls-clothing
      • women-clothing
      • pillows
      • quilts
  • home decor
    • bathroom
    • build it
    • frames
    • kids
    • kitchen
    • office
  • recipes
    • desserts
    • dinner
    • snacks
    • soups
  • parties
    • baby shower
    • birthday
    • games
    • gift wrapping
    • party decor
    • party favors
  • printables
  • holidays
    • Christmas
    • Easter
    • Father’s Day
    • Halloween
    • July 4th
    • Mother’s Day
    • New Years
    • St. Patrick’s Day
    • Thanksgiving
    • Valentine’s Day
  • gifts
    • baby
    • electronics
    • graduation
    • teacher gifts
  • About
  • Be My Guest
  • Advertise
  • Contact
  • pinterest
  • facebook
  • instagram
  • twitter
  • rss

28 Jan

Crochet Cupcake Beanie Tutorial

Cupcake Beanie Tutorial

I am so excited to be here on Ucreate today. My name is Andrea and I started All Things Bright and Beautiful a couple of years ago with the hope of one day being featured on Ucreate—and here I am!

I’m a stay-at-home mom and spend a good amount of my time each day crocheting projects that are bright, modern, and trendy. Some of those projects include blankets, beanies, and toys. I really want to share my love for crochet with you and get you excited about how fun and easy it is.

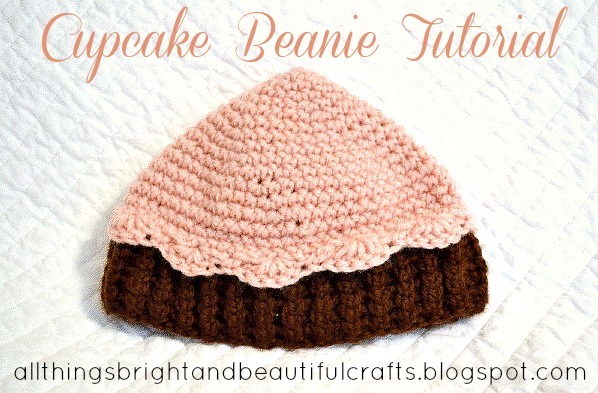
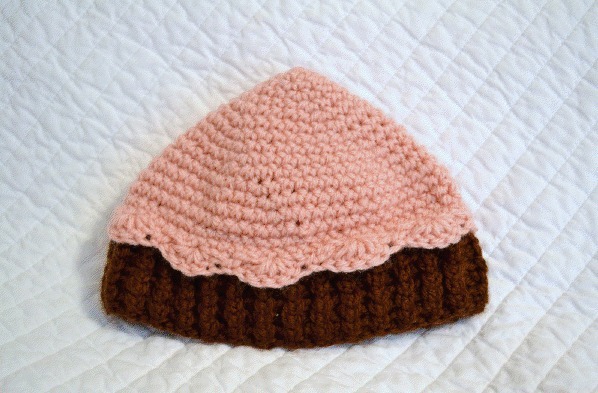
So here is a tutorial of a cupcake beanie I made my little girl for her cupcake-themed 1st birthday party.

CROCHET CUPCAKE BEANIE TUTORIAL

crocheted-252520cupcake-252520beanie_thumb-25255B1-25255D

DIY Cupcake Beanie Tutorial

Size: 12 months

 Skill Level: Easy

  •  Materials Needed:
  • H hook (5.00 mm)
  • one skein of medium worsted yarn in brown (I used Lion Brand Yarn)
  • one skein of medium worsted yarn in pink (I used Lion Brand Yarn)
  • stitch marker
  • scissors
  • yarn needle

Abbreviations:

ch: chain

sc: single crochet

dc: double crochet

st: stitch

sc2tog: single crochet 2 together

Frosting

diy-252520cupcake-252520beanie-2525201_thumb-25255B1-25255D

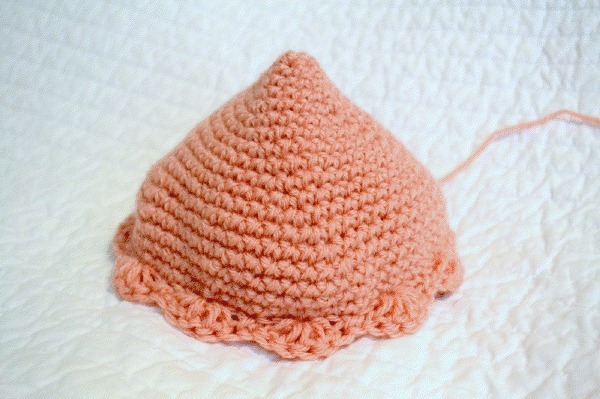
Note: You will be working in a round on the beanie, so do not turn your work or join rounds.

Row 1: magic ring 4. (4) (This link explains how to do a magic ring.)

Row 2: sc 2 st in each sc around. (8)

Row 3: *2 sc in first st, sc in next st* repeat around. (12)

Row 4: *2 sc in first st, sc in next 2 sts* repeat around. (16)

Row 5: *2 sc in first st, sc in next 3 sts* repeat around. (20)

Row 6: *2 sc in first st, sc in next 4 sts* repeat around. (24)

Row 7: *2 sc in first st, sc in next 5 sts* repeat around. (28)

Row 8: *2 sc in first st, sc in next 6 sts* repeat around. (32)

Row 9: *2 sc in first st, sc in next 7 sts* repeat around. (36)

Row 10: *2 sc in first st, sc in next 8 sts* repeat around. (40)

Row 11: *2 sc in first st, sc in next 9 sts* repeat around. (44)

Row 12: *2 sc in first st, sc in next 10 sts* repeat around. (48)

Row13: *2 sc in first st, sc in next 11 sts* repeat around. (52)

Row 14: *2 sc in first st, sc in next 12 sts* repeat around. (56)

Row 15: *2 sc in first st, sc in next 13 sts* repeat around. (60)

Row 16-18: sc in every stitch around.

Row 19(edging): working in the outside loop only, skip 2 sts, 5 dc in st, skip 2 sts, sc, skip 2 sts, 5 dc in st, repeat around and slip stitch to beginning stitch. Fasten off and leave long tail for sewing to bottom part.

Note: you can make the frosting part smaller or bigger by taking out the last couple of rows, or make it bigger by adding rows at the end and following in the same pattern (sc in first 14, 2 sc in next st, etc).

crocheted-252520cupcake-252520beanie_thumb-25255B3-25255D

Note: You will be turning your work and then sewing together at the end.

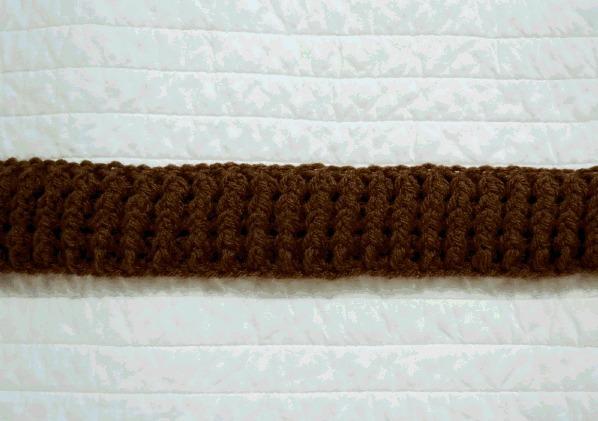
Bottom of Cupcake Hat

Row 1: Ch. 60.

Row 2: Dc in 4th ch from hook and in each st across.

Row 3: ch 3, *dc in front post, dc in back post* repeat until end of row. Ch 3, turn work. (This explains how to crochet front and back posts.)

Rows 4-6: repeat row 3. Fasten off and leave long tail for sewing sides together.

Note: To make this hat smaller or bigger, simply chain less or more at the beginning and follow the rest of the pattern.

Sewing Together

Once you have both top and bottom finished sew the bottom piece to the frosting top. Sew around evenly through the bottom inside loop of the frosting part to the top of the bottom of the cupcake hat.

Note: You can add sprinkles by sewing different colors into the top part of the beanie, or add a cherry on top.

Cherry

Row 1: magic ring 4.

Row 2: 2 single crochet in each one around. (8)

Row 3: 2 single crochet in 1st st, single crochet in next, repeat around. (12)

Row 4-6: sc in each st around.

Row 7: sc2tog, sc in next repeat around (8)

Row 8: sc2tog, sc in next, repeat around (4)

Fasten off and leave long tail to sew closed and chain 5 for a stem.

crocheted-252520cupcake-252520beanie_thumb-25255B3-25255D

Check out my blog for more beanie and blanket patterns. You can also find me on Pinterest!

If you have any questions about crochet I would be happy to answer them.

Thanks Kari for having me!

You may also like these

How to Arm Knit a Blanket by Truly MagesticHow to Arm Knit a BlanketBaby Sailor Skirt Tutorial by Sew Much AdoRuffle Pant TutorialRuffle Leg Pants TutorialStocking Hat Pattern {free}No Sew Halloween Onesies by One Crafty Place
Previous Post: Industrial Canvas Tutorial
Next Post: DIY Valentine Décor

Comments

  1. the momma (aka Shannon) says

    January 29, 2012 at 12:10 AM

    love this!!! so cute…I’m headed over to check her blog right now!

    reply to this comment >
  2. Kristen Duke Photography says

    January 31, 2012 at 2:22 PM

    Oh…I wish I had the patience to learn how to crochet…so cute!

    reply to this comment >
  3. saw2sas says

    August 26, 2012 at 5:19 AM

    Thank you for sharing this! I crochet chemo caps for the children at my local Children’s Hospital in memory of my son, Logan, who passed away there. The kiddos are going to love this hat!! Thank you!!!

    reply to this comment >

Leave a Comment Cancel reply

Your email address will not be published. Required fields are marked *

Popular Posts

Peppermint Pretzel Recipe

Peppermint Bark Pretzels Recipe

Easy Mini Stocking Tutorial

Simple Mini Stocking Tutorial

Flannel Nightgown Tutorial

Jingle Bell Ornament Tutorial

Handprint Snowman Tutorial by eighteen25

Handprint Snowman Ornament Tutorial

10 Ugly Christmas Sweater Tutorials

DIY Ugly Christmas Sweater Ideas

  • pinterest
  • facebook
  • instagram
  • twitter
  • rss
Back to Top

Copyright © 2019 U-Create • All Rights Reserved • Site Design by Emily White Designs