I created these LAZY DAY LOUNGE PANTS for my girls…and of course, I had created a tutorial just for you! These are seriously the easiest pants EVER!
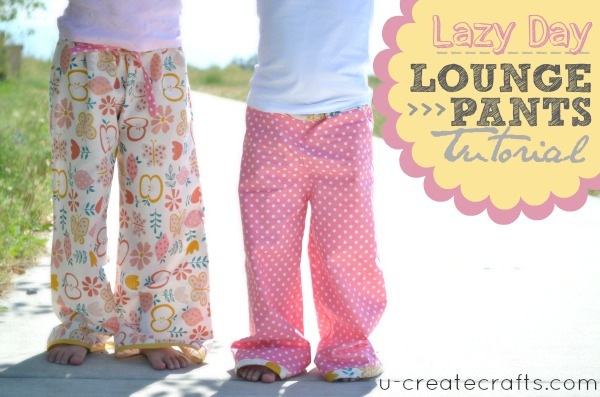
If you are intimidated thinking of sewing pants, you should start with this tutorial! It will take you an uninterrupted hour. {I saw uninterrupted because I have 3 kids and I know what it is like to sit down to sew something.}

Supply List:
- 1 1/2 yards of MAIN fabric
- 1/4 yard for HEM and WAIST
- other sewing essentials (serger, sewing machine, thread, etc.)
- a pair of pants that fit your little one
- 3/4” elastic
How to make the pattern:
To create the pattern for my 4 year old, I acted like her leggings were her body and added the space around her legs that I thought would be over-sized and comfortable. I wanted the pants to be straight legged…not tapered or bell-bottom. Remember, we are going for “lounge” pants, not dress pants.


After calculating a 1/2” seam allowance, here are my final measurements:

Fold the fabric twice and cut the “pattern” once, which gives you 4 MAIN pieces.
Next cut your trim pieces for the hem and waist band:
4 strips at 8”x3” for the hem.
4 strips at 6 1/2” x 4” for the waist band


Now that you have all your fabric cut, let’s sew!
First, grab the trim pieces for the hem (8”x3”) and the 4 MAIN body pieces. Place one of the hem pieces at the bottom of each of the four MAIN leg pieces, right sides together. Pin and sew…or serge. {If you are not using a serger, just do a zigzag stitch along the raw edge to stop the fabric from fraying in the wash.} Press the seam flat and move on to the waist band.

Do the waistband pieces (6 1/2” x 4”) the exact same way as you did the hem pieces. Press the waistband flat.
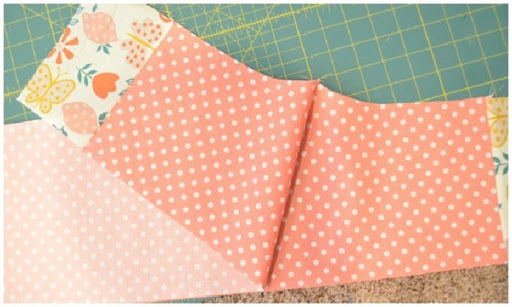
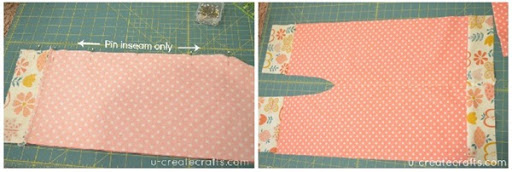
Put two MAIN pieces right sides together, making sure the seams of the waistbands and hems match. Pin the inseam and sew/serge. Open rights and press flat.
 Add 1/8” top stitch to ensure the pants lay nice and smooth.
Now you have two large (weird-looking) pieces. Place them right sides together and pin the middle arch. When you sew the arch, straighten is out like the bottom right picture. Try to just sew a straight line right through. Back stitch in the middle the secure it better.

Now, make them look like pants putting the seams you just sewed wrong sides together and press the seam flat. Add 1/8” top stitch and turn them right sides together again (just like the picture below).
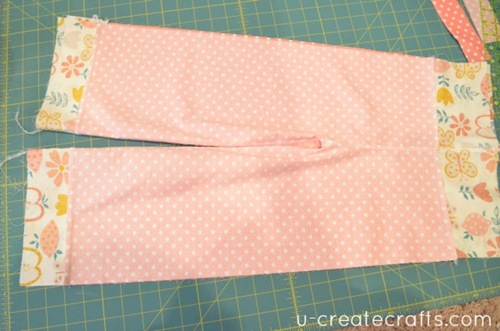 Time to sew the sides together. Make sure the seams of the hem line up then pin the sides. Sew/serge up the sides. Turn right side out and iron the seams.
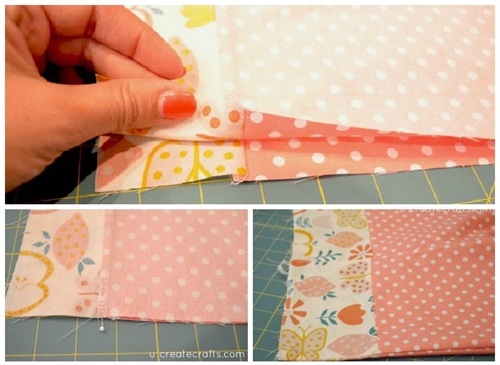 Let’s do the waistband. {Almost done!} Turn the pants wrong side out.
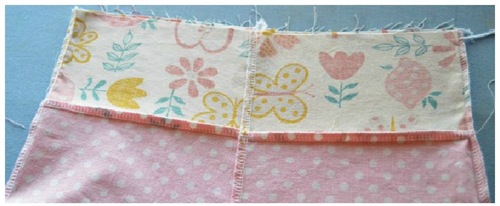 Turn the raw edge down an inch. Iron flat and turn down again matching the edge to the serged seam at the bottom of the band.
Press the band really well with a hot iron and pin in place. Make sure to mentally mark a “no sew zone” where you will insert the elastic for the waistband later. Start at one pin and sew 1/4” seam securing the band stopping when you get to the last pin.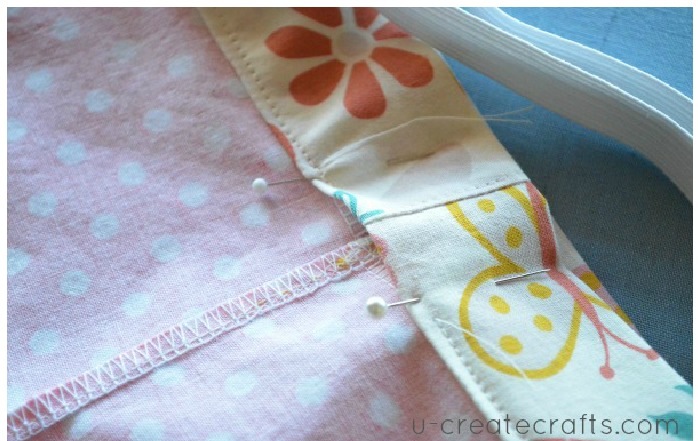 Measure your little one around the waist keeping the elastic a bit tight. Cut the piece of elastic, insert a safety pin in one end and insert it into the “no sew zone” you left in the waistband. Work the safety pin down gradually pulling the elastic through. When both sides of the elastic meet again, overlap about 1/4” and zigzag stitch a couple of times to secure.
 Tuck the elastic back in and sew up the “no sew zone.” Now the waistband is complete.
Time to hem to legs!
This is done similarly to the waistband. With wrong side out, fold the hem piece in half and then in half again. Press flat, pin and stitch 1/4” seam around the edge.  Turn right side out. Iron out the wrinkles and put them on your little one!
 I made my girls both a pair and they seriously live in them!
Have a good laugh at my little divas!


Really cute pants and girls, Becky! You rock!
Cheri
You are too sweet! Thank you.
These are supe cute and comfy! How do you think they would work made from fleece? My little girl fell in love with some pink strawberry print fleece at our local fabric store the other day and I’m trying to decide what to make with it. Thanks!
Jessica
I think they would look super cute with fleece. I say try it! They would be so comfy!
My nephew calls his fleece pants “cozy pants”!
umm…I’m totally making these for ME! Thanks for the idea!
AWESOME! Me too!
fab, I may just have to make ME some
You and me both!
So cute! I love your fabric choices and what little girl couldn’t use a ton of lounge pants right!?!?
My thoughts exactly, Taylor.
Thank you so much Becky, these are soooo cute great directions too!
xoxo, Tanya
You are welcome. And thank you for the sweet compliment.
Love these! I made Grinch pajamas for Christmas last year. This year I want to make Smurfette nightgowns!
Such a great idea, LeighAnn! Those sound adorable.
I so love making cute things for my daughter and her friends. Must try this!
It’s so fun to see them get so excited over the things I make them.
Perfectly timed, friend. My little ones have been begging me to teach them to sew and I want them to start with something purposeful. This is something we can easily do together. Miss your face!
Jill, your little ones are old enough to try this!
We really need to get together, friend!
Darling pants and great tutorial!
Thanks so much!
I think this would be the perfect thing for mommy/daughter matching pants. My little one would get a kick out of it and they look so cute and comfortable!
My girls would love matching jammies with mommy. Great idea!
So cute. Beautiful tutorial.Thanks !
Thank you so much for taking the time to comment. I appreciate it.
Great pants and tutorial!! But forget the kids, I’ve gotta make a pair for myself 🙂 So glad I found your blog thru Pins & Needles!
I actually did a tutorial for an adult version, but Christmas and life got in the way and I haven’t posted it yet. I will have to finish that up and get it posted.
Where is the adult version?? We’ve been waiting LOL ;))
I love your question. 🙂 I will get right on that. Totally forgot about these cute pants I made and the promise to make an adult version.
Can these be hand sewn easily?
Can you just serge all the seams, instead of sewing and then 1/8″ topstitching some of them?
I serged all the seams and still top-stitched just because I think it gives the garment a more clean and professional look. Top-stitching is absolutely optional. Great question.
Great tutorial, thanks!! I’m new to sewing so I don’t understand the topstich instructions. Can you explain a little bit more please. Thank you!!
Great tutorial, I’m in the process of making my boys each a pair! I’m new to sewing though and I need a little bit more explanation about the top stitch instruction. Where do I do it? Over the crease? Thanks!!
Mandy, I am so sorry I haven’t replied to you yet. I just saw your question.
To top-stitch I turn the fabric to the wrong side and iron the seam to one side. Then on the right side of the fabric I top-stitch (a 1/8″ stitch) on top of the seam. This just completes the look and holds the seam together better. I hope I explained that ok. I will post a tutorial on top-stitching by the end of the week. It seems to be a popular question. 🙂
You just saved me! I had a pattern and not enough fabric…according to the pattern. Then I remembered this tutorial that I had “pinned”. PERFECT! They are awesome and adorable and I had enough fabric too!
Oh yeah! I am so happy to read this comment. Made my day!
Wow! My own “softy” pants just got a hole, so I found my next project. I might make some for my kids too. 🙂
Fabulous! And soooo simple too thank you 🙂 x
These Pants look comfy as well as stylish! Thanks for sharing the tutorial.
-anshu
Took my daughter fabric shopping yesterday in order for me to make these – will start with a pair for her and then make some for myself aswell.
Thank you for this tutorial. I’m new to sewing and am excited to start a new Christmas tradition, making new pajama pants for the whole family to wear for Christmas morning. 🙂
It’s actually a great and helpful piece of info.
I’m satisfied that you shared this helpful
info with us. Please keep us informed like this.
Thanks for sharing.
Truly incredible! Thanks for sharing.
I definitely will try these for my grand daughter when i get her measurements. I live in Pakistan, she lives in London. By the way the pants were awesome. Thnx.