Hello fellow U Create readers. I am seriously, so excited to be here!!! My name is Heather and my little blog is Twin Dragonfly Designs. If you grab a cup of tea and browse around awhile you will find; crazy party ideas, tried and true recipes, epic craft projects and tutorials for just about all of it.
Oh and I have twin, four year old boys {so they’re involved in pretty much everything}.
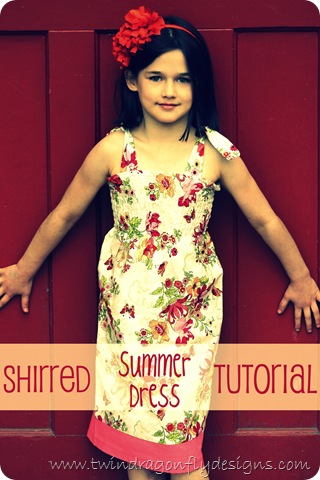
Today I am sharing the tutorial for this super cute summer dress.
It’s probably a good thing that I don’t have twin girls otherwise my sewing machine and I would be inseparable! There are just so many adorable things to create for girls!

You are going to love this dress! It is very straight forward and simple to make. And it is gorgeous of course!

I live vicariously through my friends and relatives who have little girls. This is Caitlyn, who was really excited to model and “be famous”. lol

Ready to sew? Here we go…
.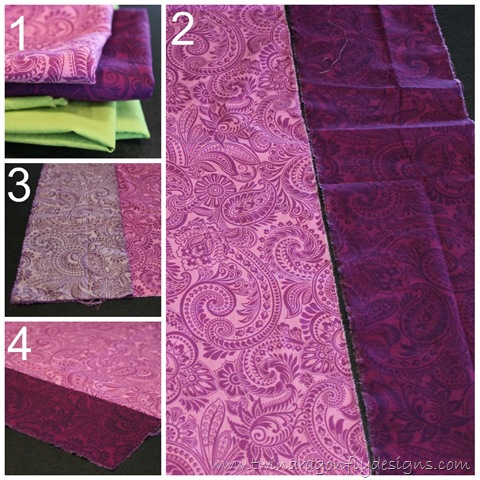

1. Choose your fabric.
Lightweight cotton blends work best. You will need about 1/2 yard to 1 yard depending on the size of dress you are making. Be sure to wash and dry your fabric ahead of time to pre-shrink it.
For a size 4T {21″ circumference at the chest}, use the following measurements:
Main fabric ~ 31″ x 17″
Accent fabric ~ 31″ x 5″
Ties/straps {cut four pieces} ~ 8″ x 2 1/2″
For a size 6X/7 {23″ circumference at the chest}, use the following measurements:
Main fabric ~ 33″ x 22″
Accent fabric ~ 33″ x 6″
Ties {cut four pieces} ~ 8″ x 2 1/2″ For other sizes, measure the child’s circumference at the chest and add 10″. Then create it as long as you want.
2. Cut the fabric to size.
At this point you may want to serge all of the edges of the fabric. You can also double fold and sew the fabric or use a zig zag stitch on the edges to prevent them from fraying.
3. Place the main fabric and accent fabric right sides together. Pin.
4. Sew the two pieces together using a 1/4″ seam allowance.
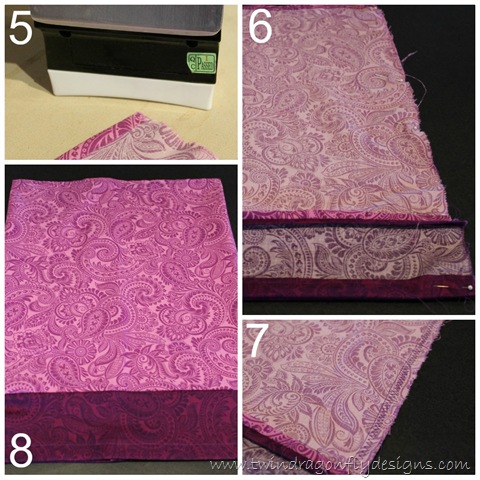
5. Fold and iron the top of the main fabric using a 1/4″ fold. Pin. Sew into place. Fold and iron the bottom of the accent piece of fabric using a 1/2″ fold. Pin. Sew into place.
6. Line up the raw edges of the fabric, right sides facing. Pin into place. Be sure to line up the seam where your main and accent fabric meets.
7. Sew together using a 1/4″ seam allowance. I alternate between using a zig zag stitch and folding my material to prevent it from fraying. No need for a serger!
8. Turn the material right sides out. Now you have a tube of fabric. For and even easier version, cut a longer piece of fabric, skip adding the accent piece and simply sew together a tube of fabric.
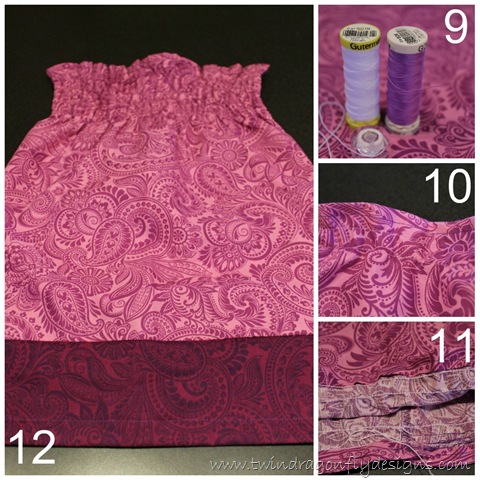
9. Now the fun part. Shirring! Begin by hand winding elastic thread around a bobbin. Using a machine to wind the bobbin will cause the elastic thread to be stretched too tightly and it will just rebound out of the bobbin. Place the bobbin into the sewing machine as usual and thread the all purpose thread through the top of the sewing machine as usual.
10. Begin sewing at the seam of the tube and a little over 1/4″ from the top of the tube. Sew all the way around the tube of fabric in a straight line. Use a regular straight stitch. Sew from the right side of the fabric so that the elastic thread is on the wrong side of the fabric
11. Repeat these rows of shirring, about 1/2″ apart, 8 to 10 times depending on how long you want the bodice to be.
12. When the shirring is complete hit it with some steam from an iron. This causes the elastic thread to shrink.
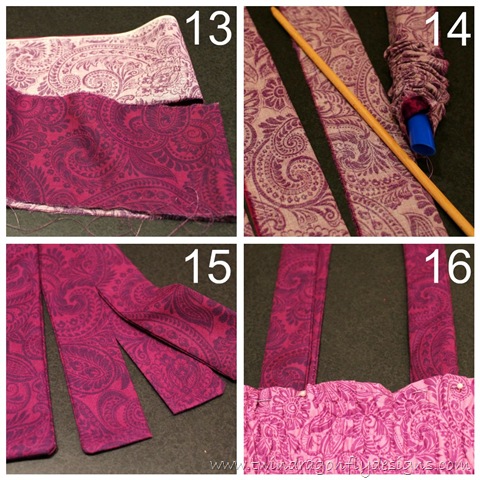
13. You will need four pieces of coordinating fabric to create shoulder ties. Having the dress tie at the top makes it super adjustable!
14. Right sides facing, sew the fabric together lengthwise using a 1/4″ seam allowance. Sew one end of each strap closed as well. Use a Quick Turn kit to quickly invert each strap so that right sides are out.
15. Iron the straps flat.
16. Pin the straps into place {about 4″ apart} and sew to the top of the dress.

Ta Da!
A super cute shirred summer dress!
That is sure to be a hit with all of the little girls in your life! This adorable model is Brianna, another soon to be famous little miss.

Be sure to stop by Twin Dragonfly Designs for more simple summer sewing projects!
Thanks for having me Kari!


With three girls in my house these dresses are sure to come in handy…thanks so much for being a guest Heather!
Make sure to check out these fabulous tutorial and more…




Very summer/spring! I love the final output. Doesn’t seem DIY-ed.
I’ve tried finding elastic thread before and have never been able to find it! Where do you buy yours?
joelledriscoll@me.com
Hi! I found it in the notions section of our fabric store. Right in the middle of all of the thread. Hope that helps!
xo
H